Retiling shower - problem solving

Joined
7 Sep 2006
Messages
196
Reaction score
2
Location
London
Country
United Kingdom
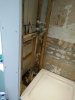
I am preparing a shower enclosure for retiling and I need a bit of advice on how to proceed. Some photo's attached for clarity.

One side was tile on plasterboard. I plan to replace that with suitable water resistant board. The other two sides are on plastered brick. I have several problems to figure out.

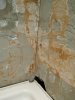
1. The surface - the thin skim of plaster has partly come off leaving very hard grey bonding underneath. Do I need to get all the brown plaster off? Can I tile directly on to the bonding, or do I need to prepare it in some way? The tiles are 600x300mm and quite heavy.

2. The walls are not square - there is a gap of about 25mm at the front on one side. What's the best way to build that up? I considered a strip of backer board, or adding more bonding to the wall using a batten to define the right thickness.

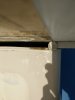
3. The tray, which I hope to keep, has a small bit of the upriser chipped off at the back. Is it safe to ignore that, or is the tray a write off, or can I repair with something? I know some trays don't have uprisers so I hope it's not a problem

4. Do I need to tank all this? I have been given a spare tub of tanking compound and tape from a friends' job.

Many thanks to anyone who can help me with this.

John
 

Attachments

  • 2016-04-24 13.10.50.jpg
    2016-04-24 13.10.50.jpg
    80.8 KB · Views: 334
  • 2016-04-24 13.11.24.jpg
    2016-04-24 13.11.24.jpg
    67.5 KB · Views: 321
  • 2016-04-24 13.11.46.jpg
    2016-04-24 13.11.46.jpg
    126.7 KB · Views: 333
  • 2016-04-24 13.13.15.jpg
    2016-04-24 13.13.15.jpg
    47.6 KB · Views: 303
Sponsored Links
I'll advise you as to best practice and you can reduce my suggestions to suit.

Ditch the tray, it will rust out in no time. Replace with a similar finned tray. (does photo 1. show a "chipped" mark on a fin?)
Hack the plaster off both walls back to brick, and render in sand and cement to obtain perfect ninety degree inside corners, & a perfect fit for the tray.
If the corner crack is "irrelevant" & the plaster feels sound then you could pull the walls out with bonding - but you are still looking for two perfect 90 degree inside corners.
The studwork looks flimsy and possibly lacking above the valve?
What section are the studs - are they actual 4" by 2" or 3" by 2" ?
Any existing fungal damage must be treated with an anti-fungal chemical.
Use backer board on the studwork. Dont use any plasterboard.


Thank you for replying, I appreciate it.

Regarding the tray, it's some kind of stone-like material, quite thick, I don't think it can rust (unless that's a general term not just reserved for iron). There is a chip out of the back corner of the upstand, but otherwise it's very solid - I was hoping to keep it. If I do replace, how do you deal with the uprisers and the shower door, won't it cause problems with fitting the bottom bar?

Would it be acceptable to use Marmox or equivalent boards to pull the walls square? I am not confident I could get a flat finish with bonding.

The studs are square section 2x2" and yes it does look too flimsy for the 60x30cm tiles I want to use.- looking at the Marmox board specifications it looks like I need to reinforce or replace what is there to ensure close enough centres.
 
If you have a composite tray fair enough. Is the tray in one piece ie. are the fins glued on? The missing bit at the inside corner is missing at a "vital" spot - dont allow that corner to slump.
You can use any board you like to square up the walls.
Once you start framing with more hefty studs you will have to be certain that the stud wall is at ninety degrees to the rear wall. The rear wall is the controlling wall.
 
Sponsored Links
If you have a composite tray fair enough. Is the tray in one piece ie. are the fins glued on? The missing bit at the inside corner is missing at a "vital" spot - dont allow that corner to slump.
.

Tray is one piece and very solid - only prob is that chip off the upriser at the back corner. Can it be mended with some kind of resin, or is it a write off? watertightness would only be through silicone sealant.
 
There are various resins and glues that might stick the piece back on. google porcelain to porcelain glues.
Once the thing is installed its under no direct pressure.
 

DIYnot Local

Staff member

If you need to find a tradesperson to get your job done, please try our local search below, or if you are doing it yourself you can find suppliers local to you.

Select the supplier or trade you require, enter your location to begin your search.


Are you a trade or supplier? You can create your listing free at DIYnot Local

 
Back
Top