Uneven wall to batten

Joined
18 Jan 2011
Messages
147
Reaction score
2
Location
Hampshire
Country
United Kingdom
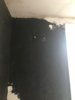
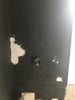
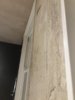
We have a small problem with a bathroom wall during this renovation that we are doing. The wall in question has had a coat of 'render' lime (NHL 3.5 with Sharpe sand) but was not scratched up for the second coat, instead someone smoothed it down.

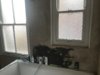
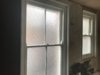
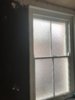
On this wall the shower will be installed, glass and long edge of the bath. Two windows are also here but the wall is to be tiled.

I have been advised by a lime specialist that while you could put another coat on the wall to even it out it is not advisable since the first coat has dried fully and has not been scratched up, which could result in a weak point and failure.

As the wall is to be tiled fully (apart from the non visible bits behind the bath) the other idea was to batten it to make it level and attach 6mm Hardie Backer to the studs this giving a straight and suitable surface to tile straight on to.

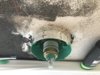
My concern is the two Hansgroher iBoxes that area already installed, as you have to limit the depth you can come out because of them (around 43mm on one and 37mm on the other remaining).

So, when I contacted James Hardie they said it didn't matter what depth of batten I used to level it out and I could use the 6mm on the wall because they will still take the weight of the tiles. The issue is what type of batten and what is the thinest I could use?
 
Sponsored Links
please post pics of the wall showing windows and iboxes.
are the iboxes already piped in position?

it might pay you to prime for suction an grip with SBR or a SBR plus water plus cement powder slurry.
apply an set to work as it tacks up.
render over with a sand an lime mix.
by renderin its easier to control the plumb an flatted finish surface.
 
Both iBox units are installed and plumbed in, they function and have been tested. All the wall requires is tiling with the installation of the remaining shower fittings.

The bath you see in the images is not fixed in place just sat to it can be used.
 

Attachments

  • IMG_9233.jpg
    IMG_9233.jpg
    214.5 KB · Views: 363
  • IMG_8080.jpg
    IMG_8080.jpg
    265.4 KB · Views: 337
  • IMG_2616.jpg
    IMG_2616.jpg
    381.2 KB · Views: 343
  • IMG_5311.jpg
    IMG_5311.jpg
    277.9 KB · Views: 307
  • IMG_6704.jpg
    IMG_6704.jpg
    267.5 KB · Views: 346
  • IMG_3320.jpg
    IMG_3320.jpg
    310.5 KB · Views: 324
  • IMG_4975.jpg
    IMG_4975.jpg
    316.2 KB · Views: 317
  • IMG_4569.jpg
    IMG_4569.jpg
    164.4 KB · Views: 313
  • IMG_7517.jpg
    IMG_7517.jpg
    206.8 KB · Views: 310
with that situation,typicly your window reveals could set the finished surface - maybe that wont work here because youve got to meet the ibox finished depth as well.
could be the green shell cover on the ibox can be left wild until your tile goes on an then cut level with the tile surface?
ive never installed an ibox so im tryin to think it through.

at the bath head the shower outlet stub looks shy ie to set back - thats if its even a shower stub an not a wall mounted spout
or does or will the bath have rim mounted taps?

level the bath in its rough final position an mark an outline on the walls.
check that any supplies an waste will work an then
pull the bath out of the way.

prep as i said in above post but dont let whoever tried with the first coat have another go at applyin the next coat - is that render solid an fixed? was the brickwork prepped?

cant see on head of bath wall whare an how you are goin to meet the wall surface beyond the above the bath area?
where do you propose to use glass/enclosure?
 
Sponsored Links
The reveals around the window are screwed in via pocket hole screws, I can/will remove them to allow me to replace them with larger ones I can order from the supplier (they can make new custom ones at negligible cost).

You are correct I want to marry to the iBox because it will make it all flush.

The glass will come back into the room, at the edge of the of the larger window (black waterproofed area) around 1250mm

I think you may be correct that it would be better to have someone to straighten the plaster, however some have said because it was smoothed off it may result in the new lime render not sticking to the wall.

Attached is a couple more images that may help, including one of holding the tile to see how much you would need to come out from the reveals of the window.

Unless there is a way to level it out, one other suggestion was to use dry wall adhesive and level it out before attaching 6mm Hardie board to it.
 

Attachments

  • IMG_8052.jpg
    IMG_8052.jpg
    299.5 KB · Views: 287
  • IMG_3404.jpg
    IMG_3404.jpg
    188.8 KB · Views: 261
  • IMG_1535.jpg
    IMG_1535.jpg
    279 KB · Views: 258
well ive already told you how to prep.
if you are talkin to proper plasterers then theyd have no problems with prepin an pulling the coat out to where you want it.
the first scratch coat was applied to brickwork - pretty smooth?
glass coming out where you say at 1250mm will end up over the "bowl" of thebath?
 
well ive already told you how to prep.
- will that cause any issue being NHL mix and the tanking that has taken place in the corner with the Ardex?

if you are talkin to proper plasterers then theyd have no problems with prepin an pulling the coat out to where you want it.
- It is an option if it is cost effective

the first scratch coat was applied to brickwork - pretty smooth?
It was smoothed off with a float, there are some rough patches still around the wet room shower area, but pretty smooth overall.

glass coming out where you say at 1250mm will end up over the "bowl" of thebath?
- No, the glass will come out into the room as one sheet that will make it a wet room area, the bath is completely separate, two hansgrohe iBox are installed, one for the bath, which leads to just a spout. The one for the wet room shower has an overhead rain shower and a side one fitting.
 
you misunderstand what im sayin eg. if the scratch coat was applied to smooth brickwork then a second coat can be applied to what you now have on your wall.

you also keep trickling in further information which causes me to go over previous advice an makes it well difficult to advise you.

maybe someone else will help you?
 

DIYnot Local

Staff member

If you need to find a tradesperson to get your job done, please try our local search below, or if you are doing it yourself you can find suppliers local to you.

Select the supplier or trade you require, enter your location to begin your search.


Are you a trade or supplier? You can create your listing free at DIYnot Local

 
Sponsored Links
Back
Top