Fixing acrylic bath - enclosed 3 sides (1 masonry, 2 stud)

Joined
30 Mar 2012
Messages
668
Reaction score
4
Location
Monmouthshire
Country
United Kingdom
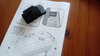
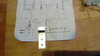
The 4 supplied fixing brackets are quite minimal; fixed to the wall, with silicon bonding bath to bracket.

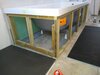
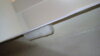
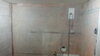
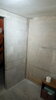
There are 3 strengthening blocks moulded in to the underside of the rim (plus 1 in each corner) connecting the downstanding rim to the top of the bath sides. Are they just for strengthening, or fixing a support frame to? There is no tubular cradle supplied, just 2 light galvanised channels with feet on threaded bar, to fix underneath.

Is the pair of channels on feet now considered largey sufficient to support the bath, with no runners or batten frame required under the rims of each long side?
 

Attachments

  • P_20210108_144245.jpg
    P_20210108_144245.jpg
    141.5 KB · Views: 223
  • P_20210108_145303.jpg
    P_20210108_145303.jpg
    65.7 KB · Views: 248
  • P_20201117_211121.jpg
    P_20201117_211121.jpg
    113.3 KB · Views: 224
  • P_20201117_211110.jpg
    P_20201117_211110.jpg
    109.4 KB · Views: 235
Last edited:
Sponsored Links
Depends on the quallity of bath but if channels came with it and you follow directions it should be ok. My bath has channel , fully encapsulated baseboard and brackets but I still CT1 bonded it to battons fixed to the walls
D665CCBC-D95A-4873-AF06-AA8081AFA902.jpeg
 
To make the bath as sturdy as possible and to ensure the edge seals properly and lasts, you want to support it along any full lengths of the edges of the bath that touches a wall and ideally a frame at the front/open ends or at least the corners.

I always use batons on the wall and add batons to the inside edges of the bath if it doesn't have them.
 
To make the bath as sturdy as possible and to ensure the edge seals properly and lasts, you want to support it along any full lengths of the edges of the bath that touches a wall and ideally a frame at the front/open ends or at least the corners.
Something like:
IMG_20191215_110030661.jpg
 
Sponsored Links
Something like:

That'll do nicely, it means that no matter where weight is put on it it (say getting in and out the bath) isn't going to flex and break things like the seal against the wall. Not so important on a metal bath of course as they don't tend to flex as much as acrylic do.
 

Thank you,
Is that full length rail up under the rim supporting the rim underside continuously? Or supporting moulded in blocks like mine has?

Is that treated roofing batten?

I always wonder what size bat was originally used when ripping old stuff out; it never seems to tally even with imperial known sizes, like it shrinks significantly as it dries over the years. Travis stores it outside so I dry it out in the house before using.
 

Attachments

  • P_20210108_145303.jpg
    P_20210108_145303.jpg
    65.7 KB · Views: 190
  • P_20210108_145234.jpg
    P_20210108_145234.jpg
    65.4 KB · Views: 197
Last edited:
Depends on the quallity of bath but if channels came with it and you follow directions it should be ok. My bath has channel , fully encapsulated baseboard and brackets but I still CT1 bonded it to battons fixed to the walls
View attachment 217905

Thenk you, CT1 sounds useful.

The bath will have a new stud wall at each end (to be enclosed on 3 sides), what sort of a gap should I leave at ends to take the CT1 (baths going in corners look easier, you just sealant 2 sides and push it in). I suppose it wouldn't take much to rig a reducer for the sealant nozzle if I had to.
 
Just use CLS, the trick is once it's all in and sealed properly then no water should get to it, so it doesn't need to be treated.

I must admit I find CT1/wetgrabs etc and the similar silicone adhesives are a bit overkill for a job like mounting an acrylic bath. I find the sealant needs a bit of flex with acrylic baths for the weight on and off and use movement, I find the adhesives a bit firm and don't allow as much give.
I just use a good quality silicone.

Also, there's a glass shower screen going on, so a batten top rail that loses 3mm width over the next 18 months might not be too clever.

Basic silicons have come on quite a bit over the years, what brand do you use?

And, slightly related, what thickness tile backer would you put on a new stud, that will have 8mm pvc panels going on. How rigid does the stud it need to be, I was thinking 6mm backer might be a bit thin?
 
Last edited:
I use Dow Corning, I'm sure others have their own preference.

6mm Backer board should be fine, it's not plasterboard remember, it's a cementous board and a lot tougher, just space the batons accordingly.

8mm PVC panels, are they board backed or honeycomb? If it's the latter then be careful as one good dunt on the board and it deforms. I've seen the honeycomb board that's had someone slip and their elbow hit it and it left a lovely elbow shaped depression.
 
That'll do nicely, it means that no matter where weight is put on it it (say getting in and out the bath) isn't going to flex and break things like the seal against the wall. Not so important on a metal bath of course as they don't tend to flex as much as acrylic do.

Is the wall long side of the bath rim similarly supported, with the custom timber frame also up under the rim?

Asking because the supplied wall brackets are slotted...vertically! FFS.
 

Attachments

  • P_20210406_155658.jpg
    P_20210406_155658.jpg
    146.5 KB · Views: 161
Last edited:
I don't use those plastic supports, I throw them away all the time.

The primary support for an acrylic bath is always anywhere it touches a wall. Batons secured to the wall are placed under the rims so the bath edge 'just about' sits on it when levelled. Then run a good bead of silicone along the baton where the bath edge will sit and another bead along the 'clean and dust free' wall where the side of the bath will touch it, paying more attention to the long and the short edges where the shower will run if there's to be one. Lift and push the bath onto the silicon, push and press down, there should be enough silicone applied to squeeze out all along contact edges, clean and smooth the silicon along the top edge to give and that's the first seal, 1 along the bottom and 1 along the wall. Check levels again. Fill the bath up to the overflow with water, and leave at least 12hrs.

The framing in the pic is extra to provide full support for the open 2 sides of the bath and the best you can provide. If the bath has 2 open edges, as if you place weight on the front or open corner, it will pull that area down and the unsupported edge(s) at right angles to it putting force upon the seal. If the bath has only the front long edge open then it's not needed so much as both bath short edges are support so there little or no corner flexing.
 
So an "open side" is one where a panel will be fitted and therefore support framing needs to be recessed up under the rim, allowing space along the outside for panels.

Change of plan, my bath will be enclosed on 3 sides with stud/Aquapanel. I can fix 3 horiz CLS supports to the stud anyway.

I could support the Aquapanel & bath on the 3 supporting horiz CLS. It might help with the levelling too.

1st seal along side & tap end seems straight forward when fitting bath in a corner, but in an alcove maybe I'll have to rig a drinking straw on the nozzle, or something, to gun the 1st seal in the tapless end after pushing the bath in the tap/side corner. 1st seal on 2 sides before fitting in a corner seems sensible, putting 1st seal on 3 sides before fitting could get messy.

What sort of sealant thickness would you allow for at each bath end, between Aquapanels and bath, where a bath is going in an alcove?
 
Last edited:

DIYnot Local

Staff member

If you need to find a tradesperson to get your job done, please try our local search below, or if you are doing it yourself you can find suppliers local to you.

Select the supplier or trade you require, enter your location to begin your search.


Are you a trade or supplier? You can create your listing free at DIYnot Local

 
Sponsored Links
Back
Top