Hi guys,
Im trying to do a 3 way mitre with quad trim (already tiled using this so i cant change it) at some external corners in the kitchen, however i just cant get all the joints to match. Its not that they are a few mm out, the one side is always way out.
Ive watched videos on youtube, ive read instructions here, i just cant get it.
Please take a look at the images attached.
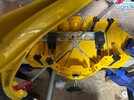
Step 1, im cutting 2 sections of trim left to right, at 45 degrees, with the trim lying flat, just as per the first image. Im cutting the 3rd piece at 45 degrees in the opposite direction (at the other end of the trim to what is pictured).
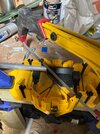
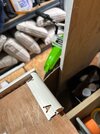
Step 2, im standing the trim up as per picture 2 and cutting at 45 degrees in the opposite direction to make a point on all 3 trims. Ive 3d printed a spacer to make sure the cut is dead centre of the trim.
Ive even 3d printed new inserts for the quansol mitre block so there isnt any play in the saw angle.
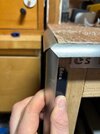
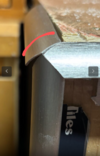
When i try to put the 3 pieces together, picture 3 is what im left with. I tried cutting the upright trim the opposite way too, so it would stick to the face perpendicular to where it is in the picture, however the mis matched side just moves to the right.
I cant for the life of me get it.
Does anybody know where im going wrong? Im going in for surgery next weekend and really need to get this done. Please help!
Im trying to do a 3 way mitre with quad trim (already tiled using this so i cant change it) at some external corners in the kitchen, however i just cant get all the joints to match. Its not that they are a few mm out, the one side is always way out.
Ive watched videos on youtube, ive read instructions here, i just cant get it.
Please take a look at the images attached.
Step 1, im cutting 2 sections of trim left to right, at 45 degrees, with the trim lying flat, just as per the first image. Im cutting the 3rd piece at 45 degrees in the opposite direction (at the other end of the trim to what is pictured).
Step 2, im standing the trim up as per picture 2 and cutting at 45 degrees in the opposite direction to make a point on all 3 trims. Ive 3d printed a spacer to make sure the cut is dead centre of the trim.
Ive even 3d printed new inserts for the quansol mitre block so there isnt any play in the saw angle.
When i try to put the 3 pieces together, picture 3 is what im left with. I tried cutting the upright trim the opposite way too, so it would stick to the face perpendicular to where it is in the picture, however the mis matched side just moves to the right.
I cant for the life of me get it.
Does anybody know where im going wrong? Im going in for surgery next weekend and really need to get this done. Please help!