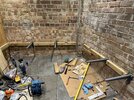
This is my first time working with chemical anchors and it's for a floating bench I'm building on a garden wall.
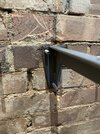
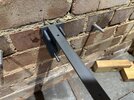
I've read up on the process and have successfully drilled and installed the anchors for my timber ledger plate. However these heavy duty metal brackets were another matter and I couldn't find any tips anywhere to properly line things up, so I thought I'd ask how everyone else does it.
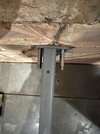
The studs I'm using is Rawlplug M10 x 130mm Stainless steel studs. I'm drilling 12mm holes to a depth on 85mm into the wall. And the 3 mounting holes in the brackets are 10mm.
The problem is that there is 0 tolerance for the stud going through the bracket mounting holes, it has to align precisely at the exact angle or it does't go through. But there are 3 holes, so if one of them is even 0.1mm out it doesn't work. And since the holes in the wall are 12mm there's already 2mm of play. Multiply that by 3 and you can see the problem. And then multiply that by the length of the stud protruding from the wall, which is 45mm, and it's an even bigger problem.
I tried to achieve as much precision as possible when drilling the holes (using pilot holes, templates, spirit levels and squares), but honestly, it still seems impossible to achieve. Additionally the studs need to be set in the wall 5mm from the back of the hole to allow the resin to fully encase it. That means you can't easily push the brackets over the studs whilst they're setting without disturbing them and causing the cure to fail.
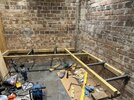
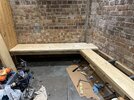
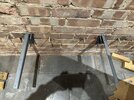
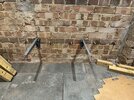
So anyway, at 18 degrees centigrade with a working time of about 7 minutes, the only sensible solution I could find, working alone, was to inject the resin into the hole. Then quickly twist each stud into the holes to the right depth. Then whilst carefully holding the studs in situ try to wiggle the bracket over the studs before the resin gets tacky. I sprayed silicon lube all over the base plate and the holes beforehand to prevent the resin extruding and bonding directly to the brackets. I then carefully held the bracket in place and gently wiggled it level with my spirit level and then slid a pile of bricks underneath to support it so that the studs were not under load.
It's really not the way it's advised to do it, but nothing else would have worked as far as I could see. As it is, the brackets are now on OK and the studs have set hard. However, I didn't get alignment so perfect that I can completely slide the brackets off and back on. They'll only move about 1cm before the opposing angle of one of the studs will prevent complete removal. I just abhout satisfied though and it should do what I need.
So what's the correct technique, what am I missing that you guys are doing?
I've read up on the process and have successfully drilled and installed the anchors for my timber ledger plate. However these heavy duty metal brackets were another matter and I couldn't find any tips anywhere to properly line things up, so I thought I'd ask how everyone else does it.
The studs I'm using is Rawlplug M10 x 130mm Stainless steel studs. I'm drilling 12mm holes to a depth on 85mm into the wall. And the 3 mounting holes in the brackets are 10mm.
The problem is that there is 0 tolerance for the stud going through the bracket mounting holes, it has to align precisely at the exact angle or it does't go through. But there are 3 holes, so if one of them is even 0.1mm out it doesn't work. And since the holes in the wall are 12mm there's already 2mm of play. Multiply that by 3 and you can see the problem. And then multiply that by the length of the stud protruding from the wall, which is 45mm, and it's an even bigger problem.
I tried to achieve as much precision as possible when drilling the holes (using pilot holes, templates, spirit levels and squares), but honestly, it still seems impossible to achieve. Additionally the studs need to be set in the wall 5mm from the back of the hole to allow the resin to fully encase it. That means you can't easily push the brackets over the studs whilst they're setting without disturbing them and causing the cure to fail.
So anyway, at 18 degrees centigrade with a working time of about 7 minutes, the only sensible solution I could find, working alone, was to inject the resin into the hole. Then quickly twist each stud into the holes to the right depth. Then whilst carefully holding the studs in situ try to wiggle the bracket over the studs before the resin gets tacky. I sprayed silicon lube all over the base plate and the holes beforehand to prevent the resin extruding and bonding directly to the brackets. I then carefully held the bracket in place and gently wiggled it level with my spirit level and then slid a pile of bricks underneath to support it so that the studs were not under load.
It's really not the way it's advised to do it, but nothing else would have worked as far as I could see. As it is, the brackets are now on OK and the studs have set hard. However, I didn't get alignment so perfect that I can completely slide the brackets off and back on. They'll only move about 1cm before the opposing angle of one of the studs will prevent complete removal. I just abhout satisfied though and it should do what I need.
So what's the correct technique, what am I missing that you guys are doing?
Attachments
Last edited: