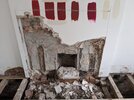
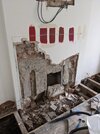
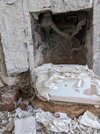
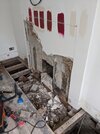
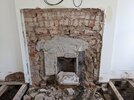
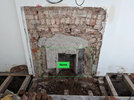
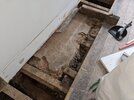
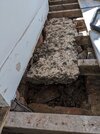
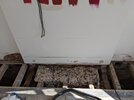
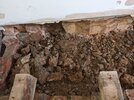
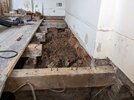
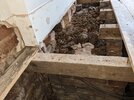
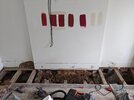
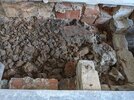
Pulling out a 1930's hearth due to the chimney being unused and the hearth is damp causing issues in the surrounding walls and joists. I've gotten this far which has been to remove the tiles on top, some sort of firebrick layer, then a black pebble concrete like screed, and now I'm down to the clay and rubble infill which is where the damp is present.
However, I don't like the look of the support for the bricks which I assume were installed to cover the fireplace and also the firebox(?) just seems to be sat on the rubble. I only just bought the property so have next to no history on what has been done behind the plaster to block off the fireplace. Do you think that the rubble could be anything structural, or am I fine to keep going? I don't really want to take down the plasterboard on the chimney breast but I'm not thinking this might be a good idea just to see what's actually been done?
This just started off as running some speaker cables
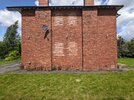
Attached are photos of firebricks, into screed into a now partially disturbed rubble mix before I got too nervous about proceeding. Then finally a photo of the external chimney stack if that makes any difference, thanks!
However, I don't like the look of the support for the bricks which I assume were installed to cover the fireplace and also the firebox(?) just seems to be sat on the rubble. I only just bought the property so have next to no history on what has been done behind the plaster to block off the fireplace. Do you think that the rubble could be anything structural, or am I fine to keep going? I don't really want to take down the plasterboard on the chimney breast but I'm not thinking this might be a good idea just to see what's actually been done?
This just started off as running some speaker cables
Attached are photos of firebricks, into screed into a now partially disturbed rubble mix before I got too nervous about proceeding. Then finally a photo of the external chimney stack if that makes any difference, thanks!
Attachments
-
 PXL_20240611_134828690.jpg413.9 KB · Views: 142
 -
 PXL_20240618_165414136.jpg456.3 KB · Views: 107
 -
 PXL_20240618_165259972.jpg257 KB · Views: 106
 -
 PXL_20240620_085337016.jpg564 KB · Views: 110
 -
 PXL_20240620_085359885.jpg371.5 KB · Views: 107
 -
 PXL_20240620_085411892.jpg465.6 KB · Views: 102
 -
 PXL_20240620_085316873.jpg242.9 KB · Views: 109
 -
 PXL_20240620_085347751.jpg673.1 KB · Views: 123
 -
 PXL_20240605_121433445.jpg672.6 KB · Views: 139