
You are using an out of date browser. It may not display this or other websites correctly.
You should upgrade or use an alternative browser.
You should upgrade or use an alternative browser.
A Rather Compromised Joist
- Thread starter Mark451
- Start date

Hi Lower, thanks for your suggestions which zero in on what I think I'm going to do.
Good call on bulking out the notch prior to resin, I'll have to see whether that stuff can be bought in smaller quantities. Not calculated the exact volume but it's not far short of a litre which is the mimimum pack size. There's also products like epoxy in putty form which would probably be as good. None of it cheap though
I don't have the luxury of sistering both sides as plumbing gets in the way of a good run at the back of the joist, so I would apply decent reinforcement to one side only, planning the arrangement so that it could be augmented in the future when the plumbing is replaced (No point replacing pipework until new boiler install which in turn has to wait until 'wallet deflection' is sorted out...)
I have some 25mm ply (extremely stiff), which I'll use to sandwich a piece of 3mm steel checker-plate against the joist, all mating faces bonded with structural adhesive and all fastened through joist with M10 Coach bolts, using M10 coach screws where rear access is out (screws and bolt positions staggered with alternating wood screws filling out the grid say No.10 x2½ ) All drilled holes to provide a snug fit on the shanks of the screws and bolts, any play would defeat the point of the object.
Pictures describe it a lot clearer.
Total run of reinforcement, 600mm either side of the notch. Depth to match joist depth with a small clearance at the bottom for plaster.
I suspect that although only 28mm thick in total, the lamination will at least match and hopefully exceed the stiffness of a single thick piece of timber, and being relatively thin have the advantage of being more easily manoeuvred into the floor void ripping the bare minimum of floorboards which, as you say, are helping the situation a lot.
Replacing a lifted floorboard which spans the two neighbouring joists is not as straightforward as it sounds: unfortunately the boards to the rear are pinned down by the stud wall, they would have to be sawn off and I can't think how to restore their load transference once they're cut. So the less destructive I can be for access purposes, the better - I reckon I'll have sufficient access with alternate boards pulled.
If the pre-drilled steel plate acts as drilling template for the ply, all holes should align fine, and the holes in the 25mm ply initially clamped in position on the joist should give good guides for drilling through the actual joist.
If the repair's insufficient it could always be replicated on the rear side of the joist using the same drillings with longer bolts but it would be nice to try for a reasonable improvement in one hit. Obviously the ideal would be to extend the entire span of the joist, or at least to the point where the advantage gained starts to fall off relative to the problem to solve, so it's a trade-off.
The only detail I can think of changing is the vertical distance apart of the two tiers of bolts. I get more mechanical advantage the further apart they are, but I ought to be maintaining a safe margin from the edge of the joist, as modern guidelines on drilling and notching imply. There again at 10mm their impact is relatively modest. I'm sure the original plumber would agree...
Good call on bulking out the notch prior to resin, I'll have to see whether that stuff can be bought in smaller quantities. Not calculated the exact volume but it's not far short of a litre which is the mimimum pack size. There's also products like epoxy in putty form which would probably be as good. None of it cheap though
I don't have the luxury of sistering both sides as plumbing gets in the way of a good run at the back of the joist, so I would apply decent reinforcement to one side only, planning the arrangement so that it could be augmented in the future when the plumbing is replaced (No point replacing pipework until new boiler install which in turn has to wait until 'wallet deflection' is sorted out...)
I have some 25mm ply (extremely stiff), which I'll use to sandwich a piece of 3mm steel checker-plate against the joist, all mating faces bonded with structural adhesive and all fastened through joist with M10 Coach bolts, using M10 coach screws where rear access is out (screws and bolt positions staggered with alternating wood screws filling out the grid say No.10 x2½ ) All drilled holes to provide a snug fit on the shanks of the screws and bolts, any play would defeat the point of the object.
Pictures describe it a lot clearer.
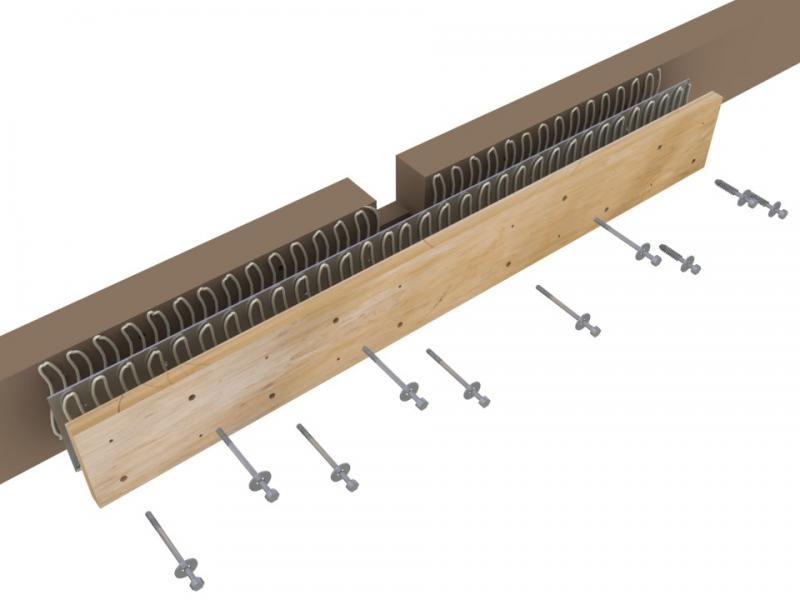
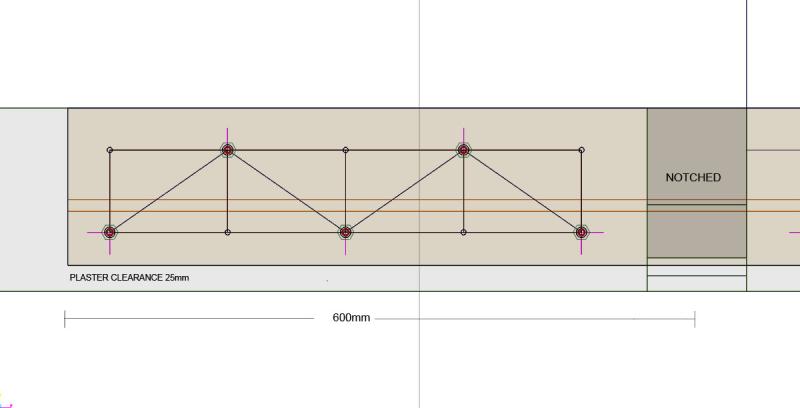
Total run of reinforcement, 600mm either side of the notch. Depth to match joist depth with a small clearance at the bottom for plaster.
I suspect that although only 28mm thick in total, the lamination will at least match and hopefully exceed the stiffness of a single thick piece of timber, and being relatively thin have the advantage of being more easily manoeuvred into the floor void ripping the bare minimum of floorboards which, as you say, are helping the situation a lot.
Replacing a lifted floorboard which spans the two neighbouring joists is not as straightforward as it sounds: unfortunately the boards to the rear are pinned down by the stud wall, they would have to be sawn off and I can't think how to restore their load transference once they're cut. So the less destructive I can be for access purposes, the better - I reckon I'll have sufficient access with alternate boards pulled.
If the pre-drilled steel plate acts as drilling template for the ply, all holes should align fine, and the holes in the 25mm ply initially clamped in position on the joist should give good guides for drilling through the actual joist.
If the repair's insufficient it could always be replicated on the rear side of the joist using the same drillings with longer bolts but it would be nice to try for a reasonable improvement in one hit. Obviously the ideal would be to extend the entire span of the joist, or at least to the point where the advantage gained starts to fall off relative to the problem to solve, so it's a trade-off.
The only detail I can think of changing is the vertical distance apart of the two tiers of bolts. I get more mechanical advantage the further apart they are, but I ought to be maintaining a safe margin from the edge of the joist, as modern guidelines on drilling and notching imply. There again at 10mm their impact is relatively modest. I'm sure the original plumber would agree...
Although wood is a fairly elastic material, it has a tendency to stay in one position if it's been deflected for a prolonged period of time.
For that reason, I would go with the suggestion of raising the joist to the same height at its neighbours, with an acroprop under the ceiling downstairs, before locking the whole thing in position.
For that reason, I would go with the suggestion of raising the joist to the same height at its neighbours, with an acroprop under the ceiling downstairs, before locking the whole thing in position.
if your floorboards run under the adjacent partition, you need to be careful in cutting them. The continuity of the boards across several joists contributes considerably to their ability to support the bath over the weakened joist. Once you cut them, that continuity is lost, even if you re-support the cut ends on a piece of timber fixed to the side of the joist.
Thanks mfarrow
To my eyes the joist is not noticeably lower than the neighbouring ones, I think in this case it's more that over time the plaster has given along the line of the joist as the load has fluctuated (+/- one person & bathwater) It's difficult to judge as plaster and lath seems to have an inherent waviness to it, futher muddied by the build quality of the house in general
I can lay a straight edge across the relevant area from above and to my mind it's acceptably flat...
@ Tony - a very good point about the floorboards, and thanks for bringing it up.
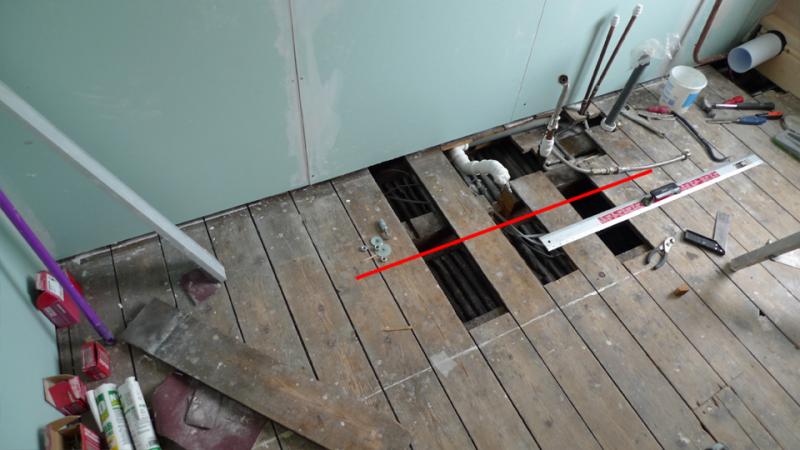
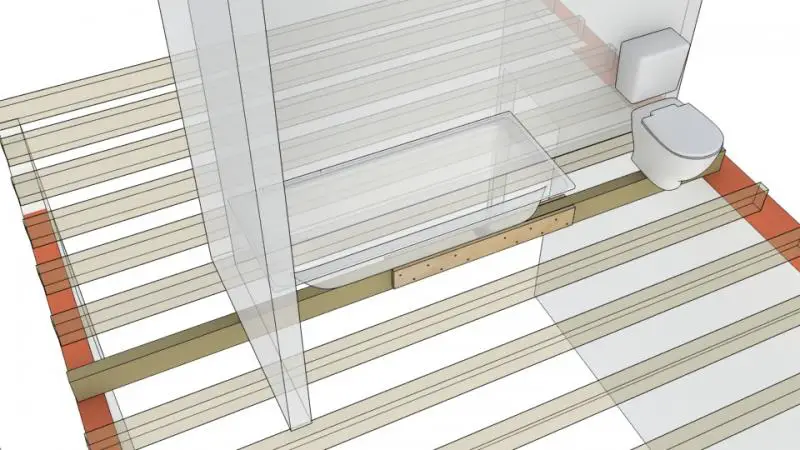
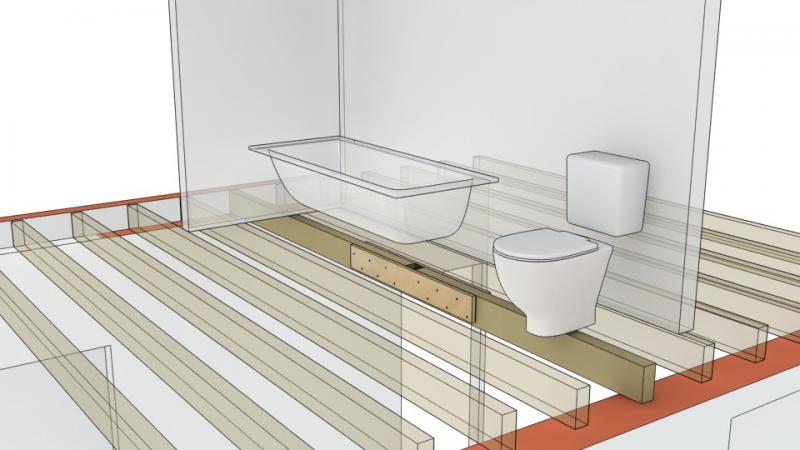
The picture shows the bath footprint area, to the far left is the return wall with the bath standing in that corner.
Red line is the extent of my intended reinforcement, 1200mm.
The bathroom and adjoining room were originally one single large space which was divided roughly half and half. The partition was evidently fixed directly down onto the existing boards, which do span both rooms. Some of the boards were cut for plumbing way back, I have not disturbed a single intact span thus far.
Of the three existing gaps in front of the damaged joist I created only the right hand side one, the board which covered it in any case didn't span the joist, just rested on it - the section behind was cut for the pipework. The left hand gap is an existing trap, covered by a board which wedges back under the partition at its end.
My own sentiment was to cut as little as possible and I'd appreciated that the floorboards were helping to support the joist, but I realised I still needed to get in there.
Provided I can get the materials into the floor void as is perhaps I should look into trying to work within the existing access space as it is: lights, mirrors, rig up a webcam even which I've used before to investigate various tight spaces. The board to the right of Gap 3 is already compromised, I could relieve that one enough to get the gear in.
Thanks again
Mark
To my eyes the joist is not noticeably lower than the neighbouring ones, I think in this case it's more that over time the plaster has given along the line of the joist as the load has fluctuated (+/- one person & bathwater) It's difficult to judge as plaster and lath seems to have an inherent waviness to it, futher muddied by the build quality of the house in general
I can lay a straight edge across the relevant area from above and to my mind it's acceptably flat...
@ Tony - a very good point about the floorboards, and thanks for bringing it up.
The picture shows the bath footprint area, to the far left is the return wall with the bath standing in that corner.
Red line is the extent of my intended reinforcement, 1200mm.
The bathroom and adjoining room were originally one single large space which was divided roughly half and half. The partition was evidently fixed directly down onto the existing boards, which do span both rooms. Some of the boards were cut for plumbing way back, I have not disturbed a single intact span thus far.
Of the three existing gaps in front of the damaged joist I created only the right hand side one, the board which covered it in any case didn't span the joist, just rested on it - the section behind was cut for the pipework. The left hand gap is an existing trap, covered by a board which wedges back under the partition at its end.
My own sentiment was to cut as little as possible and I'd appreciated that the floorboards were helping to support the joist, but I realised I still needed to get in there.
Provided I can get the materials into the floor void as is perhaps I should look into trying to work within the existing access space as it is: lights, mirrors, rig up a webcam even which I've used before to investigate various tight spaces. The board to the right of Gap 3 is already compromised, I could relieve that one enough to get the gear in.
Thanks again
Mark
I would use flat plate rather than chequer plate. If you bond flat plate you will get a much bigger contact area and therefore more strength. Chequer plate will only bond on the tips of the chequer where they are in contact with the adjacent wood.
If you can get hold of 3mm plate, i'd also put it both sides of the joint. With good bonding and a non compressible media in the cut in the joint that will be more than strong enough.
If you can get hold of 3mm plate, i'd also put it both sides of the joint. With good bonding and a non compressible media in the cut in the joint that will be more than strong enough.
Although wood is a fairly elastic material, it has a tendency to stay in one position if it's been deflected for a prolonged period of time.
For that reason, I would go with the suggestion of raising the joist to the same height at its neighbours, with an acroprop under the ceiling downstairs, before locking the whole thing in position.
Brilliant idea! I would go one step further ans say leave the acro prop in situ and with X met mesh wound around it then plaster it up like a Grecian pillar, run it past the Misses first though.

Good point on the chequer plate, local engineer suggested it as he has plenty of offcuts, although he currently holds no flat 3mm & would have to buy in a large qty of it for my relatively small job, no point. But maybe I can source some myself. Compared with the fabrications he knocks out, my modest erection would be about as exciting as watching carpets fade.
Pred, like your thinking outside the box there. To the best of my knowedge she who must be disobeyed has no overt predilections for 'Grecian pillars' or other more exotic Mediterranean delights, but I certainly have my suspicions. As it happens she did the sensible thing and retreated to the safety of her own modern house some time back; just comes round here to laugh at the building site reassured by the knowledge she doesn't have to live in it")
Hmmm..... the more I think about this, maybe I will rip out the plumbing at the back of the joist and do the thing properly on both sides. Pipework is just a branch line off the main kitchen-to bathroom loop to supply the sanitaryware. Dry as a bone but ancient Imperial copper, a fetching shade of green, valuable historical artefact, belongs in a museum, etc etc. I'll try not to get emotional about it...
Pred, like your thinking outside the box there. To the best of my knowedge she who must be disobeyed has no overt predilections for 'Grecian pillars' or other more exotic Mediterranean delights, but I certainly have my suspicions. As it happens she did the sensible thing and retreated to the safety of her own modern house some time back; just comes round here to laugh at the building site reassured by the knowledge she doesn't have to live in it
Hmmm..... the more I think about this, maybe I will rip out the plumbing at the back of the joist and do the thing properly on both sides. Pipework is just a branch line off the main kitchen-to bathroom loop to supply the sanitaryware. Dry as a bone but ancient Imperial copper, a fetching shade of green, valuable historical artefact, belongs in a museum, etc etc. I'll try not to get emotional about it...
Big thanks to everyone who made suggestions - very helpful, much appreciated.
Existing plumbing gone to allow equal bracing each side of the joist.
All floorboards already spanning the joist and its neighbours will be left well alone.
Ply and steel sourced, cut, ready to drill.
Next step, drilling one side of ply to serve as template for drilling the actual joist
Before going ahead, it would be good to run the intended bolt pattern past the jury.
10mm holes for M10 bolts, staggered. The gap at the base to clear the ceiling plaster means the pattern is slightly offset vertically on the plates to keep all holes 2" away from top and bottom of the joist.
Having read various guidelines on drilling and notching, I don't like taking any more material out of the joist at all - but to make a repair more holes have to be made; I've opted for what I think is a reasonable distribution of smaller holes rather than fewer larger ones.
This kind of repair's a new one on me, so please excuse my drifting off into the obsessive-compulsive realm.
But, better to risk looking daft than proceed without due care - enough evidence of past brain-off work in this place still to correct as it is...
Cheers -
Mark
Existing plumbing gone to allow equal bracing each side of the joist.
All floorboards already spanning the joist and its neighbours will be left well alone.
Ply and steel sourced, cut, ready to drill.
Next step, drilling one side of ply to serve as template for drilling the actual joist
Before going ahead, it would be good to run the intended bolt pattern past the jury.
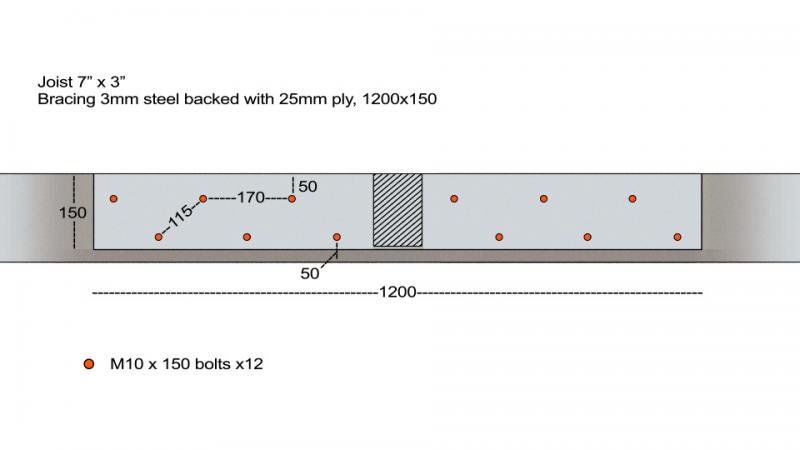
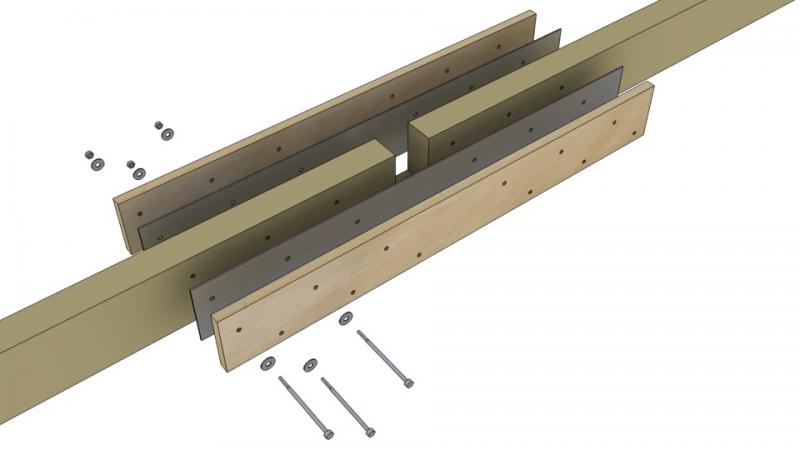
10mm holes for M10 bolts, staggered. The gap at the base to clear the ceiling plaster means the pattern is slightly offset vertically on the plates to keep all holes 2" away from top and bottom of the joist.
Having read various guidelines on drilling and notching, I don't like taking any more material out of the joist at all - but to make a repair more holes have to be made; I've opted for what I think is a reasonable distribution of smaller holes rather than fewer larger ones.
This kind of repair's a new one on me, so please excuse my drifting off into the obsessive-compulsive realm.
But, better to risk looking daft than proceed without due care - enough evidence of past brain-off work in this place still to correct as it is...
Cheers -
Mark
Your bolt spacing looks fine, but why put the steel plates in? Surely the plywood pieces each side would be enough on their own.
(Incidentally, 10mm coach SCREWS would take a greater shear load than 10mm bolts, though of course you would have to stagger the screws each side so they didn't foul each other).
Personally I think it's over-engineered, but far better that than something just cobbled together!
(Incidentally, 10mm coach SCREWS would take a greater shear load than 10mm bolts, though of course you would have to stagger the screws each side so they didn't foul each other).
Personally I think it's over-engineered, but far better that than something just cobbled together!
Hi gregers and, once more, Tony
No time to reply until now but much appreciated.
No doubt the joist's deflected to some extent over time but... nothing's dropping off underneath, all seems sound enough and acceptably flat; to my mind the grief of deeper intervention well outweighs the aesthetic benefits. 'I'd just leave the ceilings alone' has been the mantra from all of the trade who've seen it. There's a serious famine of true 90° angles around the building in any case, I suspect dating from the original construction, so geometric perfection is a pipe-dream
If the ceiling ever did come down (preferably not during my tenure, and preferably by intention ) presumably that would be the time to lift the joist; I assume an acro prop should be brought to bear against the joist itself rather than against the plaster/lath which would compress [and no doubt be crushed behind the wallpaper].
While all loads are off the area, I was simply going to reinforce the joist as it is before the bathroom was refitted, preventing any further movement under loading.
Re: Tony on the coach screws, didn't realise they were actually stronger in use than bolts. Pilots for screws certainly a lot less hassle than aligning through-bolts. The commercial plates specify screws too, perhaps not just for ease of installation then. I also noticed that part-threaded bolts have a smaller diameter on the shank than the thread OD - fully threaded or rod would be preferable where any play needed eliminating
As to the 'over-engineered' - when I got hold of the materials that was the first thing that occurred to me
Without the expertise or experience, my instincts have probably led me to exceed the requirements, but like you say better too much(within reason) than too little.
Why both in my idea? Plate steel was a lot cheaper than a set of commercial flanged plates and I thought the ply backing a good substitute for the stiffness a flange adds to a plate... though a single strip of either material does look pretty meaty by itself
Viewing the arrangement in context gives a clearer picture of the situation, and then the repair doesn't seem so extreme to my eyes, considering the joist's all but cut through.
Anyway - I've been generously advised, time to make a decision and get on with it. I've read a lot of threads on the same problem here and elsewhere but they rarely follow up with the final solution, a shame as I'd have liked to see them.
But I'll be back here to post what I end up doing.
Thanks again
No time to reply until now but much appreciated.
No doubt the joist's deflected to some extent over time but... nothing's dropping off underneath, all seems sound enough and acceptably flat; to my mind the grief of deeper intervention well outweighs the aesthetic benefits. 'I'd just leave the ceilings alone' has been the mantra from all of the trade who've seen it. There's a serious famine of true 90° angles around the building in any case, I suspect dating from the original construction, so geometric perfection is a pipe-dream
If the ceiling ever did come down (preferably not during my tenure, and preferably by intention
) presumably that would be the time to lift the joist; I assume an acro prop should be brought to bear against the joist itself rather than against the plaster/lath which would compress [and no doubt be crushed behind the wallpaper]. While all loads are off the area, I was simply going to reinforce the joist as it is before the bathroom was refitted, preventing any further movement under loading.
Re: Tony on the coach screws, didn't realise they were actually stronger in use than bolts. Pilots for screws certainly a lot less hassle than aligning through-bolts. The commercial plates specify screws too, perhaps not just for ease of installation then. I also noticed that part-threaded bolts have a smaller diameter on the shank than the thread OD - fully threaded or rod would be preferable where any play needed eliminating
As to the 'over-engineered' - when I got hold of the materials that was the first thing that occurred to me
Without the expertise or experience, my instincts have probably led me to exceed the requirements, but like you say better too much(within reason) than too little.
Why both in my idea? Plate steel was a lot cheaper than a set of commercial flanged plates and I thought the ply backing a good substitute for the stiffness a flange adds to a plate... though a single strip of either material does look pretty meaty by itself
Viewing the arrangement in context gives a clearer picture of the situation, and then the repair doesn't seem so extreme to my eyes, considering the joist's all but cut through.
Anyway - I've been generously advised, time to make a decision and get on with it. I've read a lot of threads on the same problem here and elsewhere but they rarely follow up with the final solution, a shame as I'd have liked to see them.
But I'll be back here to post what I end up doing.
Thanks again
DIYnot Local
Staff member
If you need to find a tradesperson to get your job done, please try our local search below, or if you are doing it yourself you can find suppliers local to you.
Select the supplier or trade you require, enter your location to begin your search.
Please select a service and enter a location to continue...
Are you a trade or supplier? You can create your listing free at DIYnot Local