

Greetings all, I first started reading this forum a couple of years back - around the same time I bought an old house as it happens.
Strange coincidence that.
Apologies for a lengthy first post but I've tried to provide all relevant info.
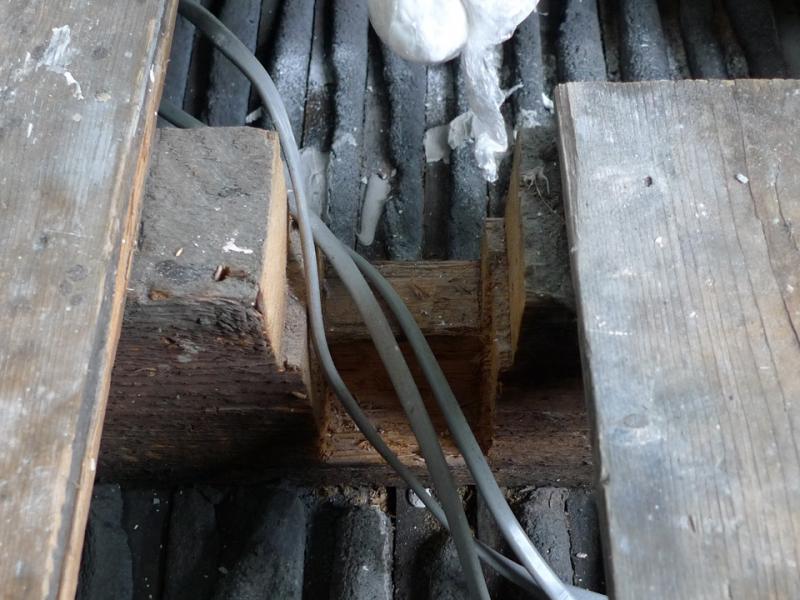
I've been debating what to do about this charming little gift from the past left waiting for me under the bath.
Looks like that dreaded primordial insect, the Lesser-Spotted Sawtoothed Joist-Nibbler, has struck again...
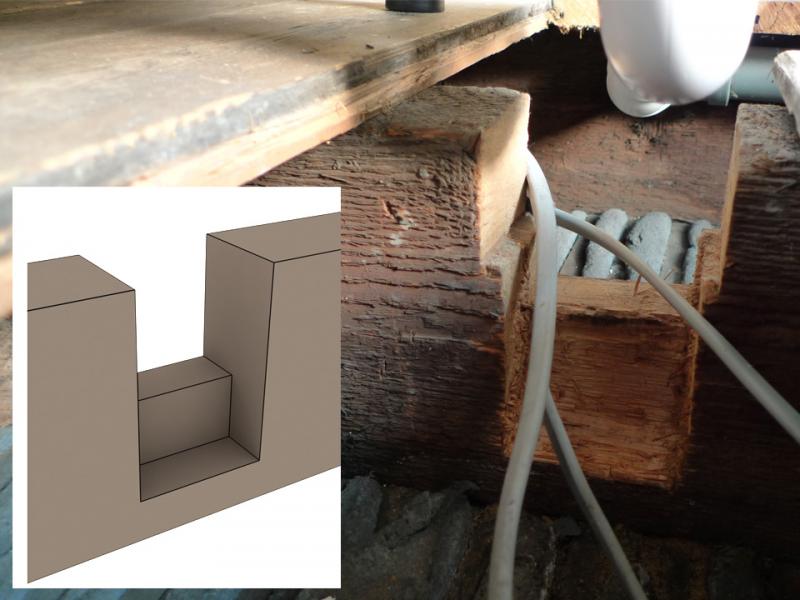
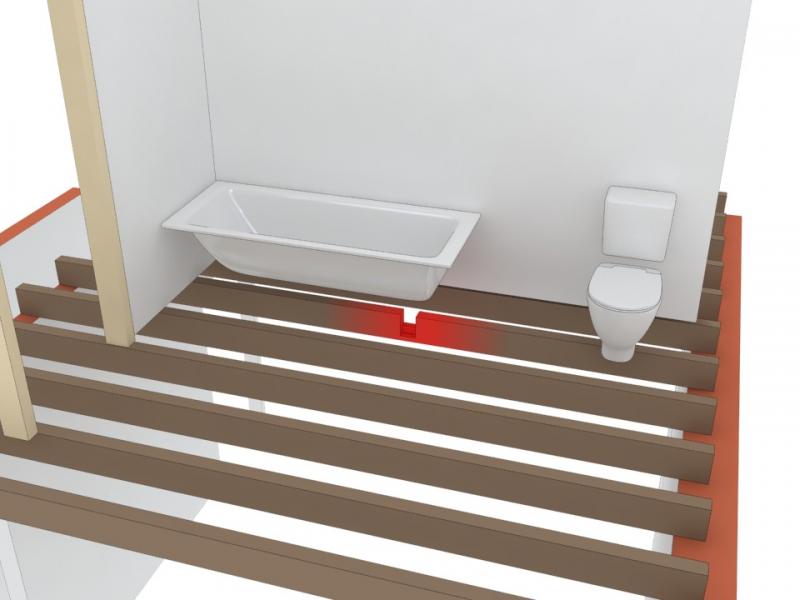
Relevant area in 3D to scale, easier to see the situation
Location:
1st floor Bathroom joist notched to accommodate a deep trap on bath waste, not an uncommon issue I gather. 100yr old terrace, the original large rear 1st floor single room subdivided back in the days of plaster & lath to create two smaller rooms, one being the bathroom. History unknown but estimated age of sanitaryware just removed including the problem bath trap, 30-40 years - so I assume the joist's been in this state for at least that long.
Joists:
7"x3"; spacing 390mm centres, span: 4m, passing under stud wall 1m from one end
Damage:
95mm wide x approx 80% of cross-section removed.
Approximate centre of 4m span
Timber otherwise sound & dry
Loading:
Under bath inline with centre of bath, so subject to fluctuating loads. Also inline with the toilet base, not to mention a pedestal basin (not shown) between bath and toilet - and I was surprised at how heavy that was, when I pulled it out. All in all, a fair bit of weight bearing down, although some of it is distributed across adjoining joists via the floorboards. Stud wall across joist may be helping to support it.
Symptoms:
There's been some flexing of the ceiling beneath along the joist line, but as it's papered, unless you're deliberately looking under certain lighting conditions there's not much to be seen, the ceiling basically appears fine but no doubt the plaster underneath is cracked appropriately. All previous advice has been to leave the ceiling alone - it's black ash plaster and considering what happened to Pompeii in AD79, I have no problems at all not provoking it.
I've been told not to worry unduly about the notching by a former surveyor as it's clearly been like this for many years, and the loading pattern isn't about to change (bathroom layout to stay as is, no tiled floor or other serious weight to be added)
I'm not entirely convinced & for peace of mind alone would rather do something about it now, while the bathroom's apart and empty and the opportunity is available. It might have been like this for decades without much drama but obviously it's structural vandalism and in the worst possible place along the joist; every time I took a bath I'd never quite be able to stop contemplating a sudden unplanned trip to the ground floor at 9.81m/s² in a sort of low-budget log flume simulation.
Solution:
I've searched extensively online for info - clearly there's more than one possible solution. Not surprisingly, I'd prefer the least painful or destructive option.
Access to the rear (as viewed in the 3D image) of the joist is poor (plumbing)
Apart from lifting some boards I'm clear on the front face to apply reinforcement, no pipes/cable to contend with. New trap's well clear of the floor, ironically.
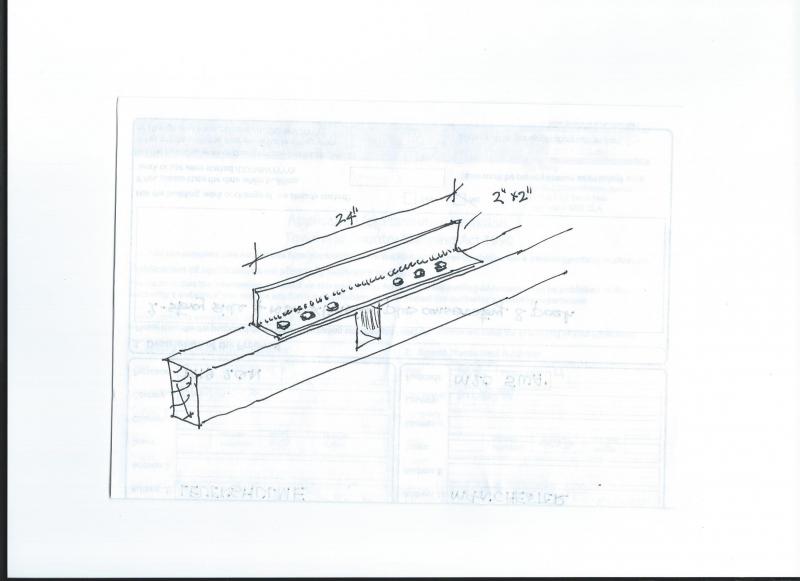
I've been thinking along the lines of a steel plate sandwiched against the joist with ply, ie. a flitch type arrangement. The Bower Beam joist end repair plates out there, which can also be used to splice, caught my notice too - a supplier of the Bower product suggested using their largest (1000mm) plate as a splice. A local engineer can supply cut and drilled steel plate to any dimension and pattern, but as a non-specialist I have no guidelines for arriving at an appropriate design: eg. overall span of reinforcement, materials spec, pattern/spec/distribution of fasteners.
I did see on an older thread here [a similar problem] mention of a useful-sounding guide, but the link has expired: http://www.diynot.com/forums/viewtopic.php?t=149477
All opinions gratefully received
Strange coincidence that.
Apologies for a lengthy first post but I've tried to provide all relevant info.
I've been debating what to do about this charming little gift from the past left waiting for me under the bath.
Looks like that dreaded primordial insect, the Lesser-Spotted Sawtoothed Joist-Nibbler, has struck again...
Relevant area in 3D to scale, easier to see the situation
Location:
1st floor Bathroom joist notched to accommodate a deep trap on bath waste, not an uncommon issue I gather. 100yr old terrace, the original large rear 1st floor single room subdivided back in the days of plaster & lath to create two smaller rooms, one being the bathroom. History unknown but estimated age of sanitaryware just removed including the problem bath trap, 30-40 years - so I assume the joist's been in this state for at least that long.
Joists:
7"x3"; spacing 390mm centres, span: 4m, passing under stud wall 1m from one end
Damage:
95mm wide x approx 80% of cross-section removed.
Approximate centre of 4m span
Timber otherwise sound & dry
Loading:
Under bath inline with centre of bath, so subject to fluctuating loads. Also inline with the toilet base, not to mention a pedestal basin (not shown) between bath and toilet - and I was surprised at how heavy that was, when I pulled it out. All in all, a fair bit of weight bearing down, although some of it is distributed across adjoining joists via the floorboards. Stud wall across joist may be helping to support it.
Symptoms:
There's been some flexing of the ceiling beneath along the joist line, but as it's papered, unless you're deliberately looking under certain lighting conditions there's not much to be seen, the ceiling basically appears fine but no doubt the plaster underneath is cracked appropriately. All previous advice has been to leave the ceiling alone - it's black ash plaster and considering what happened to Pompeii in AD79, I have no problems at all not provoking it.
I've been told not to worry unduly about the notching by a former surveyor as it's clearly been like this for many years, and the loading pattern isn't about to change (bathroom layout to stay as is, no tiled floor or other serious weight to be added)
I'm not entirely convinced & for peace of mind alone would rather do something about it now, while the bathroom's apart and empty and the opportunity is available. It might have been like this for decades without much drama but obviously it's structural vandalism and in the worst possible place along the joist; every time I took a bath I'd never quite be able to stop contemplating a sudden unplanned trip to the ground floor at 9.81m/s² in a sort of low-budget log flume simulation.
Solution:
I've searched extensively online for info - clearly there's more than one possible solution. Not surprisingly, I'd prefer the least painful or destructive option.
Access to the rear (as viewed in the 3D image) of the joist is poor (plumbing)
Apart from lifting some boards I'm clear on the front face to apply reinforcement, no pipes/cable to contend with. New trap's well clear of the floor, ironically.
I've been thinking along the lines of a steel plate sandwiched against the joist with ply, ie. a flitch type arrangement. The Bower Beam joist end repair plates out there, which can also be used to splice, caught my notice too - a supplier of the Bower product suggested using their largest (1000mm) plate as a splice. A local engineer can supply cut and drilled steel plate to any dimension and pattern, but as a non-specialist I have no guidelines for arriving at an appropriate design: eg. overall span of reinforcement, materials spec, pattern/spec/distribution of fasteners.
I did see on an older thread here [a similar problem] mention of a useful-sounding guide, but the link has expired: http://www.diynot.com/forums/viewtopic.php?t=149477
All opinions gratefully received

")