Are you sure there isn't a water leak under the house? Old pipes usually leak. Is there a water meter?

You are using an out of date browser. It may not display this or other websites correctly.
You should upgrade or use an alternative browser.
You should upgrade or use an alternative browser.
Advice on stripping back to brick with damp walls
- Thread starter giznorm
- Start date
-
- Tags
- damp exposed brick
foxhole,
i just checked a couple of your back posts and you say in 24 nov 2015 that "you can get penetrating damp from many sources".
so you agree that horizontal damp can penetrate beds and masonry - how does moisture penetrate these materials?
i just checked a couple of your back posts and you say in 24 nov 2015 that "you can get penetrating damp from many sources".
so you agree that horizontal damp can penetrate beds and masonry - how does moisture penetrate these materials?
Post on the Plumbing section for how to detect leaks. Meanwhile identify where the outside stopcock was when the house was built, and where the inside one was when the house was built. The supply pipe is pretty sure to run straight between them.
There will also be radiator pipes under the floor.
How many of your airbricks have been blocked?
There will also be radiator pipes under the floor.
How many of your airbricks have been blocked?
Unfortunately there is no water meter. I was toying with buying one of those leak detection devices.
Either way, later today I will lift up a floorboard to see if I can work out what is happening beneath.
I have a Moisture Detector - cost around £20, very good at showing damp and where is is worse (sometimes where it is not obvious). Finding the source can be difficult - water obviously spreads. I've found nearly all the ground floor internal walls I was checking have problems...
Multitude of sources of damp - apply some common sense, rule out what it can not be - pipes / leaks etc I would ignore the damp survey, I had one done once - they suggested the usual injection / hacking plaster off etc, but i worked out it was a leaking pipe in the concrete floor
As you have just bought the house you'll probably get a meter put in automatically in the coming weeks, they do it when the bill payer changes.
If it's your internal walls and you have floorboards and the void underneath I'd suggest checking your air bricks aren't covered front and back, the old houses need the ventilation. very common now for lazy driveway layers to built up and over the dampcourse / airbricks instead of getting a skip and digging up the front
- Joined
- 18 Sep 2019
- Messages
- 20
- Reaction score
- 0
- Country

Been away for a while, but thought I'd post an update to thank everyone for their advice:
Things I have done:
- I bit the bullet and paid for someone to inject a chemical damp proofing course (having seen this, I actually think this is well within the scope of a competent DIYer. The chemicals are not expensive and more modern creams are injected into the mortar not the brick)
- I replastered the wall in a breathable plaster.
- I have not yet painted the wall as I am giving it as long as humanly possible to dry out. This means my home currently has a 'rustic charm'.
- I have checked under the floorboards for signs of leaky pipes. Nothing obviously wrong there.
- I have been around with a pointy stick to check the air bricks.
Other things that I will do in the future:
- eventually I will paint the replastered walls because my other half doesn't like living in what feels like a squat that we have to pay for.
- The house needs some ventilation generally. We noticed the plaster is taking forever to properly dry out. And a damp tea towel put on a drying rack is still a damp tea towel the following morning, so this house is screaming for some ventilation. When we next have some work done, I'll install some, which should hopefully help prevent future damp.
Thanks again everyone.
- Joined
- 17 May 2012
- Messages
- 11,458
- Reaction score
- 1,048
- Country
Old air bricks are a nightmare.
Most of mine were painted over.
Some were covered in concrete path.
Some had collapsed damp course blocking them.
Most were full of decades of dirt.
I am tempted to remove all old and replace with the modern plastic ones, because they apparently have better airflow, and protect more from rain splashing in.
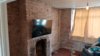
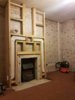
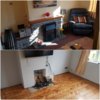
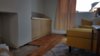
Probably not entirely relevant now but when I moved in to a 1930's house we had a few signs of damp mainly on external walls tiny bit where internal walls joined external ones.
Long story short we ended up going back to bare brick then using a mesh membrane then dot and dab on top see photos
Not sure ours is a true representation of yours as we had concrete floors with original parquet on top
Fire place was built out to give sufficient depth for the cupboard
The house has been plastered for nearly a year now with no signs of damp
Attachments
Last edited:
DIYnot Local
Staff member
If you need to find a tradesperson to get your job done, please try our local search below, or if you are doing it yourself you can find suppliers local to you.
Select the supplier or trade you require, enter your location to begin your search.
Please select a service and enter a location to continue...
Are you a trade or supplier? You can create your listing free at DIYnot Local