bathroom floor - marine ply positioning

Joined
12 Aug 2016
Messages
4
Reaction score
0
Country
United Kingdom
Hi all

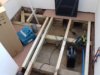
I'm putting 18mm marine ply down as a new bathroom floor, prior to tiling etc

I am thinking about how to cause least annoyance to anyone who might need to take part of the floor up in the event of a problem..and so where the ply sheets should join to best achieve this...specifically around the toilet. ..a conceased cistern unit.

Should I put down two sheets here so the floor can be removed either under the pan or under the concealed cistern? Or would one sheet under both be better?

Thanks!
 

Attachments

  • 20160812_193446.jpg
    20160812_193446.jpg
    98.6 KB · Views: 267
Last edited:
Sponsored Links
You will need to cut and screw down lengthwise ply sheets across (from left to right of the photo) the joists.
Joists are usually on 400mm centres.
You dont lay sub-floor on the basis of maybe you will later lift it here and there - you get the maximum coverage from each ply sheet.
Typically, you would use 22mm or 25mm CDX ply - marine ply is not necessary. But I dont know your FFL tile arrangements.

The first and last joists should be a few mm's of the walls to give the ply edge support.
The joists appear to be 3" x 2" - am I right or wrong?
The copper piping needs clipping to the plates its crossing - dont allow the cu pipes to touch.

Does the sub-area have adequate through ventilation?
For further questions about your concealed cistern & WC etc. a diagram showing the location of fixtures would help?
 
Hi Vine. ..thanks for the detailed response. OK so full sheets screwed down lengthwise across joists....will donly

The joists are as you said on 400 mm centres

I'm using marine ply in an attempt to make it future proof..plus it let me use an 18 mm depth as the joists have been planed down to 3" x 2"....(you are right!) which is why I've added an extra sleeper wall acroso the middle of the room. All of this height reduction is to allow me to Tile the room and keep the floor level with the hallway

Good idea to clip the pipes I forgot completely about this..

There is good ventilation yes.

I will add a diagram to this post later as am doing it from phone :)

Many thanks again
RT
 
Sponsored Links
I've been re-doing mine in hardwood-faced WBP, sealing the edges and faces. I hate chipboard.

A builder may have no thought to the future, but as a householder, I do. I can't carry 8x4 sheets so mine are cut down to 4x4, and where I have to cut down to fit, I'm doing it round the edges or to avoid having a join under a fitting. I'm marking the position of pipes and cables and using CSK stainless screws, so if necessary, it will not be too arduous to take a panel up. By staggering the joints, I have ended up with the WC on one piece and the basin on another, and the vertical plumbing duct on another.

The old floor had to be taken up a couple of times for a new suite and access to pipes and to run new cabling when a new boiler was fitted in the kitchen beneath, and was in quite a poor state (especially as it was chipboard). I am quite content that if necessary the new one can come up in panels with very little difficulty or damage. It is quieter and more rigid than chipboard and will resist any errant water.
 

DIYnot Local

Staff member

If you need to find a tradesperson to get your job done, please try our local search below, or if you are doing it yourself you can find suppliers local to you.

Select the supplier or trade you require, enter your location to begin your search.


Are you a trade or supplier? You can create your listing free at DIYnot Local

 
Back
Top