Best way to attach my skirting boards?

Joined
24 Jun 2012
Messages
5
Reaction score
0
Location
Glasgow
Country
United Kingdom
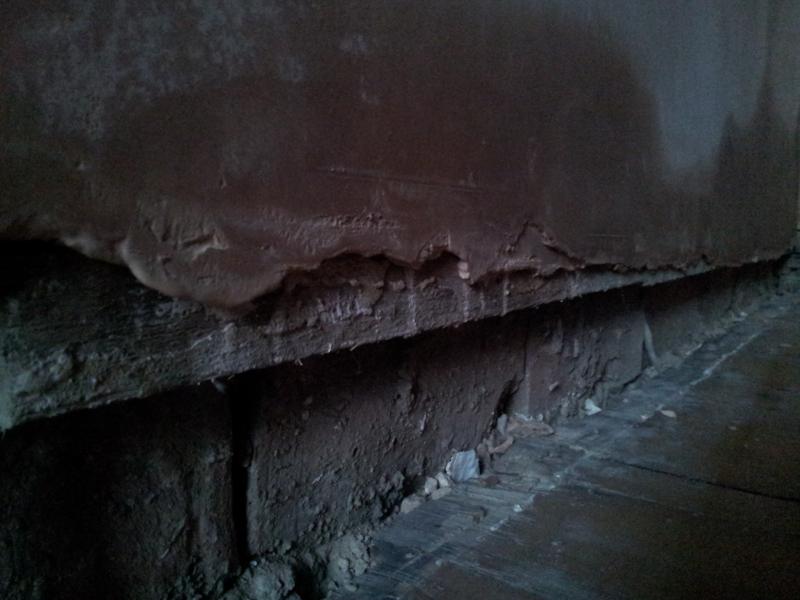
Hi, I removed my old skirting boards that were attached to battens that were more or less level with the plaster. I then had my walls replastered which has resulted in the plaster sticking out further than the battens (to varying amounts around the room).

I am now trying to work out what would be the best way to attach my new skirting boards. There is plenty of room between the floor and the existing batten, so I could attach a new batten to the brick and screw the skirting to this, but I am not sure of the best way to get the batten to match the level of the plaster all the way round the room? What would be the best thing to use to provide varying spacers depending on the depth required? Or would it be sufficient to just not screw the batten flush to the brick (i.e. leave a gap between the batten and the brick wall using the thread of the screw to hold it at the desired distance).

Or is there another technique that I am not thinking about here that I could use?
 
Sponsored Links
Can you post a picture, that way we can understand exactly what your trying to do

what size skirting are you using, does the plaster come part way down the skirting board.
 
Blimey your house must have been a posh one at some time it sounds like your down to the timber grounds they were used to level the plaster on a pukka job,then the carpenters would fix the skirting to them pity, the plasterer couldn't reuse them,if the gap is big fill the gap with render or other,fix skirting through plaster into bricks
 

That is an example of what the walls look like now. The plaster comes down to the wooden batten but overlaps it in places and the depth of the plastered wall varies around the room. Below the wooden batten is the bare brick.

I have done some measurements now too and the wood is about 4 inches above the floor and an inch wide.

In one corner of the room there is a hole that could not be plastered because there was nothing behind it to plaster onto at the base of the wall. This hole extends about 8 inches above the floor, so I was planning on getting 8 inch skirting boards. This would also put the wood pretty much right in the middle of the skirting.
 
Sponsored Links
If there is a hole its probably best to fill it in using a bit of brick and cement to stop any moisture or cold air entering the room from the cavity. As said above though if you want a solid fixing its might be best to fill in the void.

If you still want to avoid the filling then looking at it if your using a 8" skirting then correct me if im wrong but there looks to be 2" or so at the top of the skirt that would be in contact with the plaster therefore an easy alternative would be to use gripfill and glue the top part against the plaster where you can and then bang in some good nails to hold is firm while it sets.

personally though I would fill the void in then you can rest assured that its not going to cause problems in the future. Apart from that it will probably work out cheaper for you to fill the void with cement than it would to buy 8" skirts, timber isnt cheap these days.
 
I would rip a strip of ply to fill void screwed in place then you should have plenty of timber with the upper baton to pin your skirting too plus adhesive.
 
trouble is with only fixing at the top, is that if the bottom got knocked, it would go in at the bottom, like when the carpets are fitted.

i would pack it out with some timber, even if its noggins every meter or so.
 
Your plasterer has cocked up as the battens were put on originally for him to follow and create a straight edge. ie the plaster should have finished flush with the batten and when you attach the skirting to the battens and plugs which the battens are fixed to you will have a straight skirting board
The only thing you can do now is attach your new skirtings onto the existing battens , just try and locate the plugs holding the battens and fix the new skirting at these points.
Unfortunately there will be some gaps at the top between the skirting and plaster and you will have to make these good with some filler.
What you really should have done was to fix the skirtings first and the plaster could have plastered to the new skirting line.
 
Assuming that the battens are straight and the plaster is skim thickness can you not fix 3 mm ply to the battens.
 
Any hole above normal skirting level should be filled in with cement or if it is really large concrete and then plastered over.

After that I would recommend getting a bag of hardwall or browning plaster and just filling it in all around the room down to floorboard level. Will go a long way to improving the air tightness of the room aka making it less drafty.

Then when fixing the skirting I would also recommend using some solvent free grip filling building adhesive aka No More Nails of the like in addition to screws/nails. I find that it more or less eliminates any movement of the skirting board thus eliminating any cracking along the top. The adhesive will also help with any unevenness and minor padding out as well. To fix the skirting I use Screwfix's No Nonsense solvent free grip adhesive, with No More Nails interior to fill any gaps along the top.

I prefer screwing the skirting to the wall, and have become a big fan of masonry screws on brick/block walls. They really pull the skirting tight to the wall along the whole length including any unevenness and won't loosen in the same way as nails over time. I find once you pull skirting off the battens get loosened and are useless for nailing into unless lots of remedial work is carried out anyway.
 
If I can simplify this the battens are not for fixing the skirting boards, they were originally put on so that the plasterers had a straight line to follow for the backing coat.
The skirtings were then fixed using the timber plugs at the same points where the battens were attached.
Then the final skim coat was applied.
In other words your fixing points are already there, to fix using any other method is just creating unnecessary work.

Not in my house, the skirting is most definitely attached to the battens as well as the plugs.

However the point I was making is that when you take the skirting off at least some of the battens and the plugs become loose at which point some other fixing method is warranted. I personally feel that the combination of a building adhesive and masonry screws is an unbeatable combination if you are going to paint the skirting in terms of robustness of the finished product.
 
I think there wont be much guts left in wooden plugs that are probably over 100 years old and its unlikely anyone is going to use 3" cut nails to fix the skirting anyway so its about using the options that are left screws and plugs or as jabazzard said masonary screws
 
jabuzzard said
Not in my house, the skirting is most definitely attached to the battens as well as the plugs.

I would be very surprised as the battens are only 12mm max thickness, if the plugs are loose just remove the old ones and insert new ones then refix battens.
It may be the oldest method but it is still the best if you are fixing deep skirtings.
On the other hand if you are talking 75mm 100mm pencil round then I suppose you could get away with adhesive if you want a bodged job
 

DIYnot Local

Staff member

If you need to find a tradesperson to get your job done, please try our local search below, or if you are doing it yourself you can find suppliers local to you.

Select the supplier or trade you require, enter your location to begin your search.


Are you a trade or supplier? You can create your listing free at DIYnot Local

 
Sponsored Links
Back
Top