Botched bathroom installation ?

Joined
23 Jun 2024
Messages
22
Reaction score
0
Country
United Kingdom
Hi folks,

I have wandered into a new to be bathroom after the tiler left for the day and noticed some questionable tiling.

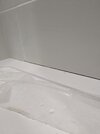
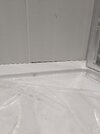
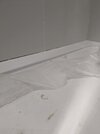
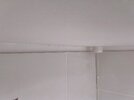
Have a better look I see the shower tray gap - is it too thin for silicone? Cut tiles above tray.

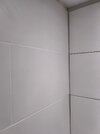
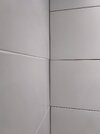
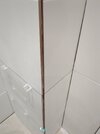
Grouting in the corner join of shower

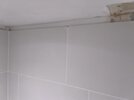
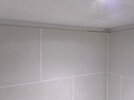
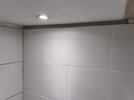
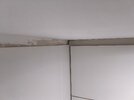
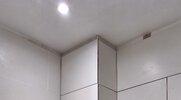
The gap (inch) were the ceiling meets - is there a remedy to be suggested for this?

Any ideas appreciated.
Thank you.
 

Attachments

  • image.jpg
    image.jpg
    70 KB · Views: 31
  • PXL_20261022_144125161.jpg
    PXL_20261022_144125161.jpg
    143.5 KB · Views: 29
  • PXL_20261022_144210904.jpg
    PXL_20261022_144210904.jpg
    169.1 KB · Views: 27
  • PXL_20261022_144137677.jpg
    PXL_20261022_144137677.jpg
    158 KB · Views: 29
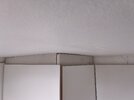
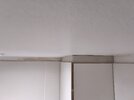
I wouldn't worry about the shower tray line, but the boxing (pic 1) looks out of alignment at the vertex - maybe it's a trick on the image. You should ask what he's planning to do at the top.
 
First the bad news :- The gap around the top is entirely due to pp layout planning; he should have taken 75 mm off that bottom row to give 100mm around the top. There’s no fix that will look good imho. The worst looking option is to tile it. The second worst will be a pvc strip ( which is when you’ll find out how level your ceiling is). Depending on how well ventilated your bathroom is ( extra fan ?) you might consider puting up a cornice……..
The good news is I wouldn’t worry about the bottom row cuts, assuming the tray was was siliconed along the outside edges of the two contact walls before being shoved in.
But that box ( stack ? ) does look badly misaligned - and I don’t see any trim in it ?
 
The pipe boxing is square although tiling less so. Your eyes are not playing tricks. Just took these now.

I can deal with slightly funky tiling in places.

Can you suggest a remedy?

Ie Fit some backerboard/drywall and cut tiles in to fit?
Fit bathroom ceiling ladding and Fit coving and be done with it?
 

Attachments

  • 20261024_125740.jpg
    20261024_125740.jpg
    107.6 KB · Views: 18
  • 20261024_125748.jpg
    20261024_125748.jpg
    118.3 KB · Views: 18
  • 20261024_125752.jpg
    20261024_125752.jpg
    160 KB · Views: 19
  • 20261024_125822.jpg
    20261024_125822.jpg
    141.9 KB · Views: 19
  • 20261024_125818.jpg
    20261024_125818.jpg
    123.3 KB · Views: 20
  • 20261024_125809.jpg
    20261024_125809.jpg
    112.4 KB · Views: 19
  • 20261024_125831.jpg
    20261024_125831.jpg
    179 KB · Views: 19
  • 20261024_125900.jpg
    20261024_125900.jpg
    164.4 KB · Views: 19
  • 20261024_125939.jpg
    20261024_125939.jpg
    191.5 KB · Views: 18
First the bad news :- The gap around the top is entirely due to pp layout planning; he should have taken 75 mm off that bottom row to give 100mm around the top. There’s no fix that will look good imho. The worst looking option is to tile it. The second worst will be a pvc strip ( which is when you’ll find out how level your ceiling is). Depending on how well ventilated your bathroom is ( extra fan ?) you might consider puting up a cornice……..
The good news is I wouldn’t worry about the bottom row cuts, assuming the tray was was siliconed along the outside edges of the two contact walls before being shoved in.
But that box ( stack ? ) does look badly misaligned - and I don’t see any trim in it ?
Hi SS,

Thanks for commenting on the dreadfullness.

I dont have the stomach to fight with a tradesman at the minute and not the finances to start over. I get it's s**t. I have asked him to stop. A bit embarrassed about getting someone else in to fix retrospectively.

There is no trim on either corner.

The room is 3mx3m-is and there is an extractor fan and a separate wall vent hole - I cannot be certain about the tray being siliconed when fitted - best if I assume it was not.

Am I best to have shower enclosure and tray removed and put back in or can the gap be siliconised, cleaned up and a shower sealant strip put over. Look awful I know.
 
Interesting idea ... Concerns about moisture from a shower though.

On the flip side - glad I turned up before floor tiles were started ... Lord knows how that would turn out ‍
 
I could add an option4, though not cheap and a bit of work in it :- CLS batten the roof, run in a new ring of lighting, then put in a new ceiling with new lights.
And don’t let him anywhere near the floor !
 
First the bad news :- The gap around the top is entirely due to pp layout planning; he should have taken 75 mm off that bottom row to give 100mm around the top. There’s no fix that will look good imho. The worst looking option is to tile it. The second worst will be a pvc strip ( which is when you’ll find out how level your ceiling is). Depending on how well ventilated your bathroom is ( extra fan ?) you might consider puting up a cornice……..
The good news is I wouldn’t worry about the bottom row cuts, assuming the tray was was siliconed along the outside edges of the two contact walls before being shoved in.
But that box ( stack ? ) does look badly misaligned - and I don’t see any trim in it ?
Just noticed there is a magnetic tile down below which leads to the pipework in the boxing in. I'm guessing that's a reason for no trim - maybe.

Can you suggest a solution for that or a type of trim?
 

Attachments

  • 17928537346835637000244149420314.jpg
    17928537346835637000244149420314.jpg
    134.3 KB · Views: 10
as the trim has to go behind the tiles, I would remove the entire column of the ‘narrower’ tile and re-do with a trim put in. This still allows the magnetic tile to be remove. ( though I wouldn’t have put one in - I’d have tiled in a white plastic hinged access pane )
 
as the trim has to go behind the tiles, I would remove the entire column of the ‘narrower’ tile and re-do with a trim put in. This still allows the magnetic tile to be remove. ( though I wouldn’t have put one in - I’d have tiled in a white plastic hinged access pane )
I somehow knew you were going to suggest that on both. Ha there's not enough room for a hinged door one as there's a WC close by. Maybe a custom sized one is available.
 
As for the top I'd just go with tiles, without removing and redoing all of the tiling the unlevel grout lines and narrow strip can't be overcome but once everything's grouted up it'll be less noticeable.
 
I have zoomed in on the images- my laptop screen has a 2k resolution. I cannot see any evidence of SBR or similar on the plasterboard boxing.

I hope he didn't just tile over the paper face on the plasterboard.
 

If you need to find a tradesperson to get your job done, please try our local search below, or if you are doing it yourself you can find suppliers local to you.

Select the supplier or trade you require, enter your location to begin your search.


Are you a trade or supplier? You can create your listing free at DIYnot Local

 
Back
Top