Can someone tell me how to fit these lights?

  • Thread starter attractivebrunette
  • Start date
I DO understand the concept of daisy chaining! But there isn't just one type of daisy-chaining when it comes to electrics just like there isn't just one junction box. That's why I've come on here to ask for help!

It seems I don't understand what I'm doing because people are deliberately being vague in their replies, so when I ask questions about their responses they seem like stupid questions.

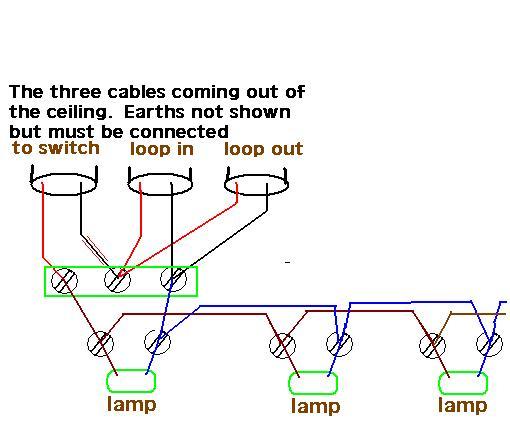
Could someone PLEASE just clearly tell me how to connect down lights in sequence! Stop telling me I'll cause a fire, stop telling me to take the whole ceiling down, stop asking me which room this is, stop telling me to "stop phaffing about", stop saying "YOU'VE BEEN TOLD ALREADY!" just give me the advice I've asked for!

I will then decide for myself, on the basis of how difficult the job is, whether to get an electrician in!
 
Sponsored Links
Surely there must be an adult on here who is knows how to fit down lights in sequence and is intelligent enough to provide a few simple steps how to do it.

Yes there are. I am over sixty and have some experience of picking up the pieces, sometimes badly charred, when things have not been done properly. A friend has seen one or two people charred or dead as result of building alterations that appeared to pose no risk to anyone.

One event some years back. People living in a flat noticed their cat was favouring one spot in the hall to sleep. They found it was warm even when the heating was off. People in the flat below had fitted lights in their ceiling. The under side of the floor boards above the lamps were charred.

Cost them a lot of money as they had to first pay the repair bill, then were given notice as they had broken the terms of the lease and then had to pay compensation to the people for all the disruption caused.

You say you have had it checked and its fine. Who checked it ? Local council building inspector. Or a salesman in a local DIY shop ?
 
Yet again, could someone please tell me how to connect down lights in sequence.
 
hello,

i have a pain in my abdomen, i think it may be Appendicitis.

I don't want any stupid derogatory answers about 'go see a doctor' and the like, they are not helpful to me as i have decided i am competent to do this myself.
After all, i managed to carve a slightly under-cooked chicken once without coming to any harm and i have a selection of sharp knives at my disposal.

Also, I personally think doctors are overpaid jumped-up premadonnas who sneer at me.
Just give me the answer i want to hear, no matter how dangerous the so-called 'professionals' believe my actions to be.

Just answer the question the way that i want it answered!!!

:rolleyes:

oh, and another thing, whats the point of this???


Sponsored Links
Why are you asking me questions about junction boxes? Are you not the expert?
 
What you do is this;

Re-route the existing ceiling wiring to a new spot position. Any one, as long as the cables can reach without extending them.

From this point, run a 1.0 or 1.5 mm2 twin and earth cable to the next light.

Then from here run a cable to the next light.

And so on.

The last light will have one cable.
4 lights will have two cables.
The first light will have the original cables, plus one new cable.

Use small junction boxes with cable clamps at the last five lights.
Use a large junction box as shown in one of the very recent posts. That will accomodate all the cables.

Use earth sleeving on all bare earth wires. Connect all earth wires, do not cut any out.

Observe how the current wiring is wired. Do not change how it is wired to how you think it should be wired. Just use an enclosed junction box.

If any of the old cables are not long enough, you could join in a junction box near a downlighter, so it is accessible.

Leave a bit of slack cable at each downlighter, but keep it away from the downlighter.

Where joists are in the way, if you cannot get over them, cut a strip of the ceiling out and drill through the joists. Then replace with a strip of plasterboard.

Are you certain you are not breaking any fire barriers?
 
Based on the three cables from the ceiling being a standard configuration

Loop in brings live and neutral to the rose. loop out takes them to the next rose. " to switch " is the cable that goes to the switch on the wall. it should have a red sleeve on the black lead.

My deliberate mistake in my hurry to satisfy was I have reversed the colours in the switch cable.

Earths are not shown...... theymust be sleeved in green / yellow and connected to the earth terminals ( if no terminal then use a third terminal block )


Get your upstairs neighbours a fire extinguisher for Christmas[/img]
 
That is not a junction box in the picture of your old wiring, that is a connector block. Not suitable because it is not enclosed.

I have suggested using junction boxes on most of these lights because it is difficult to connect two cables into a standard 230 v downlighter.

If in doubt, leave it to an electrician.
 
Hi Sparkwright, thanks for that. At least there's someone on here who has common sense! A few questions:

Why must the ceiling wiring be re-routed to a new position?

When I run the TE to the first junction box, can you tell me exactly what junction box I need? I assume the TE goes in one end of the box and terminates in a bloc inside the junction box, but the TE 'continues' to the next junction box via another length of TE?

Meanwhile, the fly leads from the lamp also connect into the same junction box? Do the fly leads need to be any way around? Is one live and one neutral?
 
If you are for real the time you have spent asking questions and trying to make yourself believe that you are competent should have been spent employing the services of an electrician.

It is for your own good that I'm not going to give any advice I see too many near disasters; severely charred ceilings; burnt out wiring and poor installs where people think it's as simple as daisy chaining.

I expect to see you on the building forum asking about replastering your ceiling next after you've filled it full of holes - as we all know that's simple - just mix it up in a bucket and slop it on.

Have you thought about testing it afterwards to make sure its safe?

Good luck - you and your neighbours will need it.
 
most of your questions have already been answered many times over

You need to reroute the original cable because it will be near a wooden beam. Just make sure your lights are at least 100mm away either side from the beams. THEY GET HOT
 
You keep asking about how to connect the three original wires. I answered that question HOURS and HOURS ago
What about the 3 mains cables already there...how do connect those to the first lamp?
Its in the WIKI see here //www.diynot.com/forums/viewtopic.php?t=37582&start=0&postdays=0&postorder=asc&highlight=

Item 1.

If you can't be bothered to look at replies then nobody can help you.

Can I ask you a quick question (no offence):
Are you, in any way, related to a troll?
 
Why must the ceiling wiring be re-routed to a new position?
Because that'll make the connection more accessible if it's near a downlight - no point shoving it back up in the middle of your ceiling, never to be seen/located again.

When I run the TE to the first junction box, can you tell me exactly what junction box I need?
One of these:

I assume the TE goes in one end of the box and terminates in a bloc inside the junction box, but the TE 'continues' to the next junction box via another length of TE?
No, the fly leads go into the black box supplied with the fitting, then run some flex to a junction box at each of your 6 downlights, like these with some 20A choc block inside them:
p1989710_l.jpg


Connect the 2x T&E at the other end of the box to daisy chain the lights.

Meanwhile, the fly leads from the lamp also connect into the same junction box?
No, as above, use a choc box at each fitting into some flex and then into the black connection block supplied with the fitting. The flying leads go into the black box

Do the fly leads need to be any way around? Is one live and one neutral?
It usually doesn't matter if they're not labelled, just make sure all your connections to flex/junction boxes etc are correct.
 
You do not seem to understand what has been said before. Please take some deep breaths and pay attention:=

102000_101492_28534_97163211_thumb.jpg


The grouped cables above need to be placed inside a contained junction box.

The LNE cables at the bottom go to the 1st light position.

At that position you will end up with 1 x cable from the junction box (mentioned above), 1 cable going to the 2nd light position and the tails for the lamp itself (they terminate either way on L and N).

The rubbish little terminal blocks that come with the lamps are hard work.

So for each lamp get a junction box and wire LNE from previous lamp, LNE to next lamp and the tails for the lamp itself.

TLCT100C.JPG


With this type you'd have the tails on the plug side and the in / out cabling on the socket side. Advantage is being able to unplug them.

ASJ501X.JPG


A fixed wiring type junction the top cord flex cable would be replaced with the tail for the light fitting.


Remember each lamp position would need 1 x junction, each lamp position (accept the final lamp) would have 1 x in and 1 x out cable feed.

here's the suppliers link I borrowed the pictures from

http://www.tlc-direct.co.uk/Main_Index/Lighting_Menu_Index/Junction_Boxes/index.html


Now please consider the fact that you will be breaking the 'fire barrier' between the floors and that fire / heat rises. Your lamps are not fire rated and will invalidate your building insurance if there was a tragic event.

Hence why people have mentioned fire caps- which require the ceiling to be pulled down in areas.

here's a fire cap

TLALC724.JPG


What I would suggest you do is dump the fittings you intend to sue, sell them on fleabay and buy some fire rated ones

http://www.tlc-direct.co.uk/Main_In...hts_Index/Fire_Rated_Downlights_Gu/index.html


FRDG10W.JPG


As you can see the metal body seals the lamp, thus they get 1 hr fire rating.

The junction boxes are better on these fittings so you will easily be able to get 2 x cable + tails in them.


Hopefully you now understand, please post (nicely) and other questions.

The "THANKS" button should be used to show when posts have been helpful !

:D
 
You do not seem to understand what has been said before. Please take some deep breaths and pay attention:=

102000_101492_28534_97163211_thumb.jpg


The grouped cables above need to be placed inside a contained junction box.

The LNE cables at the bottom go to the 1st light position.

At that position you will end up with 1 x cable from the junction box (mentioned above), 1 cable going to the 2nd light position and the tails for the lamp itself (they terminate either way on L and N).

The rubbish little terminal blocks that come with the lamps are hard work.

So for each lamp get a junction box and wire LNE from previous lamp, LNE to next lamp and the tails for the lamp itself.

TLCT100C.JPG


With this type you'd have the tails on the plug side and the in / out cabling on the socket side. Advantage is being able to unplug them.

ASJ501X.JPG


A fixed wiring type junction the top cord flex cable would be replaced with the tail for the light fitting.


Remember each lamp position would need 1 x junction, each lamp position (accept the final lamp) would have 1 x in and 1 x out cable feed.

here's the suppliers link I borrowed the pictures from

http://www.tlc-direct.co.uk/Main_Index/Lighting_Menu_Index/Junction_Boxes/index.html


Now please consider the fact that you will be breaking the 'fire barrier' between the floors and that fire / heat rises. Your lamps are not fire rated and will invalidate your building insurance if there was a tragic event.

Hence why people have mentioned fire caps- which require the ceiling to be pulled down in areas.

here's a fire cap

TLALC724.JPG


What I would suggest you do is dump the fittings you intend to use, sell them on fleabay and buy some fire rated ones

http://www.tlc-direct.co.uk/Main_In...hts_Index/Fire_Rated_Downlights_Gu/index.html


FRDG10W.JPG


As you can see the metal body seals the lamp, thus they get 1 hr fire rating.

The junction boxes are better on these fittings so you will easily be able to get 2 x cable + tails in them.


Hopefully you now understand, please post (nicely) and other questions.

The "THANKS" button should be used to show when posts have been helpful !

:D
 

DIYnot Local

Staff member

If you need to find a tradesperson to get your job done, please try our local search below, or if you are doing it yourself you can find suppliers local to you.

Select the supplier or trade you require, enter your location to begin your search.


Are you a trade or supplier? You can create your listing free at DIYnot Local

 
Sponsored Links
Back
Top