Can this be cut flat.

Joined
5 Jan 2016
Messages
233
Reaction score
8
Country
United Kingdom
Hi guys

Doing some finishing bits to my stair case before plastering. Planning on oak chamfered posts with stainless top rail and a oak base rail. The oak will be painted white. Trying to avoid pine. Got a couple questions just to keep me on track.

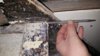
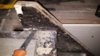
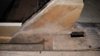
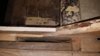
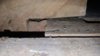
So there used to be a wall that has been took down. This has left the top corner of the stair case. I cant see how it adds any strength or alike to the stairs. Ideally this needs to be cut flat level to the floor, so i can put a baserail down. If i leave it, the newel post wil end up next to it and think it will look pants.

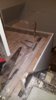
The plasterboard will be trimmed down and i was going to put a floor strip plate down on top of floor boards that the base rail will sit on. This would higher the base rail to allow for underlay and carpet and give a better edge on the stair side of the frame. Hopefully thats a decent idea?

The end newel post will be half notched into the floor joist below floorboards.


Oh and ignore the pipes! They are to be removed!

Pictures added
 

Attachments

  • 20190201_210647-2656x1494.jpg
    20190201_210647-2656x1494.jpg
    297.4 KB · Views: 252
  • 20190201_194108-1494x2656.jpg
    20190201_194108-1494x2656.jpg
    229.3 KB · Views: 273
  • 20190201_200903-2656x1494.jpg
    20190201_200903-2656x1494.jpg
    281 KB · Views: 257
Sponsored Links
It looks like a screw that has been covered by a plug is in direct line of your proposed cut?
If I was cutting, I would fit a couple of replacement screws first, then remove/cut the excess

With the newel, consider adding some noggings to help make the newel secure as people put a bit of weight on it at that point and there's is a lot of leverage
 
That triangular bit sits atop a joist and by rights should be fixed to it somehow. It actually looks as though they've fixed the stringer into a trimmer which runs parallel to the stairs (screw head beneath the plug) beneath the planked floor. The triangular bit transfers load from the stair stringer into the joist. Yes, it can be removed, but before doing that, or removing that old plug and screw, I'd put three or four bloody big screws through the stringer and into the trimmer behind it . Make sure that they are far enough down from the proposed to not to pull-out when the stairs are under load. In saying this I am making an assumption that the trimmer is man enough for the job (i.e. it's the same cross section as the joists, and ideally doubled-up) and that it is supported in the corner by a decent sized post. If it's just a bit of 3 x 2 CLS under that floor edge it will need beefing-up or replacing
 
Thanks for the replys guys. I will take another look today see if its pinned but i dont remember seeing anything.

I know that top bit for the most part is not sitting on the floor thats why i took the picture of the knife under it. Theres a 3mm gap but it does rest by the bullnose of the step edge. If it could be a risky move i could pin it to the newel. Granted ididnt want to but it wouldnt be the end of the world.

I will take a deeper look today post some more pics.

As for the newel post at the end, i planned to notch about 30mm out of it, sit it over the joist, pin it the put some steel 3mm angle iron either side of the newel against the flor joist. I could batten it to the next floor joist also if this is what you mean?

The outside corner newel is a diferent story. This is going to have to sit on top of the floor. I have seen many different ones you can use but not sure. Could someone reccomend?
 
Sponsored Links
Theres a 3mm gap but it does rest by the bullnose of the step edge.
The way stairs are made the top bullnose is a stub tread and is generally only a few inches deep. It has no real strength and shouldn't be used as the sole means to secure stairs. When you install stairs it is necessary to notch out the underside of the stringers so that you can manhandle the stairs into position, resting the underside of the cut-out on top of the joist/trimmer. On a closed riser stair the bottom step is often fixed to a block on the floor at the back. There may also be additional fixings put through the stringers (on the underside) into the walls on one or ideally both sides. In older houses these are often really big cut nails going into timber plugs or wedges in the mortar on the masonry side(s). Even thin matchboarding (commonly found in terraced houses in the Victorian and Edwardian periods) when nailed to the stringer becomes semi-load bearing over time and can cause issues if removed without first taking step to properly secure the stairs.

So whilst there is a gap under that notch now, it was probably caused by shrinkage and settlement over time and would sort of indicate that the stairs were originally well fixed/supported (although that plug might be an afterthought as these fixings were often done out of sight on the under side of the stringers). I would expect there to have been some fixings into the studs on the RH side of the stairs where the wall appears to have been removed. So if you take out that top screw and then cut away the top piece without previously fixing the stairs properly to something else that can carry the weight at that point you may find that if it is subsequently is overloaded (say, for example, by a removal man dropping a heavy divan corner first onto the top step) that the staircase could potentially fail. At the very least I'd expect an inadequately fixed staircase to start creaking over time as the wedges and glue blocks are subjected to unbalanced loading. What is important is that the stairs are adequately fixed top and bottom to circumvent any potential issues

I'm not saying don't do it. I am saying make sure that you get adequate fixings in before you take a saw to it
 
Last edited by a moderator:
Thanks for that. Fully agreed no cutting will be done without being sure. Heres some more pics.

Theres definitly no nails. The only nail i can see is pinned into the top edge of the bull nose on the top step edge. Sorry dont know correct terms.

The wall was put up by council at some point it was not original to the house. I took it down and it wasnt fixed in place. It is ex-council build.
 

Attachments

  • 20190202_113901-2656x1494.jpg
    20190202_113901-2656x1494.jpg
    232.5 KB · Views: 227
  • 20190202_113913-2656x1494.jpg
    20190202_113913-2656x1494.jpg
    239.7 KB · Views: 256
  • 20190202_113931-2656x1494.jpg
    20190202_113931-2656x1494.jpg
    162.8 KB · Views: 228
I would add loads of packing in any void before screwing through but ensure that you are actually screwing into the floor joists not just packing.
Newel wise, imagine what the forces will do when going up and down, holding the bannister. Fit some kind of noggin to stop the bottom moving with leverage. The corner newel could have a hole made in the bottom that locates a dowel to locate in the joists .
 

DIYnot Local

Staff member

If you need to find a tradesperson to get your job done, please try our local search below, or if you are doing it yourself you can find suppliers local to you.

Select the supplier or trade you require, enter your location to begin your search.


Are you a trade or supplier? You can create your listing free at DIYnot Local

 
Back
Top