CH only comes on with HW - it has always been like this!

Joined
3 Jan 2010
Messages
30
Reaction score
0
Location
Staffordshire
Country
United Kingdom
Wallstar Oil Boiler located in kitchen
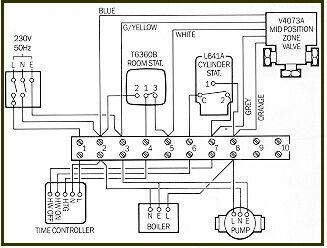
Honeywell V4073A 3 port mid pos Valve
Grundfos pump under 3 port valve.
Honeywell ST6400C programmer
Honeywell L641A cylinder stat
No room stat

I've never been able to turn on CH without HW, boiler only fires up when HW is turned on at same time, nothing happens when CH is called for (except red light on programmer comes on). I think it may be the fact that no room stat was installed or the programmer has not been wired correctly.

The 3 port valve seems to be moving freely (can move by hand) and I can here it move when I turn up/down cylinder stat.

I think it should be standard Y plan but the programmer only has L.N, E and connections 3 & 4 wired (CH & HW on). Also hot water is boiling hot even with cylinder stat turned down to 50.

Any ideas?
 
Sponsored Links
I suspect that the system may have originally been gravity hot water with pumped central heating, and was wired so that the hot water switched on the boiler and the central heating started the pump.

For a 'Y' plan you should have a connection to the 'hot water off' wire on the programmer, it's this wire that allows the boiler to fire when the hot water isn't switched on by the programmer.

The cylinder thermostat should also have 3 connections so that a live is switched on to the grey wire when the hot water is up to temperature, this allows the motorised valve to wind to the central heating position only position where a microswitch is triggered that keeps the boiler going.

It's difficult for me to diagnose any further without a complete wiring diagram of what you have installed presently.

If you check what you have against this diagram it should help you. If you have a pump overrun, the pump will be connected to pump terminals on the boiler, rather than as shown.

Also as you don't have a room thermostat, the white wire of the motorised valve should be connected to the central heating 'on' at the programmer (terminal 4 on the terminal strip)

 
Thanks for the reply stem.

OK checked the wiring and it follows the diagram exactly - but with the following exceptions:

Loop between 4 & 5. (valve white on 5 as diagram) - I guess because no room stat?

Boiler
As per diagram but has two extra black wires which go to terms 9 & 10
9 is loop connected to 1 (L).
10 going nowhere.

Programmer
no HW OFF
 
Cylinder stat
L - 6 (HW On)
E - 7 (grey on valve)
N - 8 (Live for pump and orange on valve?)
Sounds OK except for the bad practice of using an earth wire for a live. With hot water selected 'on' at the programmer, the connection to the grey wire should be live when the hot water cylinder is up to its set temperature, and connection to orange live when the water cylinder is calling for heat.

Loop between 4 & 5. (valve white on 5 as diagram) - I guess because no room stat?
That would be my conclusion

Boiler
As per diagram but has two extra black wires which go to terms 9 & 10
9 is loop connected to 1 (L).
10 going nowhere.
Hmm...really need to find where the black wires go, or at least the one connected to to 1 (L) probably nothing to do with this, but just to eliminate them from the enquiries. I don't really know. If it's something to do with an oil boiler, I wouldn't know as I'm not familar with them. Have you ever had a level probe in the oil tank maybe to inhibit the boiler if the level drops too low? or is there a frost stat somewhere?

Programmer
no HW OFF
That'll likely be your problem then.
 
Sponsored Links
Thanks again, called Honeywell and you're spot on, no HW OFF to grey/valve means it will never work, so looks like I will have to run a new cable from wiring centre to programmer!

thanks for your help.
 
One final question, Am I OK running a two core + earth flex and using that for the extra HW Off wire? and leaving exsiting 5 core in situ?
 
Yes, connect the earth to the earth terminals at each end and put the unused core in a screw connector to keep it isolated.
 
Yes, you need to keep the link until you add the thermostat.

When you do add it, looking at your link to the instructions, if they mean by "Permanent live" live 24/7 (possibly it is to maintain the radio contact between transmitter & receiver) you will need to connect L&N at the thermostat receiver to terminals 1&2 (Terminal 1 stays live even when the programmer is set to CH off) Remove the link between terminals 4&5, then connect terminal 4 to 'A' on the thermostat receiver and terminal 5 to 'B'.

Do not link 'L' & 'A' otherwise the heating will stay on 24/7 and not switch off with the programmer.

Here's a diagram, all other wires remain the same.


But you're right, the wiring instructions are vague. Strange as I'm sure 'Y' plan is probably still one of the most common installations in the UK.
 
Many Thanks Stem, you've been very helpful.

I've read other posts and may try an alternative approach which will mean I don't have to re-lay another 3 core. Here's what I'm thinking

1)Buy a wireless programmer stat that also controls CH (CM927RF).

2)Use exciting programmer for HW only and remove CH connections at either end - (In my case I will have to move the CH to HW OFF).

How does this sound to you?
 
Yes what you propose sounds OK.

Moving the CH control to somewhere else will free up a wire between the programmer and wiring centre for 'HW off', but you will still need to run a L&N to the new thermostat and it should be fed from the same fused connection unit as the rest of the system so that it can all be isolated together for maintenance.
 
OK, I'll go ahead with that plan then! The Wireless reciever will be housed next to the wiring centre so will connect into the main block there.

Many thanks :)
 

DIYnot Local

Staff member

If you need to find a tradesperson to get your job done, please try our local search below, or if you are doing it yourself you can find suppliers local to you.

Select the supplier or trade you require, enter your location to begin your search.


Are you a trade or supplier? You can create your listing free at DIYnot Local

 
Sponsored Links
Back
Top