Chipboard flooring cracking noise

Joined
14 Aug 2020
Messages
12
Reaction score
0
Country
United Kingdom
Hi to all,

I've had a renovation done on my bungalow that has all sorts of problems. Todays issue is chipboard flooring making a cracking or maybe crackling noise when walked on. Its 22mm tongue and grove flooring that has been nail gunned in as far as I can tell. The carpet has just gone in and just before that I did two things to address the issue.

Firstly I bought some Floor-Tite Tri-Lock Pozi Screw 4.2 x 55mm and screwed them down next to all the nails (if there was an improvement it was negligible).

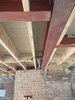
Second - The worse affected part is in the middle section of the main bedroom. The floor is supported here between two steel beams but the ceiling/floor joists haven't been notched in properly and are just sat loose in the steel with a gap of about 20mm above each joist. When talked on and looking at from the room below I could see a massive amount of bounce on the ceiling. So I cut wedges to fit each one and hammered them in and screwed at an angle to secure.

So the situation currently is that we have just moved in to the house upstairs only two days ago and the downstairs is still a shell (no insulation or plasterboard in the ceiling below). The noise is doing my head in and I really need to address it but ideally from below as the upstairs is all done.

Any and all help appreciated. Just let me know if you need any further info

Thanks

Darren
 
Sponsored Links
To install chipboard flooring properly it should be glued to the joists, the tongues should be pulled up tight and well glued, it should be screwed down at 150 to 200mm centres but NEVER nailed and the boards should have something like a 10mm gap to the walls. It's easy to get it right, but sounds like you got the guys who'd been paddling round at the shallow end of the gene pool. :censored:

You can't do much about the glue at this stage, but you can check for screw spacing and gaps to walls (the way to seal the gaps is to use something like Compraband compressed closed cell rubber).

Are there any walls fixed on top of these floors, and if so, where? If there are there is also the possibility that some of the creaking is coming from the wall sole plate where it attaches to the flooring having not been properly nailed

Also, are the end joints of the boards supported? If not, that is a source of creaking as well, especially if the joints are unglued or insufficiently glued

I terms of joists in steels there are number of approaches to take. I think one of the better ones is to drill the steel and bolt a vertical timber to it which carries the joists in steel joist hangers (with a twist nail in every hole, as per manufacturers specifications). The other way is to size the joists to be a dead fit for height to (or slightly deeper than) the steels and notch out top and bottom as required. The overall length should be a few millimetres shorter than the distance web to web of the steels, and the ends of the joists need bevel cuts to accommodate the fillets at top and bottom of the web. The tops of the joists should always be flush to the top of the steels, or just slightly above it (unless the drawings call for something different) and my own preference in that situation is to solid strut between joists near the steels and then to run a bead of silicone, rubberised adhesive, etc along the top of each steel before the sub-floor (chipboard) goes down as this reduces and possibility of knocking at that point. It takes a little bit more work, but you often end up being able to use end trim cuts from the joists to do your strutting. Wedges don't take the place of doing the job properly, so any chance if some photos from beneath so we can see what the issue is and maybe proffer a more permanent solution?

One recomendation I will make is to remove the hitching rail out in your front yard - it's attracting the wrong type of person :eek:
 
Last edited by a moderator:
Hi and thanks for the reply. There is about a 20 to 30mm gap around the edges of the floor where it goes in towards the eaves but it does get quite tight on the gable ends (few mil or even butting up to the brick in places, see pic). At the gaps towards the eaves I planned to either expanding foam or just leave them as from the upstairs they are in voids/storage space and will be insulated under before the ceiling goes in.


No walls built on the floor, its all block work built onto the steels.


By end joints, do you mean where the boards join together at the ends (600mm width) or the longer (2400mm length). In either case the answer is no though. I guess I just need to stick in a noggin and screw through the sides of the ceiling joists, or do I need to also screw up into the flooring?


With regards to strutts, they have used offcuts from the joists but only one in each run of about 2 meters between the steels (see pic). Apologies if I'm not explaining this well or missing your points as I'm not too knowledgeable on these things.


Thanks very much for your advice so far, and yes I have absolutely learnt my lesson about employing complete idiots to work on my house. I’ve attached some pics, the main issue being the floor that spans the two steels in the front of the room. The floor that goes from steel to the wall doesn’t seem to have much of an issue. At least nowhere near as bad as between the steels.


Thanks


IMG_20211007_074527.jpg
IMG_20211007_074548.jpg
IMG_20211007_125655.jpg
IMG_20211007_074527.jpg IMG_20211007_074548.jpg IMG_20211007_125655.jpg IMG_20211007_125731.jpg IMG_20211007_130244.jpg
 

Attachments

  • IMG_20211007_130256.jpg
    IMG_20211007_130256.jpg
    275.3 KB · Views: 75
  • IMG_20211007_130311.jpg
    IMG_20211007_130311.jpg
    232.7 KB · Views: 81

DIYnot Local

Staff member

If you need to find a tradesperson to get your job done, please try our local search below, or if you are doing it yourself you can find suppliers local to you.

Select the supplier or trade you require, enter your location to begin your search.


Are you a trade or supplier? You can create your listing free at DIYnot Local

 
Sponsored Links
Back
Top