

duplicate threads merged


Hi all,
Would love to have some advise on how to connect the Nest 3rd Gen Heatlink to my Potterton Gold Combi 33HEa.
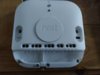
There is currently a Honeywell THR872CUK connected to the boiler which is being used with a Honeywell wall thermostat, but I would be removing the wall thermostat completely and using the Nest thermostat in its place in a different location.
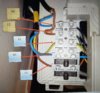
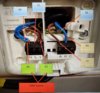
I have supplied some pictures with the current wiring as is connected at the moment to the current stat.
What wires would I need to connect to the heatlink and it what configuration as per my wiring labelling ?
If you require any further information please let me know
I would like to thank you all in advance for any help or advise offered
Last edited:

")