Connecting Nest to Ecofit pure Combi 830

Joined
2 Feb 2019
Messages
3
Reaction score
0
Country
United Kingdom
Can I check,
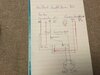
I am trying to connect the heatlink to my valliant ecofit pure 830 boiler (combi). Any ideas of how it should be connected? I have attached pictures. From what I can tell I need to connect the power cables into the highlighted red circle in the pictures.

The link needs to then also be connected to the boiler panel in the highlighted blue box in the pictures. Any idea which part needs to be connected to which input and how?

Which part on the Nest Heat link "2" and "3" should be wired up with the boiler panel?
20190202_124945.jpg
20190202_125003.jpg
20190202_125037.jpg
20190202_125054.jpg
 
Sponsored Links
Is it this Nest thermostat you are using? https://nest.com/support/images/mis...Nest-Learning-Thermostat-Install-Guide-UK.pdf
In which case, page 10 of the manual indicates you should have terminals for Neutral, Live, Common (T2) and Normally Open "Call For Heat" (T3).

Looking at the manual for your boiler series https://www.vaillant.co.uk/downloads/manuals/ecofit-pure-combi-install-manual-876620.pdf,
Page 14 shows options for two wire, 230VAC control.

I would suggest purchasing a suitable length of 5 core heat resistant flex as such https://www.toolstation.com/5-core-heat-resistant-flex-cable-3095y/p74356.
DIY places should do this by the metre.

You will need to loop the mains feed out to the thermostat, I have attached a drawing which should do the trick following the advice in the manual.
Importantly: the manual advises removing the 24V=RT red link when using a 230V control.

Wiring.png

I might be inclined to crimp pin terminals on, especially where you need to get three conductors into the terminal block for the switched live. https://www.waytekwire.com/item/30585/3M-81P-47-P-A-Pin-Terminal-22-18-AWG-/
 
Thanks Phil.
Some places have suggested the nest should be connected to the boiler control panel via connections 2 and 3. (The power cable as you have explained) they left port 1 empty and connecting 2 to the control panel on the boiler numbered 3 but obviously the eco fit doesn't have numbers.
The other question I have is which port of the "RT" do I connect to?
 
Sorry you are indeed correct it should be 2 and 3. Good spot.
I marked them up as COM and NO correctly in the drawing but used the wrong numbers. Mea culpa.

The manual indicates that you want to use the RT terminal on the main connection block where the mains comes in, as shown in your first and second picture, and connect this to the NO terminal 3 of the thermostat. The thermostat relay is then effectively just switching the live line to the RT line to fire the boiler.

You take the red link out of the white 24V=RT connection but no nothing else with it.

Does that make sense?
 
Sponsored Links
I believe you will need to use the 230V remote timer connection.

Can you see in the first picture you posted, the green connector block labelled "X1" where your mains supply comes in, also has a terminal labelled "RT".
This is the correct terminal for a 230V remote timer / thermostat.

All you need to do with the white/red 24V=RT connection is remove the red link in that one.

Following the drawing I posted up earlier, you are actually taking two wires from the "L" X1 terminal to your Nest.
One will be brown and goes from L on the boiler, to L on the nest.
One is black and goes from L on the boiler to COM (terminal 2) on the Nest.

The Grey will then go from NO (terminal 3) on the nest to the green X1 RT connector on the boiler. just underneath the earth connection.

I've corrected the terminal numbering from the original diagram and tried to lay it out in an easier to follow fashion with fewer conductors crossing over.
Have also added what the other terminal will look like in the correct state.

boiler wiring.png

Hope this helps.
 
Also, many boilers have a switched live output for the thermostat, which means when the boiler is powered off, it also powers off the thermostat receiver.

Yours does not appear to have this, I cannot see it indicated in the installer manual, looping out the mains as per my drawing will mean the thermostat receiver is still powered on when the boiler is off.

I actually think this is more desirable, the majority of problems I see with thermostat pairing are because the receiver has been powered off with the boiler and then failed to re-link afterwards.

Just bear in mind that with the wiring diagram I have provided, the boiler and thermostat receiver will always be live unless the mains fused spur is turned off and/or fuse removed.
 
The boiler has provision for 24v or 230V external controls, and the Nest Heat Link has voltage free contacts which means they can be used to switch 24v or 230V. So either way of wiring it will be fine.
 
Hi Phil, I have tried your method of connecting my Nest 3rd generation to Vaillant Ecofit Pure 835 and it didn’t work for me. The only way that I made it to work was to use the power live and neutral from the boiler connector block X1 to Nest controller connecting to live and neutral. Earth is optional.
From the Boiler terminal block X106 section of 24v where the link was removed, I connected a twin wire to the 24v output ( X106) and then run the cable to the Nest controller and connect straight to number 2 and 3 on the Nest Controller and this works for me.
Note: The live link that was originally connected from live to Nest controller port 2 is now removed and wire from 24v (X106) is connected directly to port 2 & 3 on Nest controller.
 

Attachments

  • image.jpg
    image.jpg
    400.3 KB · Views: 481
Hi,
I have an identical system as in the pictures from J. If I was to install a Nest E, I need only connect two wires from the Nest to the Boiler PCB. Namely remove the link from R and T, and wire these two terminals to the Nest E Heatlink?

My boiler presently has a VRT350f remote control thermostat, do I need to remove, disable or otherwise adjust this to always on?
 

DIYnot Local

Staff member

If you need to find a tradesperson to get your job done, please try our local search below, or if you are doing it yourself you can find suppliers local to you.

Select the supplier or trade you require, enter your location to begin your search.


Are you a trade or supplier? You can create your listing free at DIYnot Local

 
Sponsored Links
Back
Top