DIY Two Storey Extension

Joined
19 Jan 2006
Messages
315
Reaction score
65
Location
Manchester
Country
United Kingdom
Hi

I have posted plenty of posts asking for help over the last 10 months so thought I should start the build progress thread.

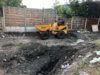
I started the site prep April 2018 and the actual dig and construction in July 2018. I'm still only up to first floor although this is kind of a weekends and evenings build due to work. Before last July i'd never laid a brick before (you might notice :LOL:), only done general DIY.

I take my proverbial hat off to anyone who attempts to build their own extension... it's a lot harder than I imagined! It takes a lot of research & reading, manual effort and determination.


The Plan

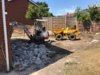
Knock down the detached garage, knock down the small single storey extension, lean-to and rebuild a two storey side extension.
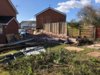

The Current House

Not a fan of the cladding, so hoping to have that removed and rendered in future, but here is my 70's box.

Screen Shot 2019-05-08 at 18.04.12.png


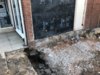
This is the side of the house... the green gate, fence, side extension and detached garage all going to come down.

IMG_5244.jpg


If you're wondering... yes that window was actually sloping! :LOL:

IMG_5240.jpg


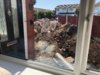
That horrible white lean-to will be going... wife has even offered to demolish it herself!

Screen Shot 2019-05-08 at 18.03.17.png
 
Sponsored Links
Demolition of the Garage

I totally underestimated how difficult and expensive the demolition was going to be. I didn't use any plant machinery, just a few basic tools; a sledgehammer, drill, reciprocating saw. The wife and kids chipped in a little to whack the smaller walls with the sledgehammer!

IMG_5636.jpg
IMG_5644.jpg


Roof off...

IMG_5647.jpg


Garage down... now just need to remove that slab!

IMG_5667.jpg


3 skips later.... :eek:

IMG_5671.jpg


The garage slab was the biggest shock, I attempted to use mini breaker to remove the slab although find it was a fully re-inforced raft up to 600mm deep.... :eek:

I ended up paying a local builder to demolish it with a mini digger, took two guys two days to break it and remove it!

IMG_5772.jpg
IMG_5769.jpg
IMG_5763.jpg
IMG_5762.jpg
 

Attachments

  • IMG_5651.jpg
    IMG_5651.jpg
    601.9 KB · Views: 348
Demolition of the Small Extension

The small extension was next. I didn't want to just rip this down with machinery, so I took it down slowly from the roof down.

IMG_5903.jpg


IMG_5906.jpg


Lintels already installed to the last extension so i just stud walled the opening and covered with protective sheeting and sealed.

IMG_5928.jpg


The old extension had obviously had problems with cracking, hence the helical bars. There was no other means of connecting the old extension to the house.

IMG_5931.jpg


The wall where the previous extension butted up to. The building inspector has said this needs opening up for a vertical DPC so i'll have to rebuild this section of wall under the lintels.

IMG_5974.jpg


IMG_5973.jpg


The last part of the demolition was to remove the old extension footings, a raft. I decided to hire the guy with the digger for this part again, so he broke up the raft and levelled the site.

IMG_6001.jpg
 

Attachments

  • IMG_6001.jpg
    IMG_6001.jpg
    549.2 KB · Views: 382
  • IMG_6006.jpg
    IMG_6006.jpg
    401.3 KB · Views: 389
  • image.png
    image.png
    2.3 MB · Views: 387
Dig the Foundations

I was going to have the foundations piled on recommendation from various sources, including the building inspector so I used the guy with a digger for this bit too. It was funny actually, because I had the guy in my phone as "Martin Diggerman" and when my son saw it he said in all seriousness... "so his name is Diggerman and that's what he does for a living too!" DOH! :ROFLMAO:

After he demolished the extension footings, he dug the trenches and cleared the site ready for the piling guys to come in.


IMG_6015.jpg


The ground was hard and awful to dig. Quite possibly an old industrial site i was told by building inspector. The trenches didn't stay nice and straight, they just collapsed around the sides.


IMG_6034.jpg


House on a raft foundation.

IMG_6010.jpg


I bet the neighbours loved us! About three loads of this went out via muck away trucks.

IMG_6006.jpg


That's me in the trenches, just doing some checks on the sizes and squareness! After the piling goes in.... time to start getting my hands dirty again. :D

JUYL8454.jpg
 

Attachments

  • IMG_6009.jpg
    IMG_6009.jpg
    566.9 KB · Views: 398
  • IMG_6013.jpg
    IMG_6013.jpg
    569.3 KB · Views: 363
  • IMG_6023.jpg
    IMG_6023.jpg
    533.2 KB · Views: 393
Sponsored Links
Start The Building

Okay, this is where I start properly now. I measured out the extension using a combination of measuring from the existing house and the 3,4,5 method to square up the extension. Once I had the exact corner locations i was able to set my gauge levels.

First of all I worked down from the existing house DPC to get my levels, allowing for the screed height specified in my building regs, the insulation height and allowing for the block and beam flooring that i would be installing.

IMG_6066.jpg


I setup bricks at each corner location and setup a gauge rod. I used a 360 degree laser level to set the height up to four brickwork courses (the height where my block and beams would sit).

Basically, the laser (not pictured) would project onto each wooden rod (each one sat on the concrete, just using the bricks to hold them upright).

Once I had the 300mm height on the laser, I could mark each rod and measure down to find out how high each corner was. I could then mark the 75mm brick courses on each rod.

IMG_6102.jpg


Using my newly create wooden gauge rod, I built my first brickwork corner! (y)

IMG_6113.jpg


After the corners were built, I could dry bond the walls.

IMG_6123.jpg


IMG_6125.jpg


I setup my brick lines, and laid the first rows.

IMG_6131.jpg


The gaps in the brickwork are where the drains will run under the extension. I have a rainwater drain and a foul drain to run under the property.

My trusty cement mixer which I bought second hand off a guy for £50.

IMG_6135.jpg
IMG_6137.jpg
IMG_6166.jpg

IMG_6224.jpg
 
Finishing the brickwork to Block & Beam Level

The brickwork nearly finished up to the block and beam level.

IMG_6243.jpg


A check with the laser level!

IMG_6245.jpg


Concrete lintels installed over the periscope vent locations and over the drain runs.

IMG_6282.jpg


IMG_6284.jpg


Internal area levelled, weed killed, tough membrane installed and gravelled over. Weed killed again.

IMG_6303.jpg
 
Block & Beam Flooring

Next came the block and beam flooring.

I drilled out the pockets in the existing house wall to sit the beam ends on, then came the tricky part; moving the beams from my driveway into place.

I moved and installed the beams by myself (not something i'd recommend). The 3600mm beams weighed 124KG each :eek: and there were 11 of them to manoeuvre into place. I used a sack truck mid centre of the each beam to balance the weight and wheeled each beam as close as possible to the extension. I then lifted and moved the end 500-1000mm a time until they were in place - hard work! I made a video of this actually, so will hope to post up soon.

IMG_6375.jpg


IMG_6376.jpg


IMG_6378.jpg


IMG_6440.jpg


IMG_6442.jpg
 
Drainage

I started to dig some of my drainage channels although this ground is impossible! After battling with this trench for three days with a mattock I decided the rest would be dug by the guy with a digger!

IMG_6342.jpg


Trench to the foul drain, just need to core drill through that concrete at invert level now! ;)

IMG_6456.jpg


More ground out, size of some of them pebbles! :LOL:

IMG_6461.jpg


Digger guy pulled this beauty out of the ground, he said "nearly broke my bucket"! :eek:

IMG_6453.jpg


Core drilling through the manhole!

IMG_6468.jpg


Installing the inspection chamber and the foul drain runs for the kitchen waste, ensuite and utility room.

IMG_6476.jpg


Rain water drain run.

IMG_6482.jpg


Foul drain through the manhole at invert level, concreted around.

IMG_6491.jpg


Drains inspected and back filled.

IMG_6517.jpg


Slowly getting to DPC level. Block and beam done, drainage installed and approved. Starting to resemble a building. (y)

IMG_6523.jpg
 
Installing the gas DPC and starting the Block work

Building control happy up to DPC so I started the block work early Jan 2019 (might even have been 1st Jan!)

First to do was grouting the block and beam floor with a wet slurry mix as per the block and beam suppliers spec. Trusty £50 cement mixer still going!

IMG_6678.jpg


Started some of the external brickwork, including the weep vents at DPC level as I needed a cavity tray due to the gas DPC spanning the width of the cavity.

IMG_6644.jpg


Struggled with the brick bond since the brickwork started. Learnt a big lesson here from a designer perspective; size the building to match the brickwork measurements! :mad: 
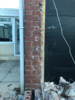
The facing bricks are longer than the engineering ones too, so that has caused me issues, not to mention some of the facing bricks can be a few mm different to each other.

IMG_6741.jpg


Gas DPC going in, corner cloaks taped. I'll tape the gas DPM to the DPC when the roof is on.

IMG_6870.jpg
IMG_6872.jpg
IMG_6895.jpg


We have baby walls! :D

IMG_6899.jpg
IMG_6911.jpg
IMG_6932.jpg
 
Brickwork coming along

The brick and block work is higher now. Not 100% happy with the bonding but hey ho!

IMG_7056.jpg
IMG_7060.jpg
IMG_7165.jpg
IMG_7309.jpg
IMG_7317.jpg
IMG_7349.jpg
IMG_7393.jpg
IMG_7421.jpg
IMG_7422.jpg
IMG_7427.jpg
 
Brickwork to Window Lintel Height

So this is pretty much up to end of April 2019. I have the brick an block work up to window lintel height. The lintels are installed, cavity trays and weep vents fitted with them.

IMG_7437.jpg
IMG_7438.jpg
IMG_7445.jpg
IMG_7486.jpg
IMG_7517.jpg
IMG_7518.jpg
IMG_7520.jpg
IMG_7523.jpg
IMG_7526.jpg
 
Wow!! You would never expect all the concrete under the ground!!

Looks great so far (y)
 
Looks great! That groundwork must have cost you dear - people think it's just a few skips but they soon add up - mines a fairly gently sloping plot and with leveling the front for block paving and digging out for my extension at the back I've had 10 skips and 3 grab lorries in the past 2 years (with a few more to come) - that's £3000 with little visible to show for it. My neighbour's garden is a bit steeper than mine - he's approaching 40 skips for his works!

I've done a bit of brickwork and similarly struggled with the bonding - my solution was to get my dad (a retired bricky) to sit there and constantly shout out "you're losing your bond" - sort of helped!
 

DIYnot Local

Staff member

If you need to find a tradesperson to get your job done, please try our local search below, or if you are doing it yourself you can find suppliers local to you.

Select the supplier or trade you require, enter your location to begin your search.


Are you a trade or supplier? You can create your listing free at DIYnot Local

 
Sponsored Links
Back
Top