Drayton L241 to Nest 3rd gen

Joined
21 Oct 2021
Messages
8
Reaction score
2
Country
United Kingdom
Hi there,

so I've found a few posts regarding what I'm trying to achieve, but the issue is that all those posts had the diagram for the "wiring center" which mine does not have. I'd appreciate any help getting this setup as I have absolutely 0 experience with these systems.
I also just moved to the UK this month and using a system like this is also a first for me. Back home there was always warm water available without turning it off/on/etc and heating was controlled directly on the "radiators" in each room with a 1-5 dial attached.


I believe the programmer part to heat link is pretty straight forward (please correct if below is wrong):
N to heat link N
L to heat link L
HW OFF (1) to heat link 'Hot Water Satisfied' (4)
HW ON (3) to heat link 'Hot Water Call For Heat' (6)
CH ON (4) to heat link 'Heating Call For Heat' (3)
1 programmer.jpg

2 programmer cover.jpg

0 heat link.jpg


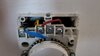
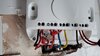
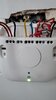
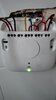
Now on the thermostat I read that you have to decommission the old one and also add a link to the heat link. That's the part where I'm very unsure, especially as the wiring centre doesn't have any diagram on the lid or anywhere near it.

3 thermostat.jpg

4 thermostst cover.jpg


What I assume is the wiring centre would be this one next to the boiler upstairs. Probably unrelated to the Nest, but I also have no clue what the white switch above does and if it should be on rather than off?
5 wiring center.jpg
6 boiler room.jpg
7 boiler room 2.jpg


Thanks a lot in advance for any help!
 
Sponsored Links
You are nearly there, your wiring is correct, but you need to make a link between L &2&5 on the heatlink, on the old room thermostat you need to join the two wires in 1&3 and safely isolate the Neutral wire, the swich you mention is the isolator for the electric immersion heater, only really used as a back up if your boiler fails
 
link between L &2&5 on the heatlink
So just plug a cable from heat link L to heat link 2 and shove in a 2nd cable from 2 that goes to 5?

on the old room thermostat you need to join the two wires in 1&3 and safely isolate the Neutral wire
Just connect 1 and 3 wire together? Feels a bit strange to an amateur like me, but I guess I can crimp one of those wire connectors on?
 
yep thats it, you dont have to crimp it, but you can, a simple terminall block will do, if the thermostat is staying where it is just put both wires into the same terminal doesnt matter which one
 
  • Thanks
Reactions: CBW
Sponsored Links
yep thats it, you dont have to crimp it, but you can, a simple terminall block will do, if the thermostat is staying where it is just put both wires into the same terminal doesnt matter which one


Sadly that doesn't seem to work, now it's just always on even if the heat is completely off on the nest system
 
post a pic of the wiring that you have done at the nest

Pictures attached.


So the boiler in the kitchen is definitely doing something, making noises. However I just went around checking the radiators and they're not warm.

Checked warm water and I got some, so I guess that's what the boiler noise is coming from even though the thermostat has water set to off as well?
 

Attachments

  • old thermostat.jpg
    old thermostat.jpg
    109.9 KB · Views: 39
  • heatlink.jpg
    heatlink.jpg
    154.1 KB · Views: 55
that couldnt be more wrong, no wonder it isnt working, wire it the way you origionally posted, why do you have nothing in 6 and a wire in OT ?? and you cant use those crimps unless you want to kill yourself, you would be better getting a pro in, its obvious you havent a clue what you are doing
 
  • Thanks
Reactions: CBW
that couldnt be more wrong, no wonder it isnt working, wire it the way you origionally posted, why do you have nothing in 6 and a wire in OT ?? and you cant use those crimps unless you want to kill yourself, you would be better getting a pro in, its obvious you havent a clue what you are doing


Thanks for the compliment I guess lol. It is wired as before it's just the perspective. If you compare the holes and numbers above it matches. Yellow is in 6, nothing is in OT, that's in ground for the nest thermostat. I'll attached another pic.

The crimps are to make this L&2&5 link. Once confirmed working I'll put a heatshrink and electrical tape over it. And the whole heat link cover obviously over the whole thing.


The boiler did shut up now btw
 

Attachments

  • 20211021_170231.jpg
    20211021_170231.jpg
    124.1 KB · Views: 63
Why all the crimps? Might just be a bad connection. Also why is there a black wire in earth? Is it being used as an earth? If so, sleeve in green/yellow.
 
Why all the crimps? Might just be a bad connection. Also why is there a black wire in earth? Is it being used as an earth? If so, sleeve in green/yellow.
Reseated all the cables now and removed the crimps.

The only thing I didn't have is a sleeve for the black ground wire. I only had red and black wires that's why black for the nest thermostat ground
 

Attachments

  • 20211021_173301.jpg
    20211021_173301.jpg
    107.9 KB · Views: 57
  • Thanks
Reactions: CBW
Does it work now? You still have the black wire in earth terminal.

Boiler still quiet for now with everything turned off, I'll keep it like this for an hour or so and if the boiler stays quiet I'll start testing heat/water


In regards to the black wire earth terminal, I read this is to earth the nest thermostat that's connected on T1/T2. Is is not needed to earth it?
 
Yes the earth is needed, unusual for it to be a black wire though. If it is an earth sleeve it to prove to anyone who may work on it.
 
Yes the earth is needed, unusual for it to be a black wire though. If it is an earth sleeve it to prove to anyone who may work on it.

Yeah I didn't have any other wires than black and red available and I will remove the Nest if I move out anyways as I'm just renting.
 
  • Thanks
Reactions: CBW

DIYnot Local

Staff member

If you need to find a tradesperson to get your job done, please try our local search below, or if you are doing it yourself you can find suppliers local to you.

Select the supplier or trade you require, enter your location to begin your search.


Are you a trade or supplier? You can create your listing free at DIYnot Local

 
Sponsored Links
Back
Top