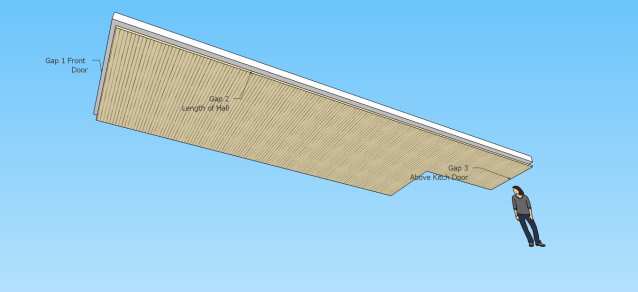
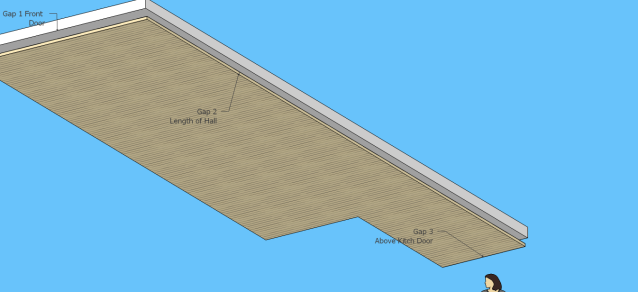
I've now placed 2x1 battens across the entire length(?) of the hall, at right angles to the joists?
Yep. A lot easier to level them up if the joists are not level. To check how straight they are stretch a piece of string end to end and you'll get a good idea (the proper way is to use blocks and a traveller but I won't get into that unless your battens are really wonky)
You say rip the two sheets into two wide strips? Why two - have you taken into account the length of the hall? By rip do you mean cut in two? Do these pieces join at cross ways to the battens?
Definition: Rip cut - longitudinal cut in timber along the grain, in sheet material normally means parallel with the longest edge. These pieces will join along the battens - which is why you may need to insert an extra batten straddling the joint to carry the joint (so that the joint won't be uneven). The reason I'm suggesting two rips is because you want to get a gap parallel to the wall on one side
which is absolutely consistent, whilst at the other side, this being an older house, you're probably not going to find that the walls are parallel or necessarily all that straight. That will mean scribing the entire edge. Strikes me that you'll probably find it easier to handle smaller pieces and joint them. But it does depend on how confident you are feeling. If you reckon you can do it in one, then why not.
Chamfer (again, some of these terms I'm not particularly knowledgeable on) - sand down the edges slightly (slight curve) so the 2-pack has something better to 'nestle' in?
Chamfer, see
this drawing. can be worked with a block plane, router and chamfer bit, even a bit of sandpaper stuck to a piece of MDF or plywood scrap. Don't sand to a curve at all - not necessary. What you are aiming for is a 2 or 3mm V-groove where two pieces butt up to each other - somewhere for the 2-pack to go.
Not even sure how I would scribe the other piece/s to the wall job...sorry...I'm not quite getting this bit (although I'm bang on up to this point).
The MDF/sheet material you are fixing to the ceiling will butt to the wall on one side. If on that edge the wall is dead straight, i.e. no really big gaps, then there's no need to scribe, however if there are big gaps you'll need to shape the edge to take-out most of those gaps because filling them will be potentially very unsightly. Have you checked how straight the wall is?


") ...besides, too busy gawping at the oh so pleasant assistants in these clothes stores!).
...besides, too busy gawping at the oh so pleasant assistants in these clothes stores!).