Fitting Nest to existing y-plan - wiring confusion

Joined
8 Mar 2020
Messages
6
Reaction score
1
Country
United Kingdom
I am looking to add a Nest to my heating system which I believe to be a y-plan.

Having read https://www.diynot.com/diy/threads/lp522-nest-upgrade-almost-working.535014/#post-4570472 (and briefly hi-jacked it) I'd like to keep the thermostat in the same place (living room) and make use of the current wiring. That logic suggests putting the Heat Link in the airing cupboard next to the current junction box rather than make use of the wiring to the programmer in the kitchen (under the boiler).

Trouble is the wiring doesn't seem to make sense versus diagrams I have seen. There are six cables coming in, one for the pump, one for the tank thermostat, one for the valve and three grey four core cables. These are wiring into connector with 7 contacts.

I assume one grey cable is the room thermostat and guess the other two cover the HW and heating switching from the programme box? Can anyone help me identify what is what?

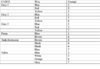
The connections are attached in a table (earth omitted - all wired to contact 1).
 

Attachments

  • wiring.jpg
    wiring.jpg
    128.5 KB · Views: 300
  • 20200309_152049.jpg
    20200309_152049.jpg
    137.9 KB · Views: 321
  • 20200309_152102.jpg
    20200309_152102.jpg
    181.8 KB · Views: 329
Sponsored Links
Hi Pittso,

Colours usually mean diddly squat in a heating system, but looking at your wiring usually the white is heating on, connected to yellow, so the room stat is probably yellow, sharing with the white to your valve (number 5). Whoever did that diy wiring centre has used a double socket and choc block, which is probably what makes it harder. If you’re comfortable using a 2 pole voltage tester or a multimeter, and comfortable with the electrics you could always alter the wiring into a center. What 3 port valve is it? Your Nest May also need a permanent supply depending on which one it is.
 
Last edited:
Thanks Novice - it is the heating system fitted by the housebuilder. Valve is a Drayton MA1. I was hoping to work out which cables are to the programmer and pull them out before connecting to the Heat Link.
 
OK, on further inspection of other posts I realise i got something wrong. After checking grey cable 1 and 3 have their orange wires meet at contact 3, with cable 2 to 4. I now think:
1 - earth
2 - live
3 - room therm/HW
4 - HW on
5 - Heating on
6 -
7 - HW off

with cable 1 the room thermostat

If I'm right I presume I can wire cable 1 to the Heat Link DC ports to power the Nest thermostat and pull out the two grey cables feeding the current promgammer to wire to the Heat Link. Does the orange for the HW in contact 3 need moving?
 
Sponsored Links
You haven't given details of the existing programmer, so I can't tell you what the wiring terminals are, but there should be a diagram printed on the back of it which will identify them for you.

The existing programmer would normally have the following wiring connections:

N
L
Hot water off
Heating off (not used for Y-Plan)
Hot water on
Heating on

If you find yours has different connections, post back details.

As @The Novice said, the choice of wire colours used is anyone's guess. It would have been down to the personal preferences of the original installer, and the cables they had to hand. Some installers will even use a green / yellow wire (which would normally be an earth wire) as a live conductor.

The only way to know for certain which wire is which, is to physically (or electrically if you know how to use a multimeter) trace them from back from the programmer and find out. However there are some pointers. The 'Hot water off' wire will be connected to the motorised valve's grey wire. The 'Hot water on' wire will go to the hot water cylinder thermostat, and the 'Heating on' wire will go to the existing room thermostat.

Once you have identified all of the programmer wires, then they are simply rerouted to the Heat link terminals that have exactly the same function.

upload_2017-10-27_8-18-41.png


So:

N = Heat link N
L = Heat link L
Hot water off = Heat link 'Hot Water Satisfied' (4)
Heating off (not used for Y-Plan)
Hot water on = Heat link 'Hot Water Call for Heat' (6)
Heating on = Heat link 'Heating Call for Heat' (3)

The Heat link (L) terminal should also be linked to the two common terminals (2) and (5)

As you have already figured, the original thermostat cable can then be completely disconnected, and you can then use it to provide the 12v thermostat supply to Heat link T1 & T2. A link should be inserted between the terminals in the wiring centre where the thermostat's two live switching wires have just been removed from, to complete the circuit.
 
  • Thanks
Reactions: CBW
As you have already figured, the original thermostat cable can then be completely disconnected, and you can then use it to provide the 12v thermostat supply to Heat link T1 & T2. A link should be inserted between the terminals in the wiring centre where the thermostat's two live switching wires have just been removed from, to complete the circuit.
If you are doing this you also need to run an earth to the heat link,no earth needed if you dont use T1&T2,dont shoot the messenger just saying
 
Quite right.

Capture.JPG


I always connect the earth from the 230V supply cable there anyway, so tend to forget to mention it.

pistol_1f52b.png
 
Quite right.

View attachment 185656

I always connect the earth from the 230V supply cable there anyway, so tend to forget to mention it.

pistol_1f52b.png
must admit not really sure why the earth is needed when using the 12v supply , but who am I to argue, if the manu says it is required then it is required .
 
I suspect that the 12v power supply has a metal cored transformer which has an earth connection in case the insulation on the windings around it fail.

If T1 and T2 aren't connected to anything the transformer is effectively 'double insulated' inside the Heat link enclosure and as there aren't any external connections to it for anyone to come into contact with it doesn't present a risk. Once wires connected to T1 and T2 leave the Heat link, it might.
 

DIYnot Local

Staff member

If you need to find a tradesperson to get your job done, please try our local search below, or if you are doing it yourself you can find suppliers local to you.

Select the supplier or trade you require, enter your location to begin your search.


Are you a trade or supplier? You can create your listing free at DIYnot Local

 
Sponsored Links
Back
Top