Floor tiling advice

Joined
27 Sep 2011
Messages
840
Reaction score
28
Country
United Kingdom
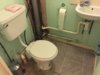
I'm floor tiling a wc/small cloakroom

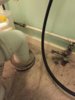
The existing toilet is being replaced with a 2 in 1 toilet/basin..

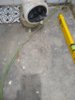
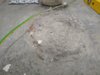
After removing the toilet to tile the concrete floor, i noticed that where the toilet sat, it is slightly raised

What i wanted to know is whether i have to leave this and just tile around it or would it be wise to get the SDS out and chisel the protruding parts, then level and tile?
 

Attachments

  • 15741658988129113620195271257743.jpg
    15741658988129113620195271257743.jpg
    249.6 KB · Views: 328
  • 15741659331726349631086509228650.jpg
    15741659331726349631086509228650.jpg
    283.5 KB · Views: 319
Sponsored Links
yes, remove the lumpy stuff - you can use any kind or hammer and chisel or a chisel in a sds drill.

it would also pay you to cut the soil pipe hub off at floor level - doing that would give you room to play when installing your fixture.

always try and tile under fixtures - dont attempt to tile around them.

its possible to probable that the earth cable is redundant - a remnant of old Regs. ask in the elec forum if you can ditch it?
 
If he cuts the soil pipe hub off at floor level how would you re-position the waste outlet when it’s set in concrete?
I’ve got an issue with mine that the outlet is too far from the wall.
 
Sponsored Links
the OP's soil pipe is centred from any surrounding walls - after removing the hub the soil pipe is still centred.

what kind of WC do you have - old or new?
is your floor outlet old or new?
 
Last edited:
My soil pipe outlet is about 180mm from the back wall. The soil stack is in the corner to the right of the toilet. The soil pipe connects to the soil stack under the concrete floor then goes outside to the drain.
Currently we have an old low level cistern toilet, but was planning on putting in a back to the wall or wall hung with a slimline concealed cystern.
 
why dont you post a pic showing the WC & WC spigot - and the floor outlet - and the soil pipe?
 
Here’s the toilet as it is now.
 

Attachments

  • 69CDA0D4-47A5-484A-B8C7-223473806F32.jpeg
    69CDA0D4-47A5-484A-B8C7-223473806F32.jpeg
    243.1 KB · Views: 299
  • DB1566F9-5A24-4EFB-B9F8-F8034687B09E.jpeg
    DB1566F9-5A24-4EFB-B9F8-F8034687B09E.jpeg
    213.1 KB · Views: 308
Update:

The protruding part of the floor was chiseled out with the SDS and the floor was screeded using a self levelling compound.

What i want to know is whether i need to wait for that area to fully dry before tiling?

I am getting impatient as i have been waiting nearly a week and i am keen to finish this job

I have even tried turning up the heat
 
Is it not dry yet???
I always had the opposite problem with self levelling compound, it dries too quick, while you're pouring it, despite following the manufacturer instructions to the letter.
Found that it's always best to add a further cup of water to the mix so to slow down the drying process without compromising the final strength.
 
Half of the area is dry. The other half is cold to the touch, slightly damp/dark in colour

Do you have to wait for it to be fully dry before tiling?
 
Screw it, I'm tiling over it dry or not..

A tradesman wouldn't wait this long
 

DIYnot Local

Staff member

If you need to find a tradesperson to get your job done, please try our local search below, or if you are doing it yourself you can find suppliers local to you.

Select the supplier or trade you require, enter your location to begin your search.


Are you a trade or supplier? You can create your listing free at DIYnot Local

 
Sponsored Links
Back
Top