garage conversion inside wall construction

Yes I'm doing it on regs, thats why I'm asking questions now before I put me plans in. I don't want the BCO to waste his and my time in sending back the plans for ammendment. I also need to do it right, marital bliss depends upon it!
Cheers All!
 
Sponsored Links
What with Hotrod and Rod Stewart singing We are sailing and Young Fred back on the pills in another post, looks like I have been conned here.
Do not get involved with many garage conversions, but will tell you what we have got away with in the past.
Deal with DD spec first. This is meant for a timber framed house and is difficult to achieve in your situation, however it can be done. Second, due possibly to typing error the spec is not put together correctly.
This is how we have done it. Your long flank external wall first. Cut your ply 10mm smaller than stud storey height. Staple your breather membrane to back of ply and lap it slightly round all edges. For first sheet of ply cut 9 number 300mm long by 50by50mm timber noggins. Fix these to back of membrane covered ply with one screw each noggin top bottom and middle flush with edge of ply that goes in corner, same again centre of ply same again other edge, except hang the 300mm length out by 25mm so that it will pick up next sheet of ply. Keep bottom blocks up of concrete by 25mm. To each block staple 350mm long piece of dpc. Lay a 125mm dpc along oversite concrete and stand your ply up against wall. Do your next sheet of ply same way, but you will only need 6 blocks this time as three are already there on sheet ply standing up. Finish your ply along the wall. Put couple braces up to hold them to wall if required.
Rattle your studwork up tight to ply. Do not use CLS it is to small, use 47x100mm. Fill your studs with 100mm foil backed Celotex, then VCM then 12,5 insulated plasterboard, skimmed. This will give you a U value of 0.30 You may get away with just 12.5 plasterboard.
Doing it this way, your ply and noggins are protected from damp from external wall, you are keeping a clear unrestricted air flow cavity. The only way it falls over is that you have a gap between your breather membrane on each sheet of ply, how ever this is covered by an upright stud, and nothings perfect in this industry.
Have done this, just to show that DDs way can be done, but will come back tomorrow Gaz, and let you in to the Trades Secrets Act and tell you a couple of ways that we normally do it.
Would have been really impressed Hotrod if that picture had shown you in that bottle. :LOL:
oldun
 
I have been in contact with Celotex and they have provided this method in achieving the u-value's by adding an internal wall to an existing single skin brick wall...

garage_conversion.png
 
Interesting post that DD.
Are you sure that only 55mm of GA4000 will give a resistance of 2.500m2K/W and a subsequent U value of 0.29W/m2K?
Am I correct in assuming that 9mm sheathing, breather membrane and vapour control membrane have no resistance value?
Thank you.
oldun
 
Sponsored Links
That was the calculation I was provided by Celotex's Technical department so I'm not arguing :)

FMT will be able to confirm the thermal resistance of 9mm sheating as that's not on my calculation, so as per the calculation above, the BM and VCL both do not provide any thermal resistance.
 
Gaz, Just couple points to clear up first.

Fredddy I list a quote below of yours posted today on another thread in Building.

Quote.
I really don't know what all the fuss about is, this is some official blurb from Kingspan http://www.insulation.kingspan.com/uk/pdf/refurb_booklet_2009.pdf page 15 or 16. I've used this spec in plenty of garage conversions and it gets approved every time.

Kingspans solution for a half brick skin is basically the same as what DD specified for Celotex, 50mm cavity, BM 12mm sheathing etc, etc.
Both pages you quote 15 and 16 from Kingspan are for a 215mm brick wall. Will agree that OP states (single brick wall), but I feel sure that he means single skin brick wall. In the other post where you posted this solution the OP clearly states single skin 102 brick wall consequently pages 15 and 16 do not apply.
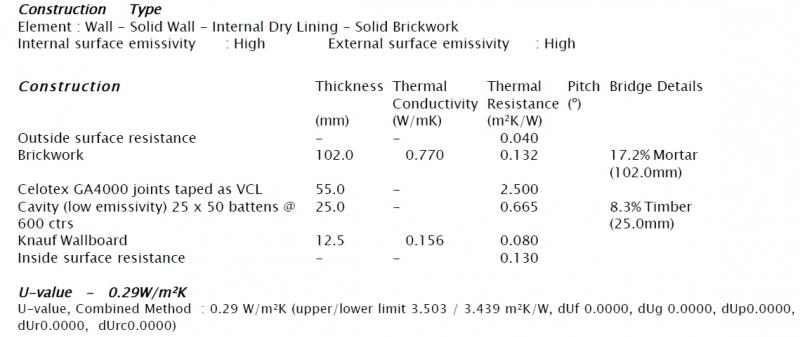
DD, I did not realise that 55mm celotex gave 2.50 resistance, but have checked it out for my own benefit, and you are correct, how ever can not make 55mm celotex stand up to a 0.29 U value best I can get is a U value of 0.35.

Gaz. Will give you two suggestions that have been approved for us in the past.. Unfortunately, what one area approves, the next area may not.
Both solutions are based on the fact that external wall is half brick skin with centre supporting pier.
Firstly both celotex and kingspan methods of battening out a wall are a load of old b******s.
Take your long wall first. Tack BM to top of wall with good vertical laps to joins and in corners and let hang down. We use Tyvex breathable felt.
Use 47x125mm for your stud partition. Reason for 125mm is so that you can sail across your supporting centre pier with your plasterboard.
Lay a 150mm dry dpc and throw your stud partition up at 600mm centres. Difficult to explain on paper, but give a lot of thought to position of stud in the corner where it will pick up back wall return studwork. If you do not get it right, then your centres are all up the creek. If BC are concerned about you fixing your bottom plate down through the dpc, then screw300mm lengths of fir band at right angles every 600mm to underside of sole plate and fix to oversite concrete. These will be covered by new floor.
Cut your 100mm celotex to sizes required and push into studwork. Before doing so rattle some 50mm nails into studwork 100mm back from face to act as stops.
Two ways now, depending on what your man will accept. Either tape all studwork and joints of celotex with 100mm aluminium foil tape or use visqueen as VCB.
Plaster board and skim. Your man may want plasterboard to be 12mm insulated.
Mention couple of other points. Have you given consideration to what you are doing with existing floor. Depends on floor level in relation to existing dpc. If installing kitchen into new work, fit noggins every where you need decent fixings, i.e. kitchen wall units etc.
One other thing, these so called modern tackers seem to have got into the habit of fixing plasterboards on studwork running with the studs, it is wrong. Plasterboard should be fixed across the studs, or across the joists.
Will post to-morrow the other approved way we have done it using blockwork.
oldun
 
Frankly Oldun, no offence but I can't be bothered to read another of your long winded posts. All I will say is that my method as drawn on the first page of this thread and submitted to at least three different Building Control Authorities on plenty of garage conversions gets approved every time and I have, to date, had no negative feedback from any inspectors, builders or any householders.

Here's another copy of the U value print out from Celotex just for you Oldun
 
:idea: Sheathing can be fixed to the cavity side if you make up your stud modules prior to fitting them. :idea:
 
Great post oldun, just a couple of quick questions..

What do you mean by "screw 300mm lengths of fir band"?

I assume with your method that the plasterboard sits against the pier with no insulation between them - is this OK?

Cheers.

PS I'm the OP from the "other thread"
 
:idea: Sheathing can be fixed to the cavity side if you make up your stud modules prior to fitting them. :idea:

That was what I was meaning by my "ship in a bottle" reference nose - i.e. construct it before you place it in situ ;)
 
Well I did'nt think this was going to be so involved. I've never seen heat transfer calcs etc. since I did my degree (electrical Eng.) this must be the Academia of the building world!.
Anyway, the wife now would like a patio door fitted slap bang in the middle of where the brick piller is postioned, so it looks like I'm going to have to dig down to the foundations and put up a pillar either side of the new doorway, and if I'm doing that I may as well go the whole hog and block up from foundation level for the entire wall. I will have to add to the foundations also as there is not enough width to the existing to add cavity and block. Bugger!
 
That's a bit of a pain in the *rse :LOL:

You don't "have" to use blockwork and if you do, there's no reason why you can't use lightweight blocks without having to underpin the existing foundations.

What's wrong in using timber as my recent Celotex calculation?

garage_conversion.png


You'd be loosing approx. 90mm with that method. If you went down the block route, you'd be looking at loosing approx. 200mm.
 

DIYnot Local

Staff member

If you need to find a tradesperson to get your job done, please try our local search below, or if you are doing it yourself you can find suppliers local to you.

Select the supplier or trade you require, enter your location to begin your search.


Are you a trade or supplier? You can create your listing free at DIYnot Local

 
Sponsored Links
Back
Top