Garden Wall & Decking Project

Joined
12 Mar 2019
Messages
243
Reaction score
19
Country
United Kingdom
This is mostly a catchup thread - I'm also very aware I've not gone back and updated my DIY Extension Build thread, but I promise I'll get there at some point! (And no, it's not finished...!)

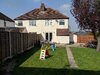
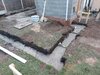
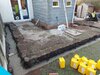
Anyway - the summary is simple. When we purchased the house there were some horrid and somewhat random concrete "patio" near the back of the house. We knew they needed to go but could never quite decide what to do, and because it was nearly 30m2 it was always going to be a serious task.

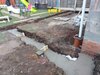
It's not a great photo, but it's one of the earliest I have from a few years ago before I rebuilt the utility. As you can see, it's not a particularly attractive area.
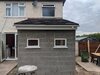
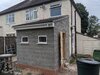
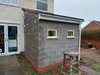
 

Attachments

  • IMG_20190415_110610 - Copy.jpg
    IMG_20190415_110610 - Copy.jpg
    511.7 KB · Views: 149
Sponsored Links
Again, not great photos I'm afraid but hopefully it'll give you a feel for the space as it looked after the main construction of the extension. So, after much debate we settled on the idea of a walled-off decking area. The idea was to create a space large enough that we could clear the garden of chairs and tables. So, plenty of space for a big family table, space for a BBQ, bit of garden storage for kids toys etc
 

Attachments

  • IMG_20200721_154110.jpg
    IMG_20200721_154110.jpg
    424.9 KB · Views: 120
  • IMG_20200721_154119.jpg
    IMG_20200721_154119.jpg
    492.2 KB · Views: 114
  • 20210221_153657.jpg
    20210221_153657.jpg
    484.2 KB · Views: 120
Of course, it wouldn't be a DIY project without some back breaking labour! It took a few weekends but with a little help I managed to clear a bunch of concrete out of the way, set out and dig my trenches. In hindsight, perhaps I should have cleared the middle first - I don't know - but this is the way I did it!

So you can probably tell from the photos that the top soil is just that - very powdery, so I dug down to the sand, deep enough to allow for a 150mm strip onto sand + 150mm from the top of the concrete to ground level. I probably made a mistake here, which I'll mention later.

The foundation was stepped down towards the house, because the sand layer gets lower.
20210228_173056.jpg

The digging also undermined my neighbours fence a little which concerned me, but in the end nothing untoward happened.
 
I spent a while debating whether to get concrete in, or to mix myself. In the end, I decided to rope in my brother and dad and mix it ourselves - mainly because getting it delivered would mean time off work and I'd be on my own. I wouldn't say it was an easy day, but it wasn't the worst with three of us - just kept on going!

I marked the height with rebar and my laser level before starting and it went okay. We were still quite early in the year when it was cold, so I did some buy some frost proof additive and covered it all up after. I was a bit paranoid because it turned out to be a colder few nights than expected - but, it's a garden wall when all said and done and everything seems okay. I used wooden forms to step down the footings 75mm a time (brick height+mortar) - that worked fine but they were next to impossible to remove!
 

Attachments

  • 20210307_164144.jpg
    20210307_164144.jpg
    607.7 KB · Views: 129
  • 20210307_164153.jpg
    20210307_164153.jpg
    524.9 KB · Views: 121
  • 20210307_164206.jpg
    20210307_164206.jpg
    449.6 KB · Views: 117
Sponsored Links
Naturally, the Mrs found the most expensive rustic looking bricks on sale - but I did agree they looked nice! It was to get on the trowel again but my first attempt was a serious failure as I had major issues with it not bonding. I still don't really know what the right answer is - but they're just insanely absorbent bricks and they'll just turn mortar back to sand. The only method I've found is to wet them down which is far from ideal, but it works a treat.

They're F2/S2 bricks so suitable for underground, and I've not had any issue with efflorescence.

Being rustic they posed a bit more of a challenge than I expected. Most are literally shaped like bananas, and the sizes vary wildly. For me, this caused real issues with gauge that I never really got a hold on. The problem is you'd build up a corner gauging one place, but the rest of the brick is somewhere else despite being level. I think it looks okay, but gauge has been the most disappointing aspect for me in the finished product. In hindsight, I'd perhaps use profiles.

The other challenge was plumbing because, again, they ain't straight so you literally can't ever be plumb across the whole brick. This is close enough in most areas, though - if I were building higher, again, I think profiles would be the way for me. Maybe some of the pros can weigh in?

For similar reasons, I decided to go with a stretcher bond and wall ties rather than English bond or anything. It was bad enough at the returns with the odd sized bricks!

It was hard going, as ever, but it felt really good to get out of the ground and get some corners up.
 

Attachments

  • 20210605_201909.jpg
    20210605_201909.jpg
    489.4 KB · Views: 123
One thing I probably didn't make clear is that the decking will be basically the same height as the existing concrete, so there's a fair few courses that won't be seen. I'm glad I decided to do a 1 brick wall insted of half brick, but it was a bit soul destroying having to build everything "twice". That run from front to back is 6 meters!

Still, progress was slow but consistent. At this stage I was still working single handedly and because I'm slow can only mix 1/4 bag of cement at a time else it goes off.

I'm having some issues posting pictures, but you can my early wall progress here:

Imgur: The magic of the Internet

At that point, I knew I'd need to do something with the middle and probably hire in some plant so decided to stop before the wall would be at risk of being knocked. I was also feeling like I needed to switch up the work a little
 
So until this point I didn't really have a specific plan for the middle - i.e., the decking. Again, in hindsight, maybe I should have and maybe I should have dug out after the concrete pour but whatever! After much debating we settled on a composite decking solution, with an aluminium subframe and plastic feet. For the subbase, I decided to dig out all the crap soil and get down 100-150mm or so of compacted Type 1 MOT, with paving slabs on top for the feet. It's a lot of effort up front, but I'm confident it's a good long term solution that will be "fire and forget"
 
Last edited:
There was no getting around the fact I was going to have to move a lot of material! So, I roped in a few favours and got in some plant. I also found a local lad happy to labour who has been a fantastic help.

So, with a little mechanical help the first weekend we cleared out all of the top soil and concrete and got down to good, virgin, sand. This was 2 grab wagons worth, totalling about 30 ton! Yeah, wasn't going to be doing that by hand...

DIY Subbase Prep - Imgur
 
Next step was getting the MOT in. Now, I know from doing my oversite on the extension that moving ton's of MOT wasn't the most fun and in fact can be a real nightmare. I'd got something like 8 bags to get in and with my back wasn't really looking forward to it.

So, I took a controversial option - and after phoning around I was able to acquire an entire telehandler for £250 or so. So, yes, it sounds a bit silly and over the top but I have absolutely no progress photos because we absolutely smashed it. Even with my very questionable driving, between 4 of us we got down I think 9 bags on Type 1 MOT in 4 hours.

Basically, I'd drive the bag over the hole - somebody would cut it and let the material out into a pile. They'd rake it around, I'd compact it with a wacker plate and then do it all again!

So, an expensive day but I was gobsmacked at how easy it was

Imgur: The magic of the Internet

So that proved a nice distraction from the wall and got a pretty hefty task out the way
 
One thing that I didn't really ever account for, is that by the time I'd done the subbase I was actually pretty much level, and sometimes below the top of the concrete footing. It's not ideal, really - my understanding is thta it should be below ground for frost proofing but to be honest it is what it is!
 
From there, it was just more of the same - I'm an exceptionally slow bricklayer, so it's taken a few weekends but I finally laid the last brick on Saturday!

One thing I've completely skipped from this write up is laying the slabs. I literally just purchased council-style concrete slabs and used sharp stand and cement to stick em in place! Oh I also used an SBR slurry. Because the decking has adjustable feet I've not worried too much about them - just got them level but pretty much where they fell. I've worked with the decking company to come up with an appropriate subframe design

DIY - Finishing My Garden Wall - Imgur
 
And here's the wall as it stands, after a little wash:

Imgur: The magic of the Internet

So, you're up to date! I've got the slabs to finish up the sub base and I've got get the coping stones and decking sorted. In truth, financial constraints mean they might need to wait a little bit but I'm fairly happy how things are turning out so far
 
I meant that its the privacy-invading personal data gathering imgur do which is completely unnecessary, not image hosting sites per se.

Strange about the site problem.
 
Last edited by a moderator:

DIYnot Local

Staff member

If you need to find a tradesperson to get your job done, please try our local search below, or if you are doing it yourself you can find suppliers local to you.

Select the supplier or trade you require, enter your location to begin your search.


Are you a trade or supplier? You can create your listing free at DIYnot Local

 
Sponsored Links
Back
Top