Hi all. I have had issues with a leaking gland nut on my stop tap for a while and was always able to stop it by tightening the gland nut. Anyway eventually that did not work and I have had the gland repacked which seems to be working well so far. I was wondering is the repacking a fairly permanent fix or is it likely to need repacking again in the near future.

You are using an out of date browser. It may not display this or other websites correctly.
You should upgrade or use an alternative browser.
You should upgrade or use an alternative browser.
Gland nut repacking
- Thread starter chrisd76
- Start date
- Joined
- 8 May 2017
- Messages
- 10,652
- Reaction score
- 2,871
- Country

Depends on how and what you used to re pack the gland . If PTFE tape was used, it will last for a reasonable period of time
Many thanks for the reply Terry. It was Loctite 55.Depends on how and what you used to re pack the gland . If PTFE tape was used, it will last for a reasonable period of time
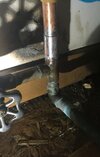
My house was built in the mid-1970s by a plumber. I've replaced the kitchen faucets several times with never a problem. Recently my son replaced it with a fancy shmancy stylish gooseneck one with a pull-down spray. But the hot water shutoff gland leaked and he left the valve just 1/4 open, where it dripped then least. This annoyed me, so today I thought I'd tighten the gland. However, the gland nut would not move and I was afraid I'd break the valve if I tried any harder. It was certainly dripping when wide open. So what I did was turn the valve fully open and closed several times and noticed it was tighter closer to closed. But it smoothed out the more I turned it. It finally stopped dripping when fully open, or so it seemed. Maybe the packing redistributed itself. Hopefully I dodged the bullet of replacing the valve in a very awkward place.
I think I noticed that on a spare 1/2 ins gate valve, I couldn't budge the gland nut, maybe just a O ring gland now?
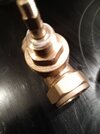
Photo is from a spare 3/4" gate valve, there just seems to spiral wound (white plastic) packing that protudes ~ a mm to allow tightening up.
Photo is from a spare 3/4" gate valve, there just seems to spiral wound (white plastic) packing that protudes ~ a mm to allow tightening up.
Attachments
Last edited:
Well, after a day the gland was still seeping. Next step, I did what eventually worked for a seeping toilet shutoff valve. I put a small plastic dish under it. Eventually I'm hoping the leak will lime up and stop like it did in my bathroom.
To examine the leak further, I took a picture.

It looks like'll need a 3/4" wrench to repack the gland. However, I first opened the valve really "hard" and the dripping reduced dramatically. I dried everything and will check the next day. If the water evaporates faster than it collects I'll be okay. If not, I'll have to shut the water off and open it up to repack the gland.
It looks like'll need a 3/4" wrench to repack the gland. However, I first opened the valve really "hard" and the dripping reduced dramatically. I dried everything and will check the next day. If the water evaporates faster than it collects I'll be okay. If not, I'll have to shut the water off and open it up to repack the gland.
Wow that’s an old one with visible threads......can the gland be repacked on that one?
Personally I’d consider having that replaced with a new one, or a lever valve if at all possible.
John
Personally I’d consider having that replaced with a new one, or a lever valve if at all possible.
John
I have 4 of those under the sink, all the same vintage. Hot and cold for the kitchen faucet, hot for the dishwasher and hard water for the hard water faucet. None have given trouble since I've lived here for 40 years except now this one. That's why I'm hesitating to take it apart to see if I can repack it. If I break it, you can see it's only 1/4"or so above the tee, so replacing with a new one would be a bit of work.
Stop taps of that age are almost certainly manufactured to BS1010
You can still get new stop taps to that specification just change head.
Would add I've found loctite 55 best for re packing glands much better than ptfe.
You can still get new stop taps to that specification just change head.
Would add I've found loctite 55 best for re packing glands much better than ptfe.
Will a new head fit straight in? That’s a stroke of luck.
How old are these things?
John
How old are these things?
John
BS1010 made all valve and tap manufacturers work to that standard so heads where interchangeable.Will a new head fit straight in? That’s a stroke of luck.
How old are these things?
John
Peglar stop taps are still made to that specification though with Doncaster factory closing who knows how much longer.
I've maybe replaced 5 heads in my time - but I've never come across one like that!
John")
John
Well, the gland was still dripping a little, needing me to empty the tray every other day, so I opted for a more permanent solution, using a Sharkbite valve. First I tried heating the joint under the old valve, but still could not get it to separate even when I could see all the solder joints in the area melting. Next, I hack-sawed the 1/2" pipe flush with the bottom of the old valve, leaving about 3/8" above the tee (see post #8 above). I heated the joint again and tried to pull out the piece of copper pipe with channel locks, with no luck. Maybe the lime and corrosion was holding it. I should have left well enough alone because now the piece of pipe sticking out was mangled so I could not fit a coupling over it. I finally could press it on after a lot of shaping and filing, so I soldered it and a short length of 1/2" to take the Sharkbite valve. Sometime I'll see how easy it is to take the old valve apart and repack it.
Attachments
DIYnot Local
Staff member
If you need to find a tradesperson to get your job done, please try our local search below, or if you are doing it yourself you can find suppliers local to you.
Select the supplier or trade you require, enter your location to begin your search.
Please select a service and enter a location to continue...
Are you a trade or supplier? You can create your listing free at DIYnot Local