Guidance Needed - Floor to Ceiling Built In Bookcase

Joined
20 Nov 2009
Messages
8
Reaction score
0
Location
London
Country
United Kingdom
Hi All,

I am looking to build a floor to ceiling built in bookcase to create a study room.

I want it to be floor to ceiling along the entire length of one wall. There are two posts, one in each corner of the room on that wall - so looking to build it into that recess if that makes sense.

The wall is plasterboard on metal studs (new build property).

I am not sure which path to take. Do I do very long shelves on battens with spring toggles behind the plasterboard - would this support (plasterboard is 15mm thick). Do I build a frame type thing similar in the way that stud walls are created.

Please can people offer suggestions, tips, tricks and advice to give me a starting point?

Many thanks in advance.

BrennaBoy.
 
Sponsored Links
I'd suggest one of two ways, depending on abilioty and experience.

If you are an experienced woodworker I'd make-up floor to ceiling dividers which can be fixed to the ceiling, back wall and floor and which have Tonk strips routed into the faces to carry shelf pegs. These dividers would probably need to be in the order of 30 to 50mm thick. The shelves are then made to length and dropped into position. Because of the way this type of shelving works installation would need to be extremely accurate, so not an approach for beginners I feel

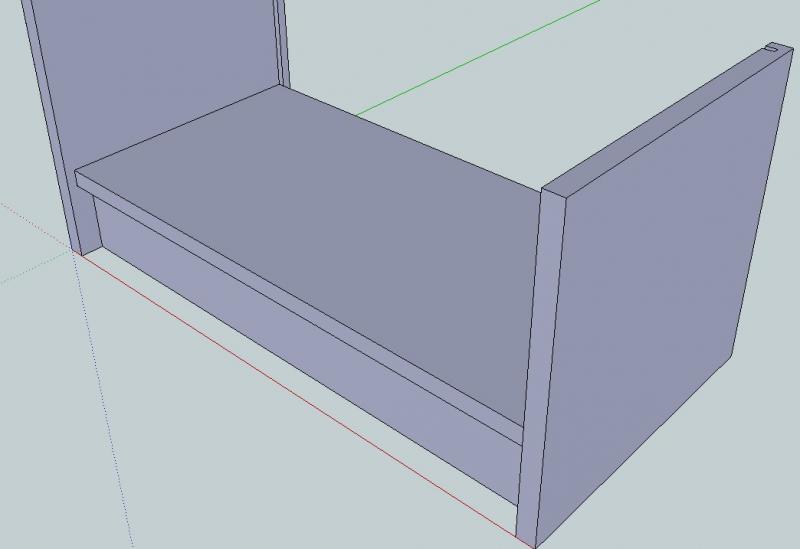
For a less experienced woodworker I'd consider making-up shelf unit frames with thin backs in grooves or rebates. The basic shell comprises two full height sides, a front plinth and a bottom shelf screwed together using black passivated carcass screws and PVA glue. This is fundamentally the same type of structure that IKEA use in their bookcases - but this one you can make to any size you see fit. The bottom looks like this to start with:


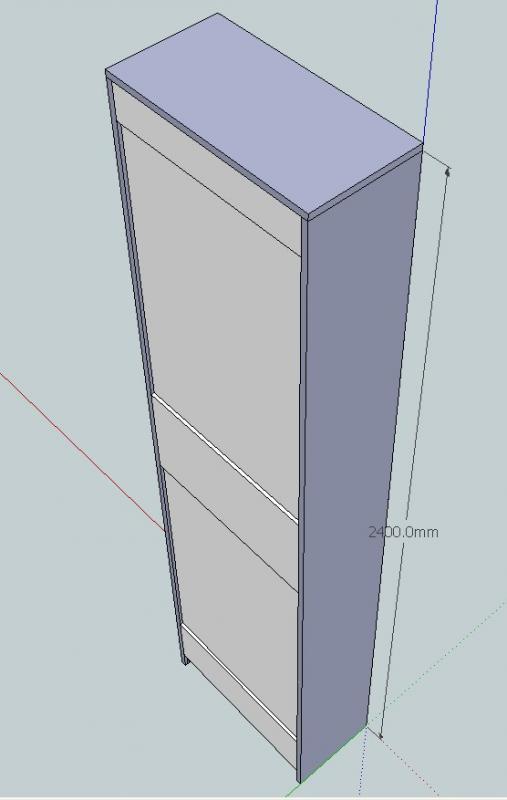
and ends-up like this when completed (before the shelves are fitted):


Note the bracing pieces across the back at top, bottom and middle to add rigidity and to stop the back being punched out too readily.

The shelves are held on planted-on shelving strips (which require the shelf ends to be notched-out) or on tags held by flush-fitted Tonk strips (routed and fitted into grooves before assembly). The width of each unit is determined by the load of the shelves. The depth would need to be constant, but 300mm should suffice for mots purposes. To calculate the sag of the shelves when loaded an on-line calculator called The Sagulator can be used

Multiple units like this can be built and screwed together using kitchen carcass joiners. Start at one end and level up as you go. The top can be made fancier by adding a bought-in cornice moulding, as you'd have on a kitchen. Similarly a built-out skirting could be fitted to the bottom like a "shoe" moulding instead ofthe inset plinth I illustrate

Maximum height will be about 2458mm (2440mm sheet length + 18mm for the top based on using 18mm MDF/plywood/MFC/MF-MDF) unless you opt for a separate plinth structure. Note that with a pre-built carcass such as this you will need to make the carcass 50 to 100mm shorter than the ceiling height in order to be able to lift it into position. The cornice or an MDF bulkhead painted the same colour as the walls can be used to disguise this

Note that these are rough concept drawings and don't show details such as the Tonk strips, loose shelves, etc
 

DIYnot Local

Staff member

If you need to find a tradesperson to get your job done, please try our local search below, or if you are doing it yourself you can find suppliers local to you.

Select the supplier or trade you require, enter your location to begin your search.


Are you a trade or supplier? You can create your listing free at DIYnot Local

 
Sponsored Links
Back
Top