Hall stairs and landing

Joined
21 Dec 2016
Messages
110
Reaction score
5
Country
United Kingdom
The bain of my life. I struggle with finding time to do this, as most parts of it seem to take a full day for maximum productivity.

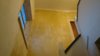
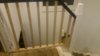
Walls have been stripped of paper, woodchip ceilings and a panel removed from the stair banister. Here it is in its current form.

Plan is for ;
Painting the walls and ceiling
Removing the banister panels on stairs and replace with poles
Fill flue hole
Carpet stairs
Repair and paint woodwork

Not in that order obviously. This has turned out to be more time consuming than I planned, so I have had to make sacrifices on the depth and detail of renovations, however I still expect a good finish.
 

Attachments

  • DSC_0450.JPG
    DSC_0450.JPG
    99.1 KB · Views: 404
  • DSC_0449.JPG
    DSC_0449.JPG
    121.1 KB · Views: 402
  • DSC_0448.JPG
    DSC_0448.JPG
    126.7 KB · Views: 435
  • DSC_0447.JPG
    DSC_0447.JPG
    121.5 KB · Views: 412
  • DSC_0446.JPG
    DSC_0446.JPG
    109.7 KB · Views: 382
  • DSC_0445.JPG
    DSC_0445.JPG
    124.7 KB · Views: 417
  • DSC_0444.JPG
    DSC_0444.JPG
    137.1 KB · Views: 416
Sponsored Links
Will you replace the newel posts or reuse them?
I think I'm going to keep them. Will be using square banister posts to go with them mind you.

Just took some carpet up and found some nasty old tiles. Black hard tiles. Some are broken around the edges, look like they snapped when some nailed the carper tacks straight into them. Think next priority will probably to get that small space tiled over before I do anything else:eek:. To match the kitchen.
 

Attachments

  • DSC_0453.JPG
    DSC_0453.JPG
    143.8 KB · Views: 310
limakilo, good evening.

Suggest caution with the tiles you have uncovered.

If your property has a solid concrete floor? built in the 50s or 60s the tiles may well contain Asbestos?

Also and more concerning is that these so called Thermo-Plastic tiles will be glued down to the concrete with a bituminous black adhesive, which is the Damp Proof membrane that is stopping the ground water from getting into the property.

If you disturb the tiles and more especially the bituminous adhesive you may fined a load of damp areas forming??

Just a consideration?

Ken.
 
Sponsored Links
limakilo, good evening.

Suggest caution with the tiles you have uncovered.

If your property has a solid concrete floor? built in the 50s or 60s the tiles may well contain Asbestos?

Also and more concerning is that these so called Thermo-Plastic tiles will be glued down to the concrete with a bituminous black adhesive, which is the Damp Proof membrane that is stopping the ground water from getting into the property.

If you disturb the tiles and more especially the bituminous adhesive you may fined a load of damp areas forming??

Just a consideration?

Ken.

I had no idea it was a damp proofing solution. Well, the extent of the damage to a few of the tiles is roughly 1 to 5 cm cracks in length, and the pieces are no more than 2cm in width. It is just a few tiles, and they're all around the edges where the carpet was tacked down. I'm not sure how serious the asbestos risk is? Is their something I can do to perhaps just seal it down around the edge and cover the tiles? I don't want to go ****ing about with then. My girlfriend now wants laminate flooring down, and I was thinking some duct tape over the tiles around the edge, underlay, duct tape edges, then laminate. Not sure how feasible that is, but in reality, we simply can't afford anything expensive such as concrete or removal.
 
Your hallway etc looks so similar to how ours was before we started, from the brass handles to the sapele wood doors...

We also have some thermoplastic tiles down (the whole of the ground floor) which we had tested - and they contain asbestos. We were told we could remove them ourselves as they are low risk, but we never bothered.

As to them being the damp proofing, this is unlikely as they dont go under the walls or skirting, they were fitted after the walls were built and the skirting put on.

Having said this, dont assume they are/arent asbestos just because they look like they might be!
 
Finally ripped all the boards out, no spindles behind as expected. Got some 32mm spindles to fit the existing handrail groove. The boards sat on the stair string so I had to fit a new baserail to take the spindles, because it looks better and is more secure (and can hide dodgy cuts). It was a bastard getting the baserail on the not so flat landing, had to get creative with a saw. Took best part of two days, sawing the crap out of everything. All spindles are pinned top and bottom plus glue, and all fillets are pinned and glued top and bottom. Veneer pins for fillets and panel pins for spindles. Baserails are screwed roughly 250mm apart or minimum of 3 screws for the small bit.

Not a masterpiece, wouldn't to happy if I paid someone to do it, but to be honest I did it all with a handsaw, a spirit level, and some twisty bevel edge to help me guesstimate angles. Mostly on the floor outside with a box of tiles as my cutting bench. I need more tools.

Lessons learnt;
Get a bench.
Get an electric saw of some description.
30mm nails aren't the same as 20mm pins (RIP spindle).
Learn about angles and cutting, preferably not halfway through 20 spindles.
Start from the top, it's further to fall.
If you didn't build it, assume it's not straight!
 

Attachments

  • DSC_0047.JPG
    DSC_0047.JPG
    119.6 KB · Views: 336
  • DSC_0048.JPG
    DSC_0048.JPG
    124.5 KB · Views: 319
Get a tape measure and a calculator too ;)

It looks pretty good to me, much better than the boards. Do the spindles let more light in to the hall?
 
Get a tape measure and a calculator too ;)

It looks pretty good to me, much better than the boards. Do the spindles let more light in to the hall?
I forgot about the trusty tape measure, pain in the arse trying to use that when you get the the newel post!
Improvement in the light is great, upstairs and down. I knew it would be better, but it's actually good to see it done. Got some little nail holes to fill and little gaps that may not vanish with paint to sort, and some spots on the wall to fill. Then going to prime the spindles etc, and the rest of the woodwork on the hall and landing to cover some old paint and obviously the black handrails and get some type of uniformity in colour. Vast majority has been sanded to some degree. Thinking 2 primer, 2 undercoat, and we are still deciding on gloss/satin/eggshell. Going with white to go with pale green/brown colour walls (looks better than it sounds). Got another week off to get it done!
 

DIYnot Local

Staff member

If you need to find a tradesperson to get your job done, please try our local search below, or if you are doing it yourself you can find suppliers local to you.

Select the supplier or trade you require, enter your location to begin your search.


Are you a trade or supplier? You can create your listing free at DIYnot Local

 
Sponsored Links
Back
Top