Help!! Dimmer

Joined
2 Dec 2010
Messages
16
Reaction score
0
Location
Sussex
Country
United Kingdom
Hi all, I hope someone can help.

Im my living room there is a total of 3 lights. 2 controllled by one switch. and the other by the remaining switch.

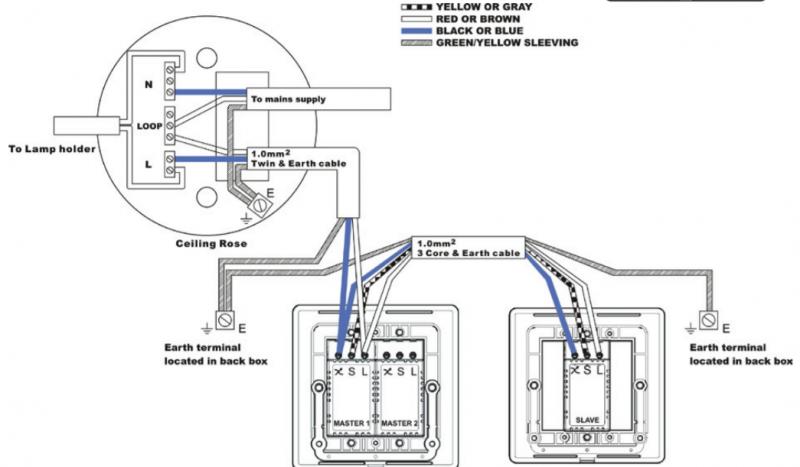
I want to fit a dimmer and they don't resemble each other at the back.

Prior to disconnection of the original it looked like this:


And the back of the new one looks like this:


Thanks in advance!
 
Sponsored Links
You probably want to put both of the wires that are currently in "COM" into "L" on the new dimmer (discarding the link wire) and then L1 to ~1 for the other two wires.

The faceplate also requires the earth wire to be connected to it, as well as a link to the backbox.
 
As above, com cables to to L on dimmer, discard link wire.
L1 of each gang to ≠1 of each gang.
Metallic dimmer requires connecting to earth and earth proved as continuous.
 
Sponsored Links
They want directly connecting to the the metallic switch plate earth terminals.
They look in good condition, but unfortunately just a visual of them does not confirm continuity, as you have a metallic switch it is very important that earths will work in case of a short to the plate. This needs electrically testing, if you have a multi-meter you could do a r1+r2 test.

Also note the minimum and maximum loads on each gang of the dimmer, do your loads comply with these.
 
Where did you get that dimmer, it quotes 200 to 230 volts? Your supply probably exceeds that and may be as high as 253 volts.
 
I take one out of the block to earth?

No they all need to be together to help keep continuity throughout.
So you have two options all three conductors in to earth terminal on switch plate or a length of earth between the connector block and the switch plate leaving all the other three in the connector as well.

Need a sparkie!
If you cannot check the continuity of the earth/CPC, I would recommend one for safety reasons, it is important that earth continuity is in place, especially when metallic accessories are being installed.
 
I look at the sine wave with arrow through it and hesitate at giving instructions. I looked for Holder dimming switches without finding any diagram but with these switches.
The sine wave with arrow through it is a data connection to the other switch of a pair.

I would say follow the instructions that came with the switch. Today there are far too many cleaver switches to jump in with standard wiring diagrams. Switches have for years used their own standards some using com others using L1 for the same terminal. The fact it has 5 terminals plus earth does seem odd normally two switches will have there own supply even when on the same plate if it needs a link then that is external to the switch.

To have a line and wire it seems that the switch is being used as a junction box and it supplies the next switch as well as the lights using USA stile of wiring. In the USA the switches have larger terminals to take the extra wires you may have a problem with switches in the UK taking that many cables.

As said likely L is common and sine wave with arrow through it 1 is supply to lights but that is a guess. Guessing is not good enough you need to read the info that came with the switch. You may have picked up a slave rather than master and it may not be suitable.
 
Now considering using a white plastic one if its something I can do on my own
 
Where did you get that dimmer, it quotes 200 to 230 volts? Your supply probably exceeds that and may be as high as 253 volts.
He is very hard-of-thinking when it comes to voltages - no matter how many times people here try (and trust me - many people have tried many times) to explain the concept of "nominal" he just isn't bright enough to understand it.

Unfortunately for everybody else he does not see why his lack of intelligence and understanding should stop him from giving "advice".
 
Back in the 1980's the dimmer was the in thing but today they are a problem with modern LED and CFL lights and have lost favour.

Since you have neutrals at the switch which is unusual you can get dimmers which will work with low power bulbs.

Today most tungsten bulbs use quartz envelopes which are designed to run very hot. Running cool causes the envelope to go black as the tungsten is deposited on the envelope rather than the element which causes premature failure of the bulbs.

With LED lamps the bulbs are often twice the cost for dimmable ones rather than non dimmable the same with CFL and with LED the colour stays the same you don't get the warm red glow when dimmed.

The 1/3 and 2/3 split is now the way to alter light levels this give three light levels with two switches.

Be aware also there is leading and lagging with dimmer switches and lamp and switch has to match. I had loads of dimmers but one by one all ripped out just too much hassle. I want to be able to pick up a bulb in the supermarket and simply fit it. Not have to send away for a special bulb for my system.

I see the point in the local church have dimmable lights so they can use projectors to show words to the hymns and adjust lights so they can be read. But in the home it's just too much hassle. Keep it simple.
 

DIYnot Local

Staff member

If you need to find a tradesperson to get your job done, please try our local search below, or if you are doing it yourself you can find suppliers local to you.

Select the supplier or trade you require, enter your location to begin your search.


Are you a trade or supplier? You can create your listing free at DIYnot Local

 
Sponsored Links
Back
Top