• Looking for a smarter way to manage your heating this winter? We’ve been testing the new Aqara Radiator Thermostat W600 to see how quiet, accurate and easy it is to use around the home. Click here read our review.

Help needed with shallow 110mm drainage

Joined
7 Jul 2015
Messages
42
Reaction score
4
Country
United Kingdom
Hi

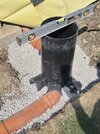
I have a 110mm pipe coming out from my half done extension that is only 8cm under the level of the intended patio (from the top of the pipe). The 110mm will carry kitchen sink and dishwasher waste via a standard 40mm waste pipe through a hole under the window.

I was going to fit this inspection chamber tomorrow with a roddable bottle gully but the inspection chamber would stick well above the intended patio and the gully is so deep it would be going uphill to the inspection chamber.

I then looked at a hopper and a p-trap which is shallower than the bottle gully at only 5cm from grid to top of outlet pipe, but i would still have inspection chamber well above patio.

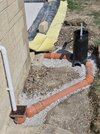
I found a 3 inlet inspection chamber at Travis Perkins (I can't find on their website but it is like this) that i can cut down. It has a lid which would stand 10cm above the inlet pipe. This is the narrowest I could find, and i could use with the ptrap and hopper but would require a big bend radius pipe as the inlets are on the back.

Has anybody got any other ideas please? I really after a very slim inspection chamber including lid with a left side 90deg inlet.

Thanks
 

Attachments

  • WhatsApp Image 2025-08-08 at 17.55.05_c1450432.jpg
    WhatsApp Image 2025-08-08 at 17.55.05_c1450432.jpg
    635.4 KB · Views: 41
Last edited:
Look at 'Level Invert' chambers, these will accept the incoming connection at the same level as the outgoing, which will keep your drain run lower from the chamber. Osma version for your needs is part No. 4D918. May not need a Riser, just drop the cover straight on the base. If you need a gain a bit of height to accommodate the Gully, a concrete Gully surround could allow you to sit the gully slightly higher than the finished patio level.

Provided the Trap fitted to your sink has a suitable seal depth, (75mm), then you can make a direct connection to the drain if preferred.
 
Hi Hugh

Thanks for the reply. Yeah i saw the left handed one you mention in Travis Perkins. They didn't have a lid in stock to see how far in the chamber the lid went. So i couldn't determine the height of the lid (4D969) above the inlet.

I dont have a P-trap yet. I was going to get this tomorrow and rig up the old sink, and hopefully I'll be able to use the same hole for the new sink, when I actually have some walls, a roof and a kitchen.

When you say "direct connection", do you mean 40 mm down the external wall and then some sort of reducer (BOS?) to get into the 110mm pipe? Are these ok to use underground?

Cheers

Darren

 
@Hugh Jaleak , Found this previous answer from you on another thread "If you need to connect below ground, you'll have to join to that and come up to ground level in 110mm pipework. Then either make a direct connection to the drain with a suitable boss adaptor, or fit a gully."

So I'm guessing i could one of these with the patio level to the top of the 110mm section.

Thanks
 
Last edited:
So I'm guessing i could one of these with the patio level to the top of the 110mm section.
Anything in that vein will be fine, yes. It's not good practice to run waste or downpipe underground, reduce to the smaller size at or around ground level.

You may be able to trim a fraction off the top of the chamber if need be, will also depend on what sort of cover you want to fit. If you want the round cover that goes with the chamber or an inset cover so you can fill it with paving to match the patio, then you may have to improvise how it is fitted to the chamber.
 
Went with the 4D960 and 4D961, with a Screwfix P-Trap and Hopper.

I need to dig out under the pipe a bit more and then fill with 10mm to support.

Is there a preferred way of concreting/slabbing over the pipe? sand, plastic covering, or just put concrete/muck and slab straight on top?

Thanks
 

Attachments

  • WhatsApp Image 2025-08-11 at 10.54.09_d86c7c47.jpg
    WhatsApp Image 2025-08-11 at 10.54.09_d86c7c47.jpg
    667.8 KB · Views: 48
Can I just ensure you've got the chamber the right way around? Cant quite tell from the photo, (will depend on internal shaping of the through channel).

I would bed and haunch with peagravel, if you are able, although if really shallow then concrete haunching is perhaps the better option to protect the pipework from accidental damage. I'd set the chamber on a bit of semi dry concrete too.
 
Can I just ensure you've got the chamber the right way around? Cant quite tell from the photo, (will depend on internal shaping of the through channel).
Well yes I was hoping this would be ok. The channels arent that deep in the chamber and the water flows fine.
The three inputs are at 135, 180, 225 deg. Not only would it take me away from the p-trap i would have to use a 90 bend. I thought 45's were easier to rod. I suppose i could use 2 x 45s but thats more joints.....
 
Take a photo of the chamber, looking in, that'll tell more.

The position of the unused 45 connection raises concern, that should be angled in the direction of flow. Wondering if you've got the wrong handed chamber, there may be Left and Right Handed versions. Although, if you're happy with the flow through, it probably wont be worth worrying about, as long as water/waste isn't holding in the chamber.

 
Hi,
Basically I've turned the chamber around so im using the 145 and 235 inputs.

I need to dig the trench a little deeper under the pipe so waiting for a 1/2 bag of 10mm clean to arrive. Nothing is set in stone yet. Or concrete.

If i need to use the i45 and then a 90 bend connector I will but this was easier and used a 45 pipe connector.
 

Attachments

  • 20250814_173834.jpg
    20250814_173834.jpg
    661.2 KB · Views: 31
Inside chamber
 

Attachments

  • 17551974130446265902803933307374.jpg
    17551974130446265902803933307374.jpg
    325.2 KB · Views: 31
As I suspected, its the wrong way round. The Outlet is on the right, you've bunged it off, the chamber is designed with a through channel and 2 entries at 45º.

I really would suggest you refit the chamber the right way round, and use either a 45 on the inlet or 2x 22.5º bends one either end of the through channel, to line it up as its designed to be. If the Gully is taking kitchen waste, I can see detritus building up in the chamber over time, and it blocking. The blanking plug is going to collect all the fat, grease and rubbish going, you need a smooth flow through to keep things clean.

Picture as a guide.
inspection-chamber-500x392.png
 
Hi @Hugh Jaleak

Thanks for your advice on this.

Just need to pour some concrete over and stick a few patio slabs on to my desired level.

Cheers
 

Attachments

  • 20250817_114235.jpg
    20250817_114235.jpg
    761.4 KB · Views: 31
  • 20250817_114224.jpg
    20250817_114224.jpg
    409.3 KB · Views: 30
  • 20250817_114207.jpg
    20250817_114207.jpg
    586.7 KB · Views: 30
  • 20250817_114153.jpg
    20250817_114153.jpg
    641.5 KB · Views: 33
Looking at that last photo you could have gone in the side 45 entry and omitted a bend, sorry I couldn't work out the angles from the initial photo in Post 6 to suggest that, but it doesn't matter now, looks a tidy job, well done.

Also so nice to help someone who's willing to listen, takes the advice on board and wants to do it right. (y)
 
Always good to learn how to do things properly with a bit of care and attention, and not bodged together like the bloke down the pub said...

Also feels good to get it right.

Thanks again

DJ
 

If you need to find a tradesperson to get your job done, please try our local search below, or if you are doing it yourself you can find suppliers local to you.

Select the supplier or trade you require, enter your location to begin your search.


Are you a trade or supplier? You can create your listing free at DIYnot Local

 
Back
Top