Help Required - Shower Drain Issue

Joined
27 Sep 2011
Messages
841
Reaction score
28
Country
United Kingdom
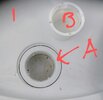
I lost the original shower drain cap.

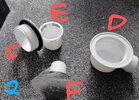
So I went and purchased this
FLUIDMASTER SHOWER WASTE

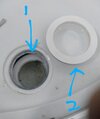
But the cap it does not fit the existing trap kit.

I cannot easily access things below the tray, due to tightness, tiling etc

Can anyone advise on what I can do?

Is my only options to keep purchasing shower waste traps and see which cap fits?

Or access the trap from the room below but cutting into the PB ceiling
 
Sponsored Links
What is the existing shower trap? If no idea, post photo, someone may recognise it. Failing that, if you wanted to fit the fluid master, access to below is required, if that means cutting plasterboard, so be it.
 
I have unscrewed the top thread (male) from the base of the trap(female) and managed to screw the new one (male) in place without any problems.
Sounds a bit dicey I know but I was surprised how easy it was to do.
 
What is the existing shower trap? If no idea, post photo, someone may recognise it. Failing that, if you wanted to fit the fluid master, access to below is required, if that means cutting plasterboard, so be it.
I don't know the brand of the existing shower trap, so I will post pics

Picture 1 is the existing setup i.e. the unknown trap

Can anyone confirm whether the part labelled A is removable by twisting? I have tried twisiting it out but it won't budge.

Picture 2 is the new Flopast trap kit that I bought

The drain cap (F) is a few mm bigger than the part A
 

Attachments

  • IMG_20230912_104317317~2.jpg
    IMG_20230912_104317317~2.jpg
    170.2 KB · Views: 57
  • IMG_20230912_104003895~3.jpg
    IMG_20230912_104003895~3.jpg
    573.7 KB · Views: 50
Sponsored Links
I have unscrewed the top thread (male) from the base of the trap(female) and managed to screw the new one (male) in place without any problems.
Sounds a bit dicey I know but I was surprised how easy it was to do.
I thought so, the part i have labelled A should be removable from above the shower tray by twisting.

In the new flopast parts i believe that this part C & D

However mine wont budge.. I think the plumber may have siliconed in place.

Does anyone have any suggestions on how to get it off?

I really want to avoid cutting into the plasterboard below.
 
You are right part C of the new should screw into D of the old thread without any problems.
It just needs something to get a purchase on for a anti- clockwise turn, being a plumber I would cut a piece of 15mm copper tube the diameter of D and place one end over one of those 4 lugs or both this should give you a bit of purchase for a anti-clockwise twist with a pair of pliers.
Even if mastic has been used it won't make much difference to the tightness.
Thanks.. I'm going to give this a try today.

Do any plumbers have any additional suggestions one what I could do if the above doesn't work for me?
 
Managed to get the part off by wedging my paint scaper then unscrewing. Thanks @Servotech

Before screwing the new part labelled 2 onto the old, should i remove the old silicone put on part 1 and just hand tighten? Or is it best to apply some fresh silicone?

Also i heard that silicone breaks down over time and causes leaks, so it better to use something like plumbers mate/OB1 or something else?
 

Attachments

  • IMG_20230920_104824224~2.jpg
    IMG_20230920_104824224~2.jpg
    148.3 KB · Views: 30
I think that you must have got it done OK by now V.
For what it's worth here's my late reply (Sorry, I've been away)) I'd personally clean off the old silicone the best I could then fit the new one hand tight with no silicone.
On the face of it it seems a dicey job but I've always managed to carry it out successfully.
No worries, thank you for replying.

Yes, I completed the job.

I did exactly as you recommended. Removed the old silicone and hand tightened the new fitting. No leaks, so chuffed :mrgreen:
 

DIYnot Local

Staff member

If you need to find a tradesperson to get your job done, please try our local search below, or if you are doing it yourself you can find suppliers local to you.

Select the supplier or trade you require, enter your location to begin your search.


Are you a trade or supplier? You can create your listing free at DIYnot Local

 
Sponsored Links
Back
Top