Help! Roof valley leaking

Joined
24 Nov 2013
Messages
328
Reaction score
12
Location
Berkshire
Country
United Kingdom
Hi

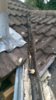
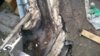
So we have a leak at the bottom of the roof valley - water drips onto the soffit and then internally.

I've taken off some of the tiles today and posted two pics: One an overview and the other a more detailed picture.

I think I can see that it is leaking because the roof valley on the left has been cut short and there is no way water can escape outside. What I obvisouly don't know if how to fix this! And should I worry about all the motar in valley itself?

Thanks a lot in advance for any advice!
 

Attachments

  • IMG_20180613_170422.jpg
    IMG_20180613_170422.jpg
    343 KB · Views: 1,594
  • IMG_20180613_170510.jpg
    IMG_20180613_170510.jpg
    409.4 KB · Views: 1,027
  • IMG_20180613_170428.jpg
    IMG_20180613_170428.jpg
    388.6 KB · Views: 1,119
Sponsored Links
from what i can understand from the photos you might be best advised to strip the valley on both sides and lift outthe valley trough materials. you might even have to strip backinto the roof plane of tiles on either side to pick up the underfelt.
the bottom of the valley looks shaky but leaks could be entering higher up the valley an presentin at the bottom.

best to start early in the morning with two of you an a tiedin ladder that wont get in your way as it projects 3 rungs above the gutter.

when its stripped off post photos on here. if youve got doubts about workin up there then give the job to a roofer.
 
Many thanks for your reply. Thankfully this is a small valley about 6 tiles on one side to the ridge and is accessible from a 1st floor terrace so can get up their even with a stepladder. The pitch is such I can walk on the roof too. The other "plus" point is none of the tiles seem fixed with nails contrary to everything I've read so far. So a lot of things in my favour perhaps except my own (lack of at times) common sense!

Having considered your comments and read and thought some more would I be right in saying that the reason it is leaking is due to the underlay felt being totally knackered and each 1M strip should run nicely into the valley and out the other side ? I guess there is no way to conduct a small fix and somehow repair where the existing underlay has torn? I guess that would be a bodge if its possible but might keep things running for another year or two when we could do it properly? If not will think about the full valley renewal.
 
stop jumpin around hopin to guess whats wrong . and decide are you or a roofer going to do the job.
for whatits wotrh i've told you above what to do, others might think different.

no matter how you access the roof its got to be tied in.
 
Sponsored Links
Under lay isn't the cause of the leak and should not be relied on to keep you dry.
The bottom of the valley is incorrect. The first course of tiles to the right should be cut into fascia on left. A big lead saddle then fitted and dressed to shape. allowing for the GRP to over lap . all side edges turned up to prevent water running off the sides.
Clearly the inadequate lead currently fitted has no turn ups and is too small anyway.
Judging from the lash up you have I would expect no lead saddle to have been fitted below the ridge either.
Easiest option is strip the mess out and start again.
 
Understood about the underlay - its a last defense should there be a leak elsewhere?

The first course of tiles to the right should be cut into fascia on left. A big lead saddle then fitted and dressed to shape. allowing for the GRP to over lap . .

I've been running that through my head over and over and still can't get my head around it. Does it mean there should be a notch cut in the left facia and the valley allowed to run over it with tiles on top of that? (but why the tiles on the right?) I've attached pic again with thick green line on left showing what I think you might mean?

Also is this what it needs to conform to - again not the easiest of docs to understand and can't see any detail about how it emerges into the gutter.
https://www.nfrc.co.uk/docs/default...formed-grp-valley-troughs-nov-15.pdf?sfvrsn=2

Thanks a lot by the way for your help.
 

Attachments

  • IMG_20180613_170510.jpg
    IMG_20180613_170510.jpg
    413.7 KB · Views: 540
Red line + tile
Green = GRP valley where it should be
Orange =Lead works
Blue = fascia notch

Valley runs over the lead saddle which is dressed over the first tile on the right

It's a common detail which if you look around you may see replicated.. yours is a lash up..
 

Attachments

  • valletdet.jpg
    valletdet.jpg
    257.1 KB · Views: 567
Red line + tile
Green = GRP valley where it should be
Orange =Lead works
Blue = fascia notch

Valley runs over the lead saddle which is dressed over the first tile on the right

It's a common detail which if you look around you may see replicated.. yours is a lash up..

Thank you so much for that!!! That is pretty clear and also pretty clear the original "builders" didn't do it properly at all. Will get it fixed a bit later in the summer.
 
Just revisiting this. I don't think the pictures I uploaded showed that the valley discharges into a gutter. Does that mean I don't need the lead apron at the bottom?
 
I worked that out from your pictures.
You shouldn't need a saddle under the first RH tile
You need a saddle over the top of the first tile (RHS) and under under the GRP and First tile (LHS) turn edges of saddle up to prevent water running off sideways
If you are careful and don't scrimp on the saddle size it can be dressed to weather where the first RH tile butts the LH fascia

Careful where you position your mortar.
 
I worked that out from your pictures.
You shouldn't need a saddle under the first RH tile
You need a saddle over the top of the first tile (RHS) and under under the GRP and First tile (LHS) turn edges of saddle up to prevent water running off sideways
If you are careful and don't scrimp on the saddle size it can be dressed to weather where the first RH tile butts the LH fascia
By saddle (goes over the ridge etc) I'm guessing you mean soaker. This is how we would do it too.
 
I'm planning to get this done in the next couple of weeks. At risk of being shot down for ignoring advice, I'm planning to redo just the bottom part of the valley - at least for now. The reasons are I'm now 100% sure the leak is due to water running down the valley on the left hand side then simply falls out of the valley just before it hits the facia board. Also it would be an easier job than the whole lot especially since its the first time I've done anything to a valley.

The two main things I still don't understand are:

1/ Trying to figure out what the existing grp valley is so I can get something close for the bottom of the valley. It measures about 360mm wideand the tiles are redland. Maybe I can use any grp valley so long as it is the same or wider width? The redland 125 is 400mm wide for example, maybe I could use that? Danelaw would be easier for me to get though.

2/ Having read so much from the manufacturer websites I still can't get it into my fick skull why I need a lead saddle at the bottom? I mean if the facia is notched, and the grp valley flows over it into the gutter what is the saddle for? Its not that I'm trying to save pennies but I just still not clear where to put it if its mandatory.
 

DIYnot Local

Staff member

If you need to find a tradesperson to get your job done, please try our local search below, or if you are doing it yourself you can find suppliers local to you.

Select the supplier or trade you require, enter your location to begin your search.


Are you a trade or supplier? You can create your listing free at DIYnot Local

 
Sponsored Links
Back
Top