
You are using an out of date browser. It may not display this or other websites correctly.
You should upgrade or use an alternative browser.
You should upgrade or use an alternative browser.
Henry Hoover (hetty model) fault diagnosis? Any help please?
- Thread starter Alberto2015
- Start date
- Joined
- 14 Nov 2015
- Messages
- 13
- Reaction score
- 0
- Country

the only thing left is the pcb.
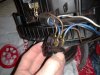
You need to put the 2 white wires from the motor direct to the on off switch. One either side one on brown one one blue. And disregard the pcb and the wires on that. look at the post re Henry below. That's wat needs to come out.
No you can't check without a tester. I've done hundreds of these and on my a couple have been on off switch. If you changed the plug and cut off 3 inches at the head end and rewired it back into the head the only thing left is the pcb. You need to put the 2 white wires from the motor direct to the on off switch. One either side one on brown one one blue. And disregard the pcb and the wires on that. look at the post re Henry below. That's wat needs to come out.
Can the Hoover operate without the PCB completely? There is no extra terminals for the white wire spades, I presume I will have to cut, crimp and join them with the blue and brown either side you mentioned?
- Joined
- 30 Apr 2008
- Messages
- 6,137
- Reaction score
- 1,045
- Country
Yes it will work without the the pcb. But the low speed won't. No need to cut or crimp the wires just pull off the old one and replace with the white ones. The rest of the wires attached to pcb are no good. Wait till you get a tester tomoz it might be the switch
- Joined
- 14 Nov 2015
- Messages
- 13
- Reaction score
- 0
- Country
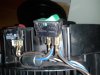
So ill leave alone the main live + neutral. (brown and blue that are in individual terminals on the left if the pic, and feed from the head of the appliance)
One of the terminals on the on/off switch is doubled up. Which is a brown wire from the pcb into the on off, then looped into the high low switch. Will i remove that wire completely and attach the white wire from the motor to the on off switch terminal?
One of the terminals on the on/off switch is doubled up. Which is a brown wire from the pcb into the on off, then looped into the high low switch. Will i remove that wire completely and attach the white wire from the motor to the on off switch terminal?
Attachments
- Joined
- 14 Nov 2015
- Messages
- 13
- Reaction score
- 0
- Country
Where do I send the christmas card mate??
Removing the PCB and switch did the trick..
Thank you for taking the time to explain
Removing the PCB and switch did the trick..
Thank you for taking the time to explain
- Joined
- 14 Nov 2015
- Messages
- 13
- Reaction score
- 0
- Country
Good stuff. Saves you buying a meter and another Hoover ,hetty lives on for a few more years. Them pcbs have been a problem for years. It blows a little triac on the board and you can't replace them.
It sure does. I don't mind paying for something when it's needed, but I like to have a go at fixing things first before condemning them. So I'm glad you were on hand to help me out.
I may still purchase a voltage/multi meter, as I'd like to improve my skills/knowledge on its usage and it may come in handy one day. (Could save a bit of initial guess work if anything was to go faulty again )
Regarding that then, whilst you are on the forum, could you possibly tell me how I would go about checking the continuity of the hoover's on / off switch?
- Joined
- 30 Apr 2008
- Messages
- 6,137
- Reaction score
- 1,045
- Country
Just put a continuity tester on the 2 live wires and as you switch on and off it will bleep for continuity and nothing when switched other way. Same with the neg side. But don't plug it in mains to test. You can check the cables with that tester as well. Just like a fuse tester you buy it shops, handy little gadget
DIYnot Local
Staff member
If you need to find a tradesperson to get your job done, please try our local search below, or if you are doing it yourself you can find suppliers local to you.
Select the supplier or trade you require, enter your location to begin your search.
Please select a service and enter a location to continue...
Are you a trade or supplier? You can create your listing free at DIYnot Local