Honeywell ST699 to Hive HW/CH

Joined
10 Apr 2022
Messages
31
Reaction score
0
Country
United Kingdom
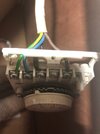
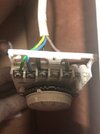
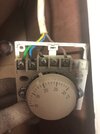
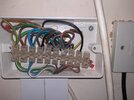
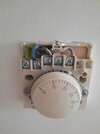
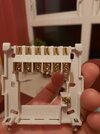
Hi I have a Hive HW/CH to replace my Honeywell ST699 programmer and thermostat. I have a conventional boiler and thermostat controlled hot water tank in the airing cupboard. Typical stuff.
I understand I need to bridge the live and live switch cables to bypass the old thermostat to enable the Hive to take control of thermostat functions. That's quite easy and will probably just bridge and then push carefully into the wall cavity for future use of necessary.

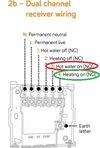
However...could anyone please give me some directions of how they think I can transfer the old ST699 programmer to the Hive programmer. Am I doomed to get my multimeter out and trace all the wires from the wiring loom into the ST699 programmer to identity where they should all go into the Hive?

Photos attached and renamed for reference! Thanks
 

Attachments

  • HONEYWELL BACKPLATE.jpg
    HONEYWELL BACKPLATE.jpg
    196.7 KB · Views: 73
  • WIRING CENTRE.jpg
    WIRING CENTRE.jpg
    244.6 KB · Views: 68
  • THERMOSTAT.jpg
    THERMOSTAT.jpg
    172.5 KB · Views: 48
  • HIVE Wiring diagram .jpg
    HIVE Wiring diagram .jpg
    40.5 KB · Views: 49
  • HIVE BACKPLATE.jpg
    HIVE BACKPLATE.jpg
    147.9 KB · Views: 75
Sponsored Links
No, simple enough. From Honeywell to Hive:

L to L
N to N
Terminal 3 to terminal 4 (heating on)
Terminal 6 to terminal 3 (hot water on)
Terminal 7 to terminal 1 (hot water off) - It’s a bit naughty to use a green/yellow wire (normally cpc/earth, but has brown sleeving at least).

Yes to bridging, or do it at wiring center.
That's great thanks for that clarification - helps with the confidence in doing this!

For terminal 5 (CH COM) and 8 (HW COM), should I just remove from the wiring centre as it seems that they wouldn't be needed? Or I could tether off with a lever nut and pop into the wall cavity (like I might do with the thermostat when bridging the live and live switch) if needed for future use? Thanks
 
For terminal 5 (CH COM) and 8 (HW COM), should I just remove from the wiring centre as it seems that they wouldn't be needed?
And I thought we'd been through this!...

 
  • Thanks
Reactions: CBW
Sponsored Links
And I thought we'd been through this!...

Ah yes you're right, woops! Thanks for your help though, really useful
 
I have looked at the pictures, and I have failed to find anything which shows the control is all 230 volt. Maybe I have missed some thing, but the Honeywell was volt free and the Hive is 230 volt only, if the original is 230 volt then no problem, but that needs testing, it could be extra low voltage.
 
As I understand, the Hive COM is inbuilt
Yes.
Remove the link wires connecting the COMs in the Honeywell.
so should be all good to go with RandomGrinch's wiring outline for the Hive?
As @CBW.

Shall we join the dots...

Hot water NC on Honeywell to Hot water NC on Hive
Hot water NO on Honeywell to Hot water NO on Hive
C/H NO on Honeywell to C/H NO on Hive
L on Honeywell to L on Hive
N on Honeywell to N on Hive

Pretty straightforward really? ;)

And link out the thermostat, either at the 'stat, or at the wiring centre.
 
  • Thanks
Reactions: CBW
It does seem to be Y Plan, as both N/C and N/O used on DHW, which points to 230 volt control. Today I don't think there are any 24 volt motorised valves, but they were used in the past.

I have some non standard wiring so am aware others may also have non standard wiring so cautious.
 
Yes.
Remove the link wires connecting the COMs in the Honeywell.

As @CBW.

Shall we join the dots...

Hot water NC on Honeywell to Hot water NC on Hive
Hot water NO on Honeywell to Hot water NO on Hive
C/H NO on Honeywell to C/H NO on Hive
L on Honeywell to L on Hive
N on Honeywell to N on Hive

Pretty straightforward really? ;)

And link out the thermostat, either at the 'stat, or at the wiring centre.
Thanks again. Just to clarify, with the thermostat, I'm going to bridge wires in terminal 3 and 1. For terminal 2 and Earth, I'm will just push them into the wall cavity too? (I might stick a Wago on each as that's probably more proper). Thanks
THERMOSTAT.jpg
 
I'm going to bridge wires in terminal 3 and 1
Yes, or just stick the thermostat up to max and leave it there.

I might stick a Wago on each as that's probably more proper
Yes, stick each into a separate Wago. Leaving them bare in the cavity would definitely not be proper.

One note of caution, if you intend to leave these wires in their existing positions, you will need to ensure the area the wires are in, can still be identified as a 'safe zone'.
The easiest way to do this, would be to use a blanking plate over the hole where the 'stat used to be.

If you want to make good the wall, bridging out the stat at the wiring centre and disconnecting the cable, would probably be the best way.
 
  • Thanks
Reactions: CBW
Yes, or just stick the thermostat up to max and leave it there.


Yes, stick each into a separate Wago. Leaving them bare in the cavity would definitely not be proper.

One note of caution, if you intend to leave these wires in their existing positions, you will need to ensure the area the wires are in, can still be identified as a 'safe zone'.
The easiest way to do this, would be to use a blanking plate over the hole where the 'stat used to be.

If you want to make good the wall, bridging out the stat at the wiring centre and disconnecting the cable, would probably be the best way.
Hi thanks for your help - in the end I put decent electrical tape around them, which is apparently satisfactory. You're right about making the area noticeable for future residents - at the moment I've mounted the Hive stat back plate over the top and will probably replacev with something more minimalist. Will then probably hand a picture over it
Thanks for all your help, I have it all working. If I had a prize to give for best advice, it would be yours
 
Hello
I recently connected the new Hive system, hub, receiver, and thermostat but stumbled in working out the wiring on the receiver. I have attached a few pics of the wiring, but for some reason, the live is connected to the neutral, and live is connected to the neutral. The current system is still working fine for 20 years and has never broken down. Still using a gravity-fed system pumped. I did end up taking back the hive system to the shop and reconnected back the old system.
My question to anyone is on the hive receiver do copy the wiring as it it is currently to the hive. So meaning, live to neutral and neutral to live on the hive system? When I did connect the wires in the neutral to neutral and live to live the system did not wan to work correctly.
Here are some pictures to show you what I have.
IMG_4832.JPG
IMG_4833.JPG
IMG_4834.JPG
IMG_4836.JPG
IMG_4837.JPG
 

Attachments

  • IMG_4839.JPG
    IMG_4839.JPG
    39.4 KB · Views: 20
  • IMG_4840.JPG
    IMG_4840.JPG
    38.8 KB · Views: 16
  • IMG_4841.JPG
    IMG_4841.JPG
    39.9 KB · Views: 20
  • IMG_4842.JPG
    IMG_4842.JPG
    42.8 KB · Views: 20

DIYnot Local

Staff member

If you need to find a tradesperson to get your job done, please try our local search below, or if you are doing it yourself you can find suppliers local to you.

Select the supplier or trade you require, enter your location to begin your search.


Are you a trade or supplier? You can create your listing free at DIYnot Local

 
Sponsored Links
Back
Top