Honeywell T6R HW install

Joined
10 Feb 2022
Messages
9
Reaction score
0
Country
United Kingdom
I live in a new build and I have the esi system installed.
I’m looking at installing the Honeywell T6R HW. I have two zones and separate hot water control.
This is what I’m thinking
Receiver 1- First zone and HW control
Receiver 2- Second zone
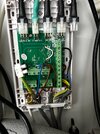
My current setup:

Main module on the tank
upload_2022-2-10_17-17-41.jpeg


Two thermostats
upload_2022-2-10_17-18-0.jpeg


Programmer
upload_2022-2-10_17-18-14.jpeg


The new receivers are similar to this
upload_2022-2-10_17-18-44.jpeg


I’m proposing
Taking a cable from CH1 on and HW on and connecting to B and E
Taking a cable from CH2 on and connecting to B on the second receiver.
Taking E N and L to each receiver and then adding a loop from the extra L on each receiver to A and D on one receiver and A on the second.

The thermostats themselves need L and N for this module
upload_2022-2-10_17-21-37.png


Currently there is L N and N/O at each thermostat. Can I just disconnect the N/O from the main module and continue using the L and N. They will still be connected to STAT 1 and 2 on the main module. Or do I need to disconnect them from STAT 1 and 2 and connect the wires to a different L and N?
 
Last edited:
Sponsored Links
Hi Stem
Could I get your opinion on my system for a smart meter install? I wasn’t able to send you a PM
https://www.diynot.com/diy/threads/honeywell-t6r-hw-install.586571/

Thanks for the invite :) I had to disable my PM's as I was deluged with requests for assistance that hadn't been posted on the public forum.

I've never installed an ESI ES WPB Three, however apart from the 'plug in' facility it follows the same convention of a regular S-Plan+ so what you suggests sounds fine to me.

I would also, wire the T6R receivers to the ESI ES WPB Three 'programmer terminals' CH1 On / CH2 On / Hw On using the B & E terminals you describe. The Second receiver won't use the Hw On connection of course.

Once you remove the old room thermostat NO from the 'ESI ES WPB Three' you will have to add a link to both sets of terminals to complete the circuit caused by the removal of the thermostats. That can be done by adding a link between L1 and NO for Stat 1 and also for Stat 2.

You might not be able to use the existing live at the thermostats, as the 'ESI ES WPB Three' is probably designed so that L1 is controlled via the programmer, so not a permanent live, if that is the case moving the two thermostat wires from L1 to a permanent L wouldn't be a major issue.

EDIT.
Something that occurred to me afterwards. I see that the programmer N and L terminals at the 'ESI ES WPB Three' don't have any wires connected.

Capture.JPG


Obviously the ESI programmer does have a mains supply to it, in fact there are a lot of wires in there, so it seems to be doubling up as a junction box.

Capture1.JPG


I suspect that the mains supply may go to the programmer first and then on to the 'ESI ES WPB Three'. There's no problem there, but it will mean that when you remove the old programmer provision will need to be made such that the wires in the L and N terminals remain connected together as they are now.
 
Last edited:
Thanks for the invite :) I had to disable my PM's as I was deluged with requests for assistance that hadn't been posted on the public forum.

I've never installed an ESI ES WPB Three, however apart from the 'plug in' facility it follows the same convention of a regular S-Plan+ so what you suggests sounds fine to me.

I would also, wire the T6R receivers to the ESI ES WPB Three 'programmer terminals' CH1 On / CH2 On / Hw On using the B & E terminals you describe. The Second receiver won't use the Hw On connection of course.

Once you remove the old room thermostat NO from the 'ESI ES WPB Three' you will have to add a link to both sets of terminals to complete the circuit caused by the removal of the thermostats. That can be done by adding a link between L1 and NO for Stat 1 and also for Stat 2.

You might not be able to use the existing live at the thermostats, as the ESI ES WPB Three' is probably designed so that L1 is controlled via the programmer, so not a permanent live, if that is the case moving the two thermostat wires from L1 to a permanent L wouldn't be a major issue.

Many thanks for your input. I plan to install the two new receivers next to the tank.

With regards to the old programmer
upload_2022-2-16_10-45-40.jpeg


I believe the wires 3,4,6 will need to be removed as they won’t be connected to the ESI ES WPB Three. The other L E N cables I assume are still needed?

Should I remove the plate and join the L E N cables separately with wago connectors to keep them together in a junction box? So all the live together on one connector and all the earth and neutral on two separate wago connectors
 
Sponsored Links
Worked on the install today and managed to get it up and running. You were right with bridging the live and switched live on stat 1 and 2 on the board and also the switched live coming from the board. I needed a permanent live which I got using the old cables from the programmer, I connected them to the L and N terminals of the old programmer

I just need to clean up the wiring and move the power to the thermostats to a separate junction box and add the sleeves for the earth cables.

I can then add the cover to the ESI main board.

I’ve left the old programmer in place as it still acts as a junction box for the multiple L N and earth cables. Will consolidate those at some point as well

1D8FC6EC-45AE-461C-9809-10678AFE3577.jpeg

6D4791FF-CE1F-4AFB-8A2A-8E11787F4998.jpeg

F4C795DF-59AE-4194-B205-ED9CBEDF853F.jpeg

13EDD691-8D11-424D-9714-438EC43912CE.jpeg

652D8465-6D4E-487E-B545-44CC4F220FFC.jpeg

390508AE-BA33-4C8A-B92A-99666106466F.jpeg
 
Last edited:
Well done for getting it working but worth noting that the two receivers are supposed to be a minimum of 30cm apart. If you get communication issues, that's your problem
 
Well done for getting it working but worth noting that the two receivers are supposed to be a minimum of 30cm apart. If you get communication issues, that's your problem
Thanks for that. Both zones and hot water seem to working well. Will keep that in mind
 
Well done, for understanding the circuits and what goes where.(y)

Looking at the photos it appears you hadn't completely finished the work when you took the them, but if you haven't, already done so, don't forget to secure the cables and make everything safe.

I assume that the cable sheaths are now fixed under the cable clamps that were provided with the receivers; but I can't see anything in place to secure the cables where they go into the junction box; they just seem to pass through the grommet. However, if you fix the cables to the wall with clips, or better still put them in trunking that will prevent them being caught and pulled out of the junction box anyway.

On several occasions, I have been asked to help with an installation where insecure cables have been snagged and the wires pulled out of their connections when someone was taking clothes / sheets / coat hanger etc., out of an airing cupboard. On one occasion the wires had became entangled in an ironing board and started a fire.

Ideally, the bare earth wires should have green/yellow sleeves over them to prevent them inadvertently touching anything they shouldn't, but looking at their length and proximity to the other wires in the receivers that wouldn't seem likely.

I plan to finish up this evening. Add clips to the wiring and the earth sheaths. Surprisingly the receivers didn’t come with cable clamps which was strange. Will try to source some from somewhere to secure the wiring.

Will be moving some of the wiring to a separate junction box to power the thermostats. I can then reinstall the white cover to the main board
 
The base of the clamp is molded into the receiver, and the clamps usually come in a separate small plastic bag. Might be worth checking you haven't accidentally thrown them out with the boxes.
 
The base of the clamp is molded into the receiver, and the clamps usually come in a separate small plastic bag. Might be worth checking you haven't accidentally thrown them out with the boxes.
Still have the boxes at home. Got someone to check and they’re not in there.
Can they be purchased separately ?
 
You got me thinking then. I've not had that much exposure to Honeywell T6, so wondered if I was mistaken, Looking at pictures online though, they do seem to show them in a separate bag. Although this is a different model to yours, the clamps look the same.

Capture.JPG


I would imagine that they are made specifically for Honeywell, so you would probably have to ask them for some. However, if they didn't come with the receivers they should send some out to you gratis.
 

DIYnot Local

Staff member

If you need to find a tradesperson to get your job done, please try our local search below, or if you are doing it yourself you can find suppliers local to you.

Select the supplier or trade you require, enter your location to begin your search.


Are you a trade or supplier? You can create your listing free at DIYnot Local

 
Sponsored Links
Back
Top