How best to cut in a curved ceiling?

Joined
30 Oct 2007
Messages
536
Reaction score
0
Location
Yorkshire
Country
United Kingdom
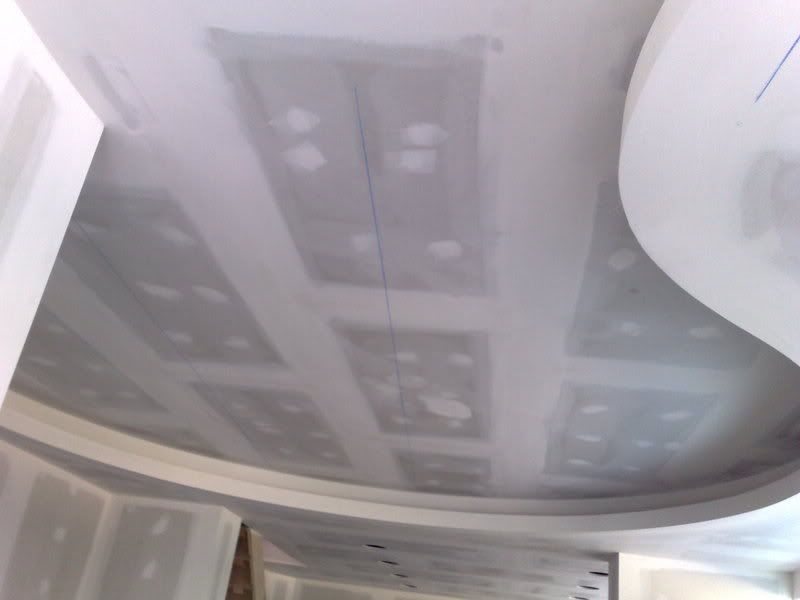
hi guys, i have a ceiling which has a sort of suspended cove to mimic a curved disection in my ceiling. Now I was wondering how I would cut in the curved edges.

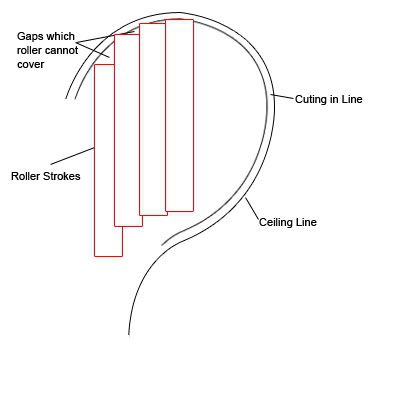
Whilst concentrating on the ceiling what I did was cut in using a brush first but when it come to rolling the rest it become too difficult to reach the edges. So what I did was using a 9" roller, roll around the edges to make the cutting line stick out further and then continue rolling the paint on.

Is this the correct way of doing it?

I have realised however that where the straight roller strokes meet the curved roller "cut in line" it looks very visible. I was wondering whether this would simply dry out and become non noticable later

cheers
 
Sponsored Links
can someone please help me with this as im really stuck and cannot progress with this part of my ceiling.

I also find acute angles very difficult, again what would you guys do to tackle this situation

And finally, is it ok for me to cut in using the normal brush method and then use a small 4" roller to give a nice smooth finish
 
Sponsored Links
sorry but cant wwork out wot your doing>>>??? pic needed I think
 
Confident, silly of me not to provide images in the first place

The following is my ceiling
30062008031.jpg


If you look at the inner part of the curve i.e. the inner cove, I want to cut the ceiling side of this in. This is not a problem however, when i use the roller to paint up to the cut in line, I have an issue as I cant roller right to the cut in line without missing bits out due to the curve. Likewise what do i do to cut in and how would I tackle the rolling

Basically what I have done at the moment is cut in using a 3 inch brush which was fine, roller to the edge as best as i can then follow the path of the cut in line using a 9 inch roller to fill in missed patches. However the result i recieved was naff as you could see the straight roller marks.

In case you dont understand what the problem is, I also have an illustration

probdia.jpg


Obviously the problem is more dramatic than it seems in the diagram but its an illustration

The other problem is similar but with the side of a staircase. Where the staircase strins meet the walls obviously an angle on the wall around 45 degrees exists so when you roller in straight verticle lines on the walls you get to a stage where you 9 inch roller strokes do not meet the diagonal cutting in line, again what would the solution to this be

thanks
 
Uh?

from what ive read on here, your supposed to roller in straight lines. Now when im rolling straight and get to such a point which way would i turn lol
 
Blimey. Looks like you've moved into a converted office - you can see where the ceiling lights were!

With my degree in Rocket Science, I would suggest you turn your roller round, so that the "free" end of the roller is next to the curve. Then roller round the cutting-in line you've drawn, using short strokes, round the curve. You don't need to use straight lines *all* over the ceiling!

Actually.... it's not Rocket Science, after all! :LOL:
 
Buy yourself good quality roller 9" and 4" turn it round on to their side. Your thinking about it to much, rip the dress of yourself get the tunes on and go for it. It you do'nt want roller marks dont put so much pressure on the roller. cool ceiling good luck :eek:
 
I think thats maybe where i went wrong, I did do what you guys mentioned above prior to posting this thread but I guess the reason I was seeing blatant roller marks was due to the pressure i was probably applying.

Also I have just changed rollers finally realising the roller I had was naff. Have a decent quality medium pile 9" and a nice 12" roller also. All of a sudden the jobs seems so much easier :p

Regarding the new converted office, its my new premises where I have basically done a total rip out and shopfit more or less by myself. Hence the reason its taken nearly 8 months so far ;)

Btw the photo you see is an old one, it was the only one showing the cove more clearly.

As you can see the chalk lines on the ceiling, that was due to miscalculations. Lucky for me I didnt hit any furring once I minually cut the 30 recessed light holes out, yes that is 30 lights all by hand lol

But thanks for the help guys, wish me luck in finishing the painting and sorting my security cables out :rolleyes:
 

DIYnot Local

Staff member

If you need to find a tradesperson to get your job done, please try our local search below, or if you are doing it yourself you can find suppliers local to you.

Select the supplier or trade you require, enter your location to begin your search.


Are you a trade or supplier? You can create your listing free at DIYnot Local

 
Sponsored Links
Back
Top