How to re-wire three-way light switch (images)?

Sponsored Links
Three gang - three way is three switches working one light.
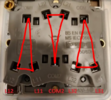
The switches are exactly the same - ignore the lettering.

1701775756424.png
 
What is vital is please make sure you don't mix up the cables between the 2 switches .......... mark the cables & photograph before you disconnect anything.
 
Thanks for your replies.

I labelled every wire and re-connected as you advised, but now the left and right switches are controlling the opposite lights incorrectly.

How can I resolve this?
 
Sponsored Links
Either swap the connections or turn the switch upside down. Five minutes work to swap the connections over.
 
Three gang - three way is three switches working one light.
Is it? I would says three way is one switch working three lights, like enter, knock, and wait lights outside an office, the switch can direct the output 3 ways.

With the switches shown, there are three connections only to each switch in the gang, and it could work two lights each say stop/go although we use them to control one lamp in conjunction with another switch
two-way-real.jpg
as typically shown here. There are other methods, but the method shown means no connector block required in the switches. When we want three switches we use an intermediate switch. But not going to show the wiring in case it causes confusion. your picture 1702115562991.png is spot on, should not need to read anything, just follow the picture.
 
Is it? I would says three way is one switch working three lights,
Yes, that would be a three-way switch as opposed to three-way switching.

So what do you call three switches (at different locations) operating one light?


The OP has three-gang two-way switches; two of which (I think) are operating as one-way.
 
The new light switch is still not working when re-wired as advised above.

Maybe I should ask the question a different way:

Which terminals relate to each other on the two switches below please (old vs new)?

CnvmaXh.jpg
 
if you look at each of the switches you can see that it is groups of three terminals L-L1_L2 and on the grey one COM1-L11-L12

the white one has three groups of L-L1-L2 but the grey one uses COM1-L11-L12 and COM2-L21-L22 and COM3-L31-L32

so white L equals COM , white L1 equals L11/L21/L31 and white L2 equals L12/L22/L32

exactly as efl stated above
 
On the new switch, they have inserted an extra 1, 2, and 3 into the markings.
So, L11 on the first switch is simply the same as L1 on the old switch. (Forget the first number after the L)
L12 on new is L2 on the old switch. (Forget the first number after the L)
Middle switch is as follows;
L21 is L1 on old switch L22 is L2 on old switch. (Forget the first number after the L)
Right hand switch is as follows;
L31 is L1 on old switch L32 is L2 on old switch. (Forget the first number after the L)

Admittedly, they have swapped the positions of the L1's and L2's on the new switch which doesn't help because it adds a bit more confusion to them adding an extra 1, 2 and 3 to denote the switch numbers. But whatever wire was in L1 on the old switch goes into L1 on the second. Just ignorethe first number after the L in each case.
 
Thanks for the help everyone.

It was only when @conny mentioned that the L1s and L2s were in the opposite positions on the new switch that I realised where I had been going wrong.

All lights now working.
 

DIYnot Local

Staff member

If you need to find a tradesperson to get your job done, please try our local search below, or if you are doing it yourself you can find suppliers local to you.

Select the supplier or trade you require, enter your location to begin your search.


Are you a trade or supplier? You can create your listing free at DIYnot Local

 
Sponsored Links
Back
Top