How to remove Round Head Nails

Joined
7 Dec 2023
Messages
31
Reaction score
0
Country
United Kingdom
Hello all

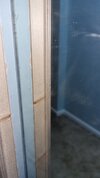
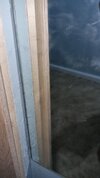
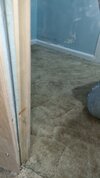
The Central Heating Pipes that come down the Wall from the Airing Cupboard Upstairs are currently in a Channel made of Two Vertical pieces of 50mm x 30mm Wood and then covered with a 6mm Plywood Sheet.

Unfortunately, when the Plywood Cover is Screwed in place it pushes against the Pipes resulting in Expansion Noise.

I would like to Remove the Two Vertical pieces of 50mm x 30mm Wood and Replace them with 50mm x 50mm Wood to give the Pipes some Clearance.

Unfortunately, when the House was Built in 1988 the Builders, seemingly, had never heard of Screws and the Wood is Nailed using Round Head Screws.

Does anyone know of the Best, and Easiest way to Remove the Nails?

I was thinking I could probably use a Small Plug Drill Bit but am not able to find any.

Any suggestions?

Thanks in advance

Kevin
 
Sponsored Links
Oddly enough, before the widespread availability of affordable cordless combi drills nails were the preferred option as they were faster and cheaper than screws. I know because I am of that generation

To get your boxing off the wall the simplest approach is to use a thin pry bar with a piece of thin plywood between the curved section of the prybar and the wall to forestall any damage to the plasterwork (by spreading the pressure). If needs be a hammer can be used to drive the pry bar. Either way be prepared to do some minor repairs to plasterwork and decorating. The boxing can be dismantled using the same tools

The sort of special tool you are talking about has been made in the past for screw removal. They invariably don't stay on the market long because (a) they are difficult to control, (b) they are fragile, blunting easily if they contact metal, etc (c) they are relatively expensive for a single purpose and rarely needed tool, (d) they are not really required that often by that many people, especially tradesmen because (e) most of the people likely to do this sort of job on a regular basis, such as tradesmen, are likely to possess a hammer and a flat prybar or old chisel (all multi-purpose tools, BTW) which can be utilised for this task as part of their standard tool kit
 
Last edited by a moderator:
Hello

Thanks for the Reply and the information, much appreciated.

I will be having the Hallway, where this is situated, Skimmed This Year so Minor Damage and Decorating should not be an issue.

Finally, no disrespect meant regarding the Nails vs Screws.

Kevin
 
Sponsored Links
Hello

I did think of doing that but I thought it would not look as neat.

An option worth looking at though.

Thanks

Kevin
 
TBH rather than trying to dig out nails with a nail bar, which invariably damages the items you are trying to dismantle, and sometomes quite badly (at least if the nail heads are sunk under), I find it's better to use an old chisel or a flat bar such as this:

458HT_P.jpeg.jpg


Or a furniture restorers bar:

mokuba-japanese-restorers-cats-paw-bar-tf-tools-ltd-1_500x500.jpg


Or even a beekeper's pry bar which are very thin) to separate the joint between the timber batten(s) and the plywood. If the chisel end of the bar is hammered into the joint near to a nail it is often possible to spring the joint and loosen the nails which can then be removed using a pair of carpenters nippers - or a nail bar. I mainly work on listed buildings these days and you simply wouldn't use a nail bar alone to remove nails unless the nail heads were already proud of the material. So not really a fan of those little nail barrs because I've seen the damage they can do
 
Hello all

Well, in the end I decided to go with the idea of cdbe.

I got Two Lengths of 44mm x 18mm x 2400 which matched what was already there.

I then Screwed it in place over the existing Wood.

Everything looks fine, I need to Fill and Sand some areas where the Wood Joints are but overall it looks Good.

One Question I have though is how to Reduce the Width of the 6mm Plywood Cover from approximately 1m from the Bottom Down as it is slightly Wider in that section and Overhangs.

Can 6mm Plywood be Planed, or, Sanded to take off approximately 5mm?

What would be the best solution?

Thanks in advance

Kevin
 
Hello

I can but it will be difficult to see the Overlap as I am not able to get the Phone behind it due to lack of space.

The First Image is from the Side.

Some lateral Thinking later, the Last Three Images are taken through a Mirror, hopefully you are able to see the Overhang.

Thanks

Kevin
 

Attachments

  • 20240111_174844.jpg
    20240111_174844.jpg
    249.9 KB · Views: 28
  • 20240111_175522.jpg
    20240111_175522.jpg
    156.8 KB · Views: 26
  • 20240111_175555.jpg
    20240111_175555.jpg
    164.4 KB · Views: 28
  • 20240111_175612.jpg
    20240111_175612.jpg
    203.7 KB · Views: 29
Assuming your toolbox is at basic DIY level, i.e. you have a wood saw, but not a circ saw, planer, table saw, multi tool, jigsaw or grinder with flap wheels etc

Run a pencil up the back so a line is drawn of where you will need to trim

Unscrew the panel

Find another bit of wood you don't mind sacrificing and screw the marked panel to it through the existing screw holes so the sacrificial wood sticks out beyond the edge you wish to cut

Cut through both using a basic wood saw; the sacrificial wood will keep the saw running down the edge of the wood you're keeping

-

If your toolbox is a bit more extensive, then it would be quicker and easier to use eg a multi tool or jigsaw with a fine toothed blade, or a grinder with a flap wheel to sand the 5mm away to nothing. You could use it as the excuse to start upgrading your toolkit :) - mains AC versions of tools from brands like Titan (Scrwfix's own brand) are typically quite good value for money and if you find yourself wanting to do more, then invest in cordless tools later.
 
Last edited:
Hello

Thanks for the detailed Reply and Instructions, it is appreciated.

Kevin
 

DIYnot Local

Staff member

If you need to find a tradesperson to get your job done, please try our local search below, or if you are doing it yourself you can find suppliers local to you.

Select the supplier or trade you require, enter your location to begin your search.


Are you a trade or supplier? You can create your listing free at DIYnot Local

 
Sponsored Links
Back
Top