installing block and beam without cavity

Joined
26 Oct 2023
Messages
3
Reaction score
0
Country
United Kingdom
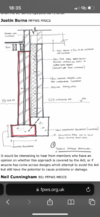
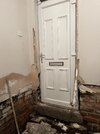
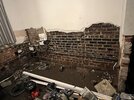
Hi, im looking at installing a block and beam floor in a 1920 mid terrace house with a solid wall (no cavity)
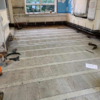
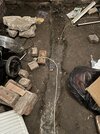
will be fitted on ground floor was previously solid concrete (now removed) and this had been fitted incorrectly as it was bridging the original DPC. and causing damp
issue im facing is i can’t find any supporting material for this particular situation. All info is on newbuilds or homes built with cavity walls.
mostly all on newbuild properties where the concrete beams sit on the inside wall therfore everything fits in place

can anyone help me how to solve the issue im facing please?
 
Sponsored Links
Surely a new insulated and damp proofed slab would be cheaper and easier. Otherwise you'll have to remove bricks from the outer side of the wall to manoeuvre the beams in.
 
Build some sleeper walls, but in all likeyness foundations of that era won't be wide enough.
It sounds like a bugger of a job, I'd fit a suspended timber floor in that situation.
 
Hi thankyou for your quick replies. I would ideally want to go ahead with the block and beam main reason being high water table area beams cannot rot all
the problem with putting concrete slab in it will push damp into walls especially given the high water table, this has been well documented,
my other question is if i put the sleeper walls too close to the walls could that be a cause of concern for the damp as it would not allow air circulation between sleeper wall and building wall. ither option is to build a wall as in the diagaram i have upploaded what do you think?
0FE01FBF-067F-432A-8885-5EB068C2E6CA.jpeg
 

Attachments

  • D2C7D2A4-B96D-4A08-B35F-306A18043D5A.png
    D2C7D2A4-B96D-4A08-B35F-306A18043D5A.png
    566.1 KB · Views: 49
  • 6C3FDEDC-3171-4956-9519-4C6395B1F3A8.png
    6C3FDEDC-3171-4956-9519-4C6395B1F3A8.png
    265.1 KB · Views: 39
  • 004F88FA-D94B-48F1-8994-597FA86AF034.jpeg
    004F88FA-D94B-48F1-8994-597FA86AF034.jpeg
    467.3 KB · Views: 40
  • E40C79F1-A44C-4B13-951F-808AA2EC5E4C.jpeg
    E40C79F1-A44C-4B13-951F-808AA2EC5E4C.jpeg
    193.9 KB · Views: 30
  • 6643AA3D-C4E0-41C5-B14C-D0F2EA0433B7.jpeg
    6643AA3D-C4E0-41C5-B14C-D0F2EA0433B7.jpeg
    283.4 KB · Views: 41
  • B224386B-DC45-459A-8B15-53AF8B5D182A.jpeg
    B224386B-DC45-459A-8B15-53AF8B5D182A.jpeg
    347 KB · Views: 35
  • E616B82C-D3B7-406F-82DC-15C00606FFB8.jpeg
    E616B82C-D3B7-406F-82DC-15C00606FFB8.jpeg
    408.2 KB · Views: 37
Sponsored Links
or build the walls further away from walls as you would with a timber suspended floor all photos of B&B is with walls on the 4 sides
B169A6F7-B25D-4E49-BD88-CDC940E803B7.jpeg
 

DIYnot Local

Staff member

If you need to find a tradesperson to get your job done, please try our local search below, or if you are doing it yourself you can find suppliers local to you.

Select the supplier or trade you require, enter your location to begin your search.


Are you a trade or supplier? You can create your listing free at DIYnot Local

 
Back
Top