Intumescent groves on door frame

Joined
30 Apr 2008
Messages
278
Reaction score
9
Location
Manchester
Country
United Kingdom
I have 5 doors to do this week fitting 15mm intumescent strips.

I’ve been using a router for door hinges for years but never done an intumescent strip.

My question is if I want to grove the frame rather than the door how do you finish the end of the grove where the router body stops from going any further up or down?

I see quite a lot of people are routing the door instead but is there a way to router the frame all the way around ? I guess I can chisel the rest of the grove and fill it with filler to smooth straighten it but not ideal. Any suggestions. ?
 
Sponsored Links
These can be useful.
 
I am not sure how you would be able to accurately get your router fence to glide up the architrave to create a perfectly straight rebate for the strip, let alone accurately chisel the remainder.

If you are able to achieve this, I would use a straight edge and a utility knife and carefully score the timber prior to chiselling.
 
You can't rout a door frame or casing after it has been installed because the router won't go into.the corners, and if the door frame or casing has been fitted with architraves, well, forget it. If the door frame or casings are already fitted you will need to go round three sides of the door instead. In any case you are not permitted to use filler around an intumescent strip. This really is the standard way to approach this.

You may be unaware that since Grenfell there has been a new standard issued which covers fire doors. The standards for fitting have also been tightened up somewhat, so if you need to get these doors certified (e.g. for insurance purposes) there will probably be a lot more work in it than just installing fire door blanks and intumescent seals. I am saying this having just had to correct some of the work of every other joiner who worked on fire doors in a new build (including one of my own) in order to get the doors signed off by a fire door inspector.
 
Last edited by a moderator:
Sponsored Links
You can't rout a door frame or casing after it has been installed because the router won't go into.the corners, and if the door frame or casing has been fitted with architraves, well, forget it. If the door framevor casings are already fitted you will need to go round three sides of the door instead. In any case you are not permitted to use filler around an intumescent strip. This really is the standard way to approach this.

You may be unaware that since Grenfell there has been a new standard issued which covers fire doors. The standards for fitting have also been tightened up somewhat, so if you need to get these doors certified (e.g. for insurance purposes) there will probably be a lot more work in it than just installing fire door blanks and intumescent seals. I am saying this having just had to correct some of the work of every other joiner who worked on fire doors in a new build (including one of my own) in order to get the doors signed off by a fire door inspector.
There is alot of money to be made in Fire Door installation in todays world. Nominally £500 per door and or frame, Ree-dic-cu-lous.
 
There is alot of money to be made in Fire Door installation in todays world. Nominally £500 per door and or frame, Ree-dic-cu-lous.
It depends on how ridiculous you regard saving lives to be. Basically, if a fire door doesn't do its' job then smoke can get past the seals - and smoke is what kills people in fires - but also if the door set fails prematurely, then fire can go through a bulding much faster, as Grenfell demonstrated. Sorry if this sounds like a stuck record, but as a joiner if you work on commercial premises or multiple residence buildings you really do need to know this stuff - and in my experience a lot of builders and joiners are still blissfully unaware of the legal requirements, which are now some what tighter after Grenfell, but more importantly are now being more rigorously enforced by insurers, Building Control, etc
 
Last edited by a moderator:
Ok thanks for your responses.
I will route the doors then.

Can I just check I want to install smoke and fire seals so is the aim for the hair of the smoke seal to just touch the frame of the door.
I’m asking this so I calculate the depth of the routing after measuring the gap between the door and the frame.

Alternative I can set the router depth based on the depth of the intumescent seal so it is flush with the edge of the door( not the frame ).
 
I want to install smoke and fire seals so is the aim for the hair of the smoke seal to just touch the frame of the door.
I’m asking this so I calculate the depth of the routing after measuring the gap between the door and the frame.
I'm afraid that's completely wrong. The combined cold smoke brush strip and intumescent seal has got to be centred on the door edge and is installed in a groove which is 4mm deep so that the intumescent part of thr combined intumescent/brush strip is flush to the door edge, not above or below that level. These strips have self adhesive backs. The best way to rout these in is to use a cutter designed for the job, like this one:

c220x1_4tc_3d1_1-1.jpg


These intumescent cutters are available in 10, 15 and 20mm widths to match standard intumescent strips (which in the UK are mainly 4mm thick). 15mm is probably the most common width of combination strip we come across

Alternative I can set the router depth based on the depth of the intumescent seal so it is flush with the edge of the door( not the frame ).
Yes. The gap between the door and the door frame around the 3 sides (left, top, right) must be between 2 and 4mm for the brush strip and intumescent seal to work properly. The gap at the bottom of the door must not exceed 3mm at any point when the door is closed, or 10mm if the floor is uneven and a drop seal is being fitted. If it does exceed 3mm, then a drop seal will need to be fitted tobthe door (and the same 3mm gap when closed rule applies to the drop seal). This is a surface mounted drop seal (note the combined brush/intumescent strip in the door edge like the OP needs to do, and the intumsecent strip actoss the bottom - the latter is something I have never seen, or been asked for):

Smoke-Rated Surface-Mounted Bottom Door Seal1_600-1.jpg


An alternative is to fit a close fitting hardwood (not metal, plastic or softwood) threshold on the floor which restricts the gap to 3mm or less

Instead of using a combined brush and intumescent strip you can fit a flat intumescent strip in a groove plus a "batwing" smoke seal in the corner of the rebate:

LAS1010-white-768x512.jpg


TBH when fitting a replacement door in an existing door frame or casing it can be easier to swing the door in the opening, remove the architraves, cut out any old packing material (by rights you should do this in any case), loosen or remove the frame/casing screws on the lock side, then use timber wedges to get the door frame/casing to line up with the door to give the correct gapping, refix the frame/casing, cut back the wedges/packers as required, repack the frame using mineral wool or intumescent caulk and refix the architraves. You are no longer permitted to plane a fire door to get it to fit (although that still goes on, it isn't regarded as acceptable practice by the inspectors unless the door manufacturer specifically permits it)

Other things you need to be aware of are:

- the door needs to be mounted on fire rated hinges and intumescent hinge pads

- the door itself must be fire rated and of the correct rating (so a frame and panel door wouldn't be acceptable unless specifically manufactured as fire rated or converted in an approved manner)

- to be classed as a true door, the door should have an appropriately sized fire rated closer

- locks and ironmongery should all be protected with intumescent paper wraps (e.g. Envirograf paper)

- the packings between the wall and the door casing/frame (beneath the architraves) must also be fireproof with at least one layer of 10mm thick intumescent caulk for 30 minutes and two layers (one each side) for 60 minute doors. Old expanding foam is not fireproof and needs to be dug out and replaced by mineral wool (for gaps greater than 10mm) or intumescent calk or alternatively modern fire-rated intumescent foam (gaps less than 10mm - caulk is considered better by many inspectors). Plastic and timber packers need to be cut back 10mm from the surface where intumescent caulk is being applied

All in all a bit more complicated than just sticking some strips on a door
 
Last edited by a moderator:
Wow! thanks so much. The doors in our factory weight possibly more than 50kg made of acoya wood and have no architraves.
They have just been fitted with a square frame. They have 4 hinges.
Yes the fire officer who inspected the place noticed the expandable foam and said exactly the same thing that needs to be removed and be replaced with either mineral wool and intumescent chaulk or intumescent expandable foam. I'll do that last. He does not seem bothered with the gap at the bottom he said he will allow up to 5mm but I am pretty sure the gap is smaller, will have a look.

Love these surface mounted drop seals.

I will install the 15mm x 4mm intumescent strips. Any strips you would recommend?
Also where can I buy this intumescent hinge pads and lock intumescent paper?

Thanks so much for your help, I have the inspection this coming Friday so hopefully will advice how we did.
 
He does not seem bothered with the gap at the bottom he said he will allow up to 5mm but I am pretty sure the gap is smaller, will have a look.
The gap at the bottom is partly dependent on the door manufacturer and the inspector. The stuff I've been dealing with recently was all specced by the door manufacturer at 3mm or in a few cases 4mm. If your inspector will allow 5mm, then stick with that

I will install the 15mm x 4mm intumescent strips. Any strips you would recommend?
Not really. Our last lot came from Howdens (because the firm I sub to has an account there), but there are a lot of suppliers out there, even Screwfix sell them

In a factory, commercial or multiple occupancy environment doors may also need an appropriate fire rated closer and will need metal or self-adhesive signs on both sides of the door in specified positions, either "Fire Door - Keep Closed" (for self-closing access doors), "Fire Door - Keep Locked" (for doors without a closer, which would normally be kept closed and which do not require a door closer, e.g. on switch rooms, riser cupboards, etc) or "Fire Door - Keep Clear" (for access doors which are normally held open on something like a magnetic fire latch that is automatically released in the event of a fire, causing the closer to shut the door) or similar such wording. The metal signage is a lot more durable and is what most architects specify - I tend to regard the self-adhesive type as temporary as they can be easily removed or defaced by malicious individuals

For doors with closers the inspector will check the closing action from a number of points, from 90 degrees open right down to about 5 degrees. The pressures on the closer must be adjusted so that the door will close at both ends of the spectrum (and the brush strip will do its' darndest to mess that up for you - that is partly why getting the 2 to 4mm gapping becomes important). Note that hydraulic closers have seals which bed in over time and change the closing speed - so after installation they will probably need adjusting several times in the first few weeks of use, again after about a month and thereafter maybe once every 6 months to a year. On a busy doorway, such as in a hospital corridor or in a school, that interval may be a lot less (and the closers last a lot less time, too).

Because of the foregoing I recommend getting your doors swinging, properly gapped and with the closers fitted and properly adjusted first before adding the brush intumescent strips to them, and readjusting the closers. I also recommend readjusting the closers the day before your inspector arrives

Also where can I buy this intumescent hinge pads and lock intumescent paper?
That used to be much more of a problem than it is now. Even Screwfix now do the intumescent paper and the intumescent hinge pads (which came as a surprise to me). One of the big names in this stuff is still Envirograf, and for many fire rated products they are still the go to supplier. BTW the hinge pads add about 1 to 1.5mm depth to the recess depth, depending on supplier, so you need to take this into account when routing for hinges

Please note, I am not pushing Screwfix as a supplier on these products, but the fact that even they are selling this stuff indicates how much of an important topic this has become

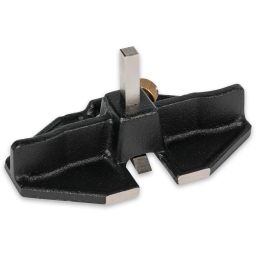
As an aside, for basic gap checking I have a set of Hilka brake calliper gauges:

20230219_091501.jpg


Mine were checked with my Mitotoyu digital callipers and found to be within under 0.1mm of the stated sizes. I have tried taper (bore) gauges, but they tend to be really inaccurate and they always need to be checked when you buy them using something like engineering accuracy callipers before use (many are too inaccurate, you may get one in two or three good ones if you buy the Silverline ones, for example),. They should be discarded when they get bent (and they can get bent a lot checking gaps!)

I suppose I should put E&OE (errors and omissions excepted) or the standard get out clause at the end of all this, but I can't cover every situation and what I wrote in this thread is, as far as I can ascertain in February 2023, a reasonable interpretation of the current fire door regs. Who knows what changes will occur in the future?
 
Last edited by a moderator:
The job where I had recently been painting (the one I have moaned about), the carpenter, who fitted the FD30 door liners and doors, went to fit the brush seals. He soon realised that he could no longer close the doors because he had only allowed about 2mm around the door at the time of fitting. He tried to use a blunt chisel to rebate the channel deeper and, not surprisingly, made a mess of the channel. They then decided to fit intumescent strips with no brushes.

At one point I did tell them that I do not believe that 15mm door stops are allowed on FD30 doors...

None of the fire rated hinges have intumescent pads behind them.

Building control turned up on Friday. All they said was that the two doors leading off the stairwell up to the property need door closers. He suggested percos.

The property is the 1st and 2nd floor of a maisonette. At some point the owner wants to make the 1st and 2nd floor in to two separate properties. I think she is gonna be pee'd off when the fire rating inspector checks the properties further down the line.
 
Building Control are a lot less stringent than a Fire Door Inspector, after all it isn't really their specialty and he won't be checking gapping, door closer perfomance, etc. On commercial builds and multiple occupancy builds the building insurers often won't cover the building now unless all the fire doors have been checked and passed by an FDI. I have to admit that I was out of date on the regs and was unaware at how much they had tightened up on this in the last 12 months. In fact a lot of the standards are now about 18 or so years old, dating back to the Regulatory Reform (Fire Safety) Order 2005 aka the Fire Safety Order (which applies to multiple occupancy buildings), but the government put in place new guidelines on 1st June, 2022 which have strengthened the previous measures. In the light of this insurers are now being a lot more picky about what is and isn't acceptable. All I know is that it makes installing fire rated doors quite a bit more interesting, especially where the flooring guys have made a hash of it (which in the future will result in more floors needing to be dug out and relevellled - I have already seen this on one hospital job)

Sounds like the joiner was making up the casings on site, but to meet compliance door makers prefer to supply doors and casings/frames as a set, together with the ironmongery. That way if it is installed correctly, you meet the standards. The other thing is that some FDIs like to see the packings before the architraves are fitted, because these are often skimped or just plain wrong. I wonder if your guy is aware of that

As to Perkos, they are the invention of the devil, and when dealing with them you need to be super careful not to get your fingers trapped (they have quite a bit of force in the springs)
 
Last edited by a moderator:
Sounds like the joiner was making up the casings on site, but to meet compliance door makers prefer to supply doors and casings/frames as a set, together with the ironmongery. That way if it is installed correctly, you meet the standards. The other thing is that some FDIs like to see the packings before the architraves are fitted, because these are often skimped or just plain wrong. I wonder if your guy is aware of that

The door frames were purchased as FD30 kits. They had the seal receivers built in and the header was the reversible type (accommodating two different door widths). I suspect that the doors were from a different supplier.

I didn't get to see the door packers, most of the architraves were on by the time I made the mistake of working on site. I did notice that they use those screws with the reverse thread towards the head of the screw (presumably allowing them to let a frame out without using extra packers). At no point did I ever see the "carpenter" dill a clearance hole, pilot hole or countersink. All screws (including door hinge screws) were driven home using an impact driver with no other type of pre drilling. The absence of holes for me to fill on the door frames leads me to believe that ALL fixing screws were in a straight line and hidden by the narrow (under spec) door stops.

At one point I asked him to bury a screwhead that was proud (screwed in at 45 degrees in hardwood). He had cammed out the screwhead with his impact driver so much that he could't bury it deeper or remove it. He spent 5 minutes whacking it with a hammer (actually, my hammer) and because it was still proud, he just put loads of two pack filler over it.
 
At no point did I ever see the "carpenter" dill a clearance hole, pilot hole or countersink. All screws (including door hinge screws) were driven home using an impact driver with no other type of pre drilling.
Classy! Who says true craftsmanship is dead?

The absence of holes for me to fill on the door frames leads me to believe that ALL fixing screws were in a straight line and hidden by the narrow (under spec) door stops.
The ones with planted on stops are actually door linings - a lot of fire door inspectors didn't used to like them and could insist on them being glued in place and screwed on from the back of the lining. I have to say that all the fire door "frames" I've installed in the last 10 years have been either rebated casings or rebated frames.

Fire door linings or casings should ideally be fixed with two rows of screws - so four or five pairs on each side with at least an additional pair in the head, but only for double door sets (to stop any drooping). You normally hide one row beneath the hinges or intumescents (if there are any), whilst the other row should be 2-packed (softwood) or pelleted (hardwood) and flush trimmed. The screws need to go through the packers and I almost always try to start by putting a screw through the hinge seats for the top and bottom hinges, which means you need to cut the hinge seats and pilot drill for the hinge screws before installing the casings (which is hotw pre hung door sets already come). By having screws behind the hinges and near the keep the door frame or casing tends to be a lot more rigid. The second row of screws can also be useful when straightening a door "frame" to a wall

At one point I asked him to bury a screwhead that was proud (screwed in at 45 degrees in hardwood). He had cammed out the screwhead with his impact driver so much that he could't bury it deeper or remove it. He spent 5 minutes whacking it with a hammer (actually, my hammer) and because it was still proud, he just put loads of two pack filler over it.
As I said, classy! I'm only surprised he didn't get a shovel...
 
Last edited by a moderator:

DIYnot Local

Staff member

If you need to find a tradesperson to get your job done, please try our local search below, or if you are doing it yourself you can find suppliers local to you.

Select the supplier or trade you require, enter your location to begin your search.


Are you a trade or supplier? You can create your listing free at DIYnot Local

 
Sponsored Links
Back
Top