Hi
About a year ago my partner and I had some minimal decoration done to our kitchen, it is our first house and the kitchen was very old fashioned so we did minimal stuff, Work tops, new tiling etc. it's about all we could afford at the time but looking around now there's some things we should have complained about at the time, quite a shoddy finish, but it's our first house and our first time hiring someone so we kept quiet...
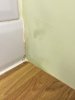
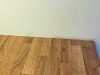
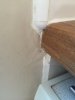
The things I'd like to improve upon are where the worktop meets the wall. How can we get close enough to paint the wall and cover the bare plaster without painting on the new worktop? And where the plaster has seeped into the tiling grout as seen in picture two.
Upon advice of the plasterer we had the plastering done first but then the kitchen fitter ripped about half the wall off putting in the new worktop so we had the plasterer came back to repair. We are therefore left with little lumps around the kitchen where the fitter patched it up (also badly sawed edges of worktop and under cupboards but that's a different story.)
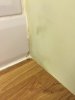
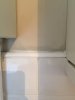
I would also like to improve upon where you see the top of the tiling and the sealant has smudged onto the paint and gone a bit damp and mouldy as you see in picture three.
If anyone has any suggestions on how I can improve this I would be most grateful. I'm new to DIY but would be willing to give it a go or get someone better than me to do it.
Thanks for any advice")
About a year ago my partner and I had some minimal decoration done to our kitchen, it is our first house and the kitchen was very old fashioned so we did minimal stuff, Work tops, new tiling etc. it's about all we could afford at the time but looking around now there's some things we should have complained about at the time, quite a shoddy finish, but it's our first house and our first time hiring someone so we kept quiet...
The things I'd like to improve upon are where the worktop meets the wall. How can we get close enough to paint the wall and cover the bare plaster without painting on the new worktop? And where the plaster has seeped into the tiling grout as seen in picture two.
Upon advice of the plasterer we had the plastering done first but then the kitchen fitter ripped about half the wall off putting in the new worktop so we had the plasterer came back to repair. We are therefore left with little lumps around the kitchen where the fitter patched it up (also badly sawed edges of worktop and under cupboards but that's a different story.)
I would also like to improve upon where you see the top of the tiling and the sealant has smudged onto the paint and gone a bit damp and mouldy as you see in picture three.
If anyone has any suggestions on how I can improve this I would be most grateful. I'm new to DIY but would be willing to give it a go or get someone better than me to do it.
Thanks for any advice