Laminate flooring living room and dining room

Joined
21 Jun 2016
Messages
54
Reaction score
1
Country
United Kingdom
It's gonna sound daft and I know I've put this flooring down before but small square rooms... I just done want to mess up.

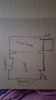
Just wondering were is best to start from? If you can make it out in the picture I'm doing to rooms the same laminate as they are both open plan. Do I start from the top left by the window in the small alcove or from the middle? Bearing in mind the first peice I lay will be cut draught away. I also want to stagger the joints. Last time I messed up and most joints were bunches together in 1 area. ?? Help would be appreciated.

Thank you
 

Attachments

  • 20170412_195601.jpg
    20170412_195601.jpg
    57.1 KB · Views: 92
Sponsored Links
I'd be inclined to start at the window at the bottom of the picture. Make sure you have at least a 300mm overlap on the joints. I take it you have spacers, and you'll be using quadrant to cover the gaps.
 
So anything less than 300 mm off cut is no good ??. Do I start by 1 side of the alcove and lay the next peice the other side of it ? . Yes I have spacers etc
 
300 is the absolute minimum, but aim for 450 if you can. Start at the window wall, and work along it. You'll get to the end and have an offcut, but put that to one side for now. Start your next row, but aim to get the joins in the middle of each board on the first row, and this will give you more stability for the overlall floor. You'll have to waste half a board on the start of the second row, but you'll use that somewhere. The piece you cut off of the last board in each row, can be used as the start of the next row, as long as it give you your 300-450mm distance from a join on the previous row, and basically you continue to work each row in turn, selecting the best off cut (or cutting a new board) to get your joins staggered correctly. Keep in mind that it's best to have a bit more wastage than trying to keep it at a minimum, and that'll mean that you get the joins staggered better than you've done in the past.

Putting the spacers in along the window wall will allow you to give the boards a good wack so that they join tightly, but you can move the spacers allong the side wall down each row in turn so that you've got something solid to wack the boards against along each row.

There'll be a lot of videos on youtube to give you a more visual idea, but it's pretty straightforwad once you get going.
 
Sponsored Links

DIYnot Local

Staff member

If you need to find a tradesperson to get your job done, please try our local search below, or if you are doing it yourself you can find suppliers local to you.

Select the supplier or trade you require, enter your location to begin your search.


Are you a trade or supplier? You can create your listing free at DIYnot Local

 
Back
Top