Laying reclaimed pine - nailing advice please

Joined
21 Aug 2012
Messages
4
Reaction score
0
Location
Surrey
Country
United Kingdom
Hi all,

I've recently been prepping a room to lay a reclaimed pine floor. Work so far is:

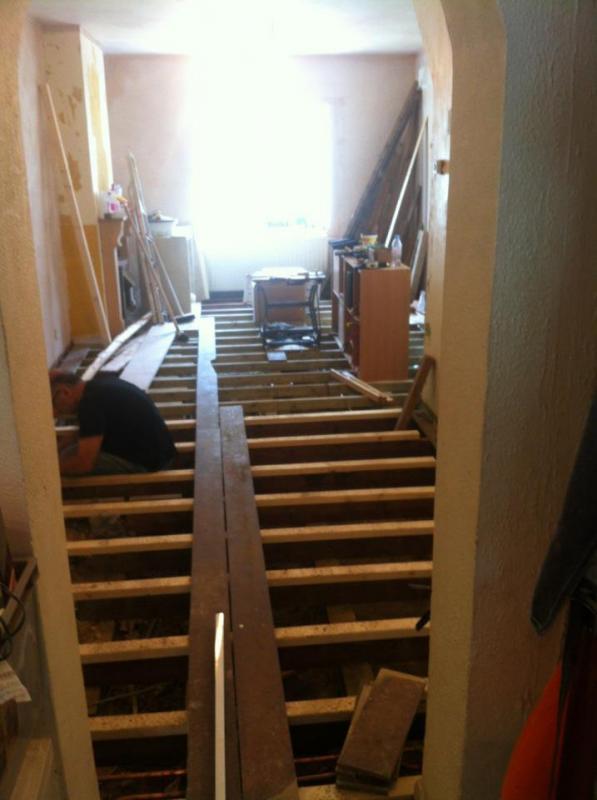
- old laminate floor ripped up and old boards removed (the room is actually 3 separate areas knocked in to one some time ago).
- joists replaced where need be and packed out/levelled
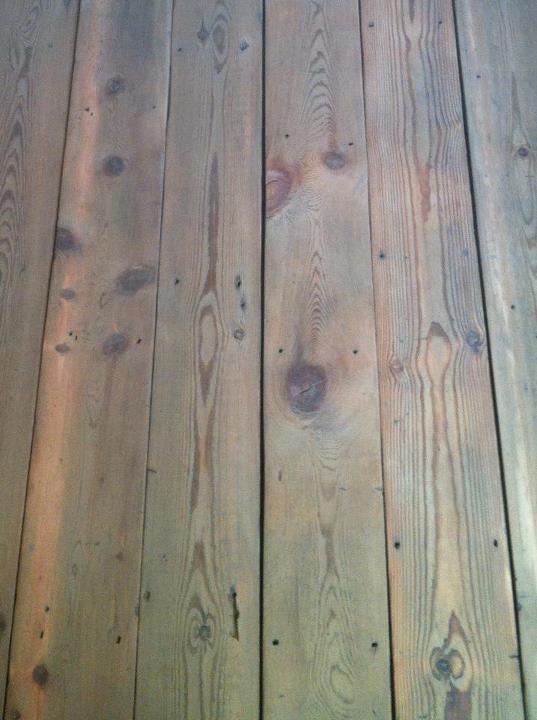
- reclaimed boards sanded and cleaned to useable state. Any rotten sections have been cut out.

The boards themselves look gorgeous! They have a nice dull honey colour.

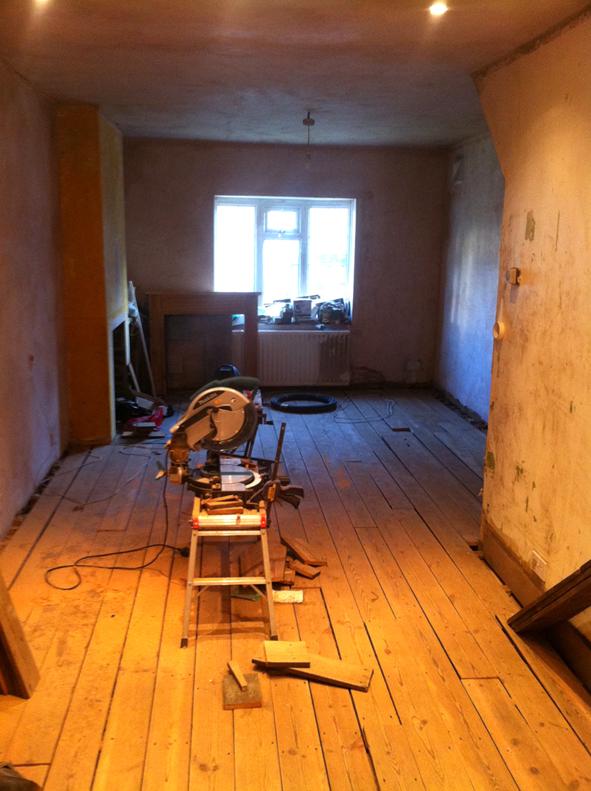
I am basically ready to nail them down, having laid them in the room and cut them to suitable lengths. The boards are not T&G and are instead square cut.

My question is, what should I use to nail them down? Is a nailgun suitable or do I risk ruining all of my hand work so far? Is predrilling and nailing a better idea?

Any advice would be really appreciated.

Many thanks

Jon
 
Sponsored Links
You are wise to seek advice on this, many a good floor is ruined by bad fixing.
How you nail depends on the finish you are looking for. I would nail as I like a traditional floor with nail heads visible. But they are not just any old oval or round nail. These original nails are called floor brads or cut nails and give a floor character. They are also blunt, that is they have no pointed tip and have square sides. Basically when made they are CUT from a flat sheet of metal rather than made from wire.
So when you hammer them into the floorboard the flat blunt tip cuts/punches through the wood grain as opposed to separating it as a point of a round nail does, this separating causes the wood to split, so brads and cut nail tend not to split the wood.
Having said all that, where new freshly seasoned wood tends to be more tolerant to splitting reclaimed wood tends to be very very dry and easily splits, so if you have time I would pilot drill as well.
A final tip if you are using floor brads or cut nails is the manufacturing process creates a black dusty coating, it get on your fingers and hammer head. Other than you putting finger prints on you nicely sanded boards black fingers is no problem, but the black residue on your hammer head causes the hammer to slip off the nail head and you get half crown marks on your boards, a bad effect. So keep a sheet of sand paper handy and keep polishing the hammer head.
 
Thanks for the advice Steve!

Is it possible to pilot square cut brads? I too really like the look of the crisp rectangular nail heads, but amd worried about splitting the boards...
 
Another point, if you are using all the original boards you should not have a problem with shrinkage but any new boars brought in should be acclimatised and I would use floor board cramps.

Regarding nail guns. I use them a lot and they are good for not splitting the wood. But they are not cheep and you have to be sure to use the correct gauge and length of nail. My Senco second fix nailer has a soft tip so does not mark the wood.

You could screw and plug, lots of work but the fix is good and virtually invisible.

But as I said I like to see the brad nail heads.
 
Sponsored Links
Thanks for the advice Steve!

Is it possible to pilot square cut brads? I too really like the look of the crisp rectangular nail heads, but amd worried about splitting the boards...

Yes, your not making a clearance hole its a pilot hole. get the nails and size a drill bit that is about half the shank size of nail, your probably looking at a 2,5 or 3mm drill bit.

The floor brads also have a hangover that holds the floor board down. difficult to describe but this link has a pic.

http://www.thesitebox.com/wood-nails/cut-floor-brad-bright-steel.aspx

Have some faith in these nails, they are best for not splitting. Definitely pilot when fixing close to cut ends.
 
Jon; the advice you have been given by Steve is spot on.

Just one point I would add when using the cut brads. Being cut from steel sheet, rather than drawn, the edges of the nail can be sharp. I was told by an old joiner some years ago that if you are fixing a lot of these, it is wise to use gloves, as prolonged fixing can cut your fingers after a few hours work.
 
Thanks for all of the responses chaps!

I forgot to mention that I have also hung chicken wire between the joists and insulated with rock wool.

This is mine and my girlfriends first home and my father and I are doing the majority of the renovation work (plastering excluded). I'm really loving the sense of achievement of doing a job and more importantly, doing it well.

Here are some photos of the work so far as a thank you.


It's looking great. I am sure you may have already done so but just check you have loads of ventilation under the floor. Get those air brick checked out and cleaned out. Under floor insulation is a great idea especially with non grooved boards.
And as your not using T&G boards and they are still not fixed I would lay 12mm ply on the joists, mark all joist positions on the ply then fix the floor boards down to joists through the ply.
 
Yep, ventilation has all been checked and sorted. We actually had a whole host of damp treatment work carried out on the property, with repairs and prevention being the order of the day. The airbricks have all been cleared, I have removed a whole heap of rubbish from under the boards and a few extra airbricks were installed.

Can I ask what the purpose of the ply would be? I'm guessing it's for draft exclusion?

As you have square edge boards, if they do shrink back and gap a bit, not only could you get draught but insects using the gap to travel from underfloor into the room. Plus ply really ties the floor joists together and reduces and possible bounce. There should be breather supporting walls below but sometimes the joists were only 4x2 timber and breather walls too far apart so the floor bounces a bit.

Ply is belt and braces really.
This is getting off the original topic but floor and ceiling joist should have strutting at right angles to its length about every 4-6' (imperial cos were talking old houses) which ties the joists together to stop floor bounce. When I have replaced rotten floors of Victorian houses I have found that when 4x2 timbers were used on breather walls no strutting was put in either, so ply would help. Worth checking while you are at it!

The only problem being it could interfere with floor levels in adjacent rooms or hallway.

Now get back to work and off the computer, you have a floor to put down.
:)
Steve.
 

DIYnot Local

Staff member

If you need to find a tradesperson to get your job done, please try our local search below, or if you are doing it yourself you can find suppliers local to you.

Select the supplier or trade you require, enter your location to begin your search.


Are you a trade or supplier? You can create your listing free at DIYnot Local

 
Sponsored Links
Back
Top