Leaking radiator valve - downstairs living room

Joined
6 Jan 2021
Messages
65
Reaction score
2
Country
United Kingdom
Hi,
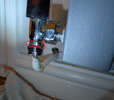
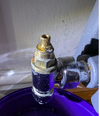
My heating was working fine, but I've recently discovered a leaking radiator valve in a downstairs radiator.

It's a very slow drip. So far, I've just turned the heating off and screwed the top square part of the radiator all the way down. I've also screwed down the valve on the other side as well.

What's the best way to fix a slow leak? Do I need to drain the whole system?

Thanks in advance
 

Attachments

  • radiator valve.png
    radiator valve.png
    1.1 MB · Views: 58
^ Agreed. The water stain on the valve body suggests the valve stem seal is the likely culprit.
 
Is there a stuffing gland beneath the black cover, or is it a TRV? If a stuffing gland, try tightening it a little. If a TRV, press the pin up and down firmly a few times, and also turn it with pliers a few revolutions.
 
It's not a TRV valve. You're right the leak is coming from the top as well. I've added a bit of jointing compound and PTFE to the bottom and tighten the nut, but its still leaky.

To make matters worse, I decided to try and isolate the radiator by closing the right (opposite end) valve off as well - this just led to the right valve leaking as well!!!

I believe I likely need to replace both valves. Do I need to drain the entire system to do this? Are the valves a standard size?

Thanks
Is it a gravity fed or combi pressurised system?

How did you manage to add PTFE?

How did you manage to add jointing compund?
 
My boiler is an eco tec plus 630 which uses a sealed cylinder.

For the PTFE, I simply loosened the nut at the bottom where the pipe joins (water dripped out) cleaned with rags, added PTFE abd some jointing compound back into the nut whilst the water was still dripping and then tightened he nut back. It's dripping less, but still not 100%.
 

Attachments

  • 1767306737161.png
    1767306737161.png
    463.1 KB · Views: 9
The bottom nut which you attempted to seal with PTFE tape and jointing compound looks to be a compression joint. As such, the nut and its thread do NOT form a seal - the seal is formed by an olive around the pipe which is compressed when the nut is screwed up. So the only way to improve the seal will be to completely remove the nut away from the joint to expose the olive and then put jointing compound on that. However, if water is still wetting everything, this is unlikely to be successful.
The evidence that water is also leaking from the valve gland suggests that the best option is to replace the valve. You'll at least need to drain the radiator to do this, but you could avoid draining the whole system by using a pipe freezing kit on the pipe coming into the valve. There looks to be enough room to do this on the pipe that comes out of the wall.
 
Set your stall out and there is no need to freeze anything. Not withstanding the messing about with the PTFE etc now that you have nipped up the nut a bit tighter is it still leaking from that joint as if it still is you may have an issue with the olive not seating right or being over compressed which means a new valve may not cure the leak from that joint which means a more difficult solution.
 
If the olive has been over-compressed than I guess your "more difficult solution" just involves removing the old olive and putting on a new one. You can get olive splitting tools that remove them quickly and cleanly. You can also use a hacksaw but you have to be careful not to saw into the pipe.
 
If the olive has been over-compressed than I guess your "more difficult solution" just involves removing the old olive and putting on a new one. You can get olive splitting tools that remove them quickly and cleanly. You can also use a hacksaw but you have to be careful not to saw into the pipe.
Unless its compressed the pipe at the same time but thats OK because you can quickly cut and solder a new piece of pipe in place
;)
 

If you need to find a tradesperson to get your job done, please try our local search below, or if you are doing it yourself you can find suppliers local to you.

Select the supplier or trade you require, enter your location to begin your search.


Are you a trade or supplier? You can create your listing free at DIYnot Local

 
Back
Top