More questions about a cut roof

Joined
11 Apr 2006
Messages
2,154
Reaction score
201
Location
Berkshire
Country
United Kingdom
I'm at the point where I'm about to order the timber for my cut roof, and I'm trying the get the construction details straight in my head so that I can buy the right fixings.

What do you guys think of the way the rafters, joists, and wall plate timber overlap (or dont!)

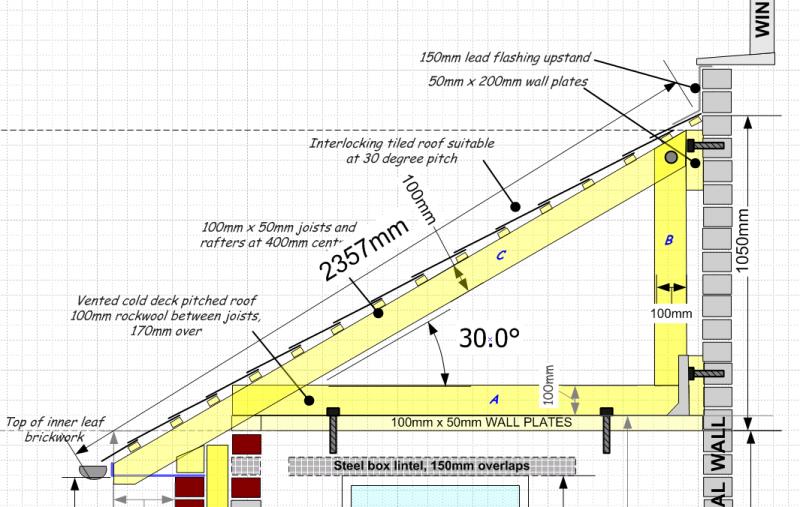
In the diagram below, I've labelled them A,B, and C.

A will sit in a joist hanger at one end, and on the outer wall plate at the other. Nailed at either end. C will overlap with A, and be birdsmouthed and nailed into the outer wall plate, and also nailed into A.

B will sit on top of A - i.e. no overlap, and nailed in to the hanger and also into A.

Where C and B meet I've chosen to bolt them, and will allso nail through to the wall back plate too.

Does that seem okay?


Thanks!

Gary
 
Sponsored Links
by bolting B to C, all of the roof load is being supported by the bolt and consequently only half or less of the depth of C.. ( half - radius of hole.. )
 
You are making heavy work of it fellow. You do not need the 50x100mm hanger with the bolt
As Cumbrian says, either 50x125 or 50x150mm as ridge plate, ditto as ceiling joist plate, both through bolted to wall.
Fix commons each side to ridge plate, hang ceiling joists on joist hangers to joist plate.
If window in wall above roof, make sure you have room for lead apron under cill. We set top of ridge plate three course below cill
If using interlocking tiles, go 600mm centres on commons and joists.
Don’t know why you are showing wall plate down your flanks?
Your soffit will not work as shown on your drawing.
old un.
 
Sponsored Links
No need at all for piece B. You may need to tidy your drawing up to show the detail for Fascia and soffit though. As the Old 'Un says, what you have drawn there for it won't work . ;) ;)
 
Thanks for the replies. I'm doing this to building regs compliance - does that make any differece your views?

So if I hear you rightly, I should remove B, and then allow C to sit onto a slightly lower positioned wall plate. And that also, the other wall plate in the drawing is over engineered?

Edited to add: Joinerjohn - sorry - why won't the current plan work - you question has made me look at it and think that perhaps the current plan won't provide enough space for the guttering?

Thanks,

Gary
 
How does this look then - slightly smaller ridge and wall plates (50 x 150) and I've removed the vertical 'B' timber:


I'm still concerned about your comment regarding the soffit/eaves area not working. I could make my outer wall plates thicker - say 75mm - and that would give me more vertical room for a taller facia, and less cramped guttering.

Don’t know why you are showing wall plate down your flanks?

The end of the porch is actually a hip end, so there's also a 45 degree ridge plate at the end that's not shown.

Cheers

Gary
 
Gary, You are nearly there. Your last drawing complies 100% with building regs. You did not need that hanger, it was wasted money both on timber and bolts.
Terminology on a lean to can be confusing , wall plate is plate on external wall, ridge plate is top plate on lean to wall, ceiling plate is lower plate on lean to wall.
Rise is top of wall plate to top ridge plate. Run in your case is outside of wall plate to inside of ceiling plate, length of common is from plumb cut ridge plate to plumb cut to birds mouth, overhang is from plumb cut birds mouth to plumb cut facia.
Normally top of plate is 2.4m, top of frame is 2.1m, giving you 300mm drop from top of plate to underside of facia, and facia runs over tops of frames. If your commons are 50x100, working on a 30 degree pitch will make your 60 degree facia plumb cut 115mm long. Allowing for upstand for tiles, this will make facia approx 200mm deep and soffit approx 225mm wide. There is then no need to do horizontal cut to bottom of commons and you have enough meat for decent fixing of facia to bottom of common.
Unless you fully under stand opposite, adjacent and hypotenuse, you will find it difficult to possibly obtain a 30 degree pitch when you fix your ridge plate.
We used to ignore pitch. Fix your ridge plate preferably, three course, below cill, two course at a pinch, of any upstairs windows, then cut your commons to suit. There is a very easy way to mark these out, you don’t need tables or roofing square, just block of wood and pencil. If you want me to explain it, then come back.
You did not say it was a hip and I do not understand when you say, quote, (so there's also a 45 degree ridge plate at the end that's not shown). Do you mean your hip rafter? That is the only 45 degree timber that is coming down from lean to wall,
Hope I have not confused you in any way.
old un.
 
Hi old un,

Thanks for taking the time to write such a detailed reply. I think I follow your description, but I'll go through it all in more detail and make sure I understand it fully.

The 30 degree symbol on the diagram is actually me using the drawing tool to measure the pitch of the roof so that I can choose tiles, rather than a target pitch. As you say, I don't care what the pitch will be, but the fact that it'll be below 35 degrees is important for choosing tiles, obviously.

I'm very interested in discovering your method for marking the cuts and birdsmouth on the commons please!

Re: the hip end, I'll upload a couple more diagrams shortly and all will become apparent hopefully!

Thanks

Gary
 
This is the plan view. As you can see the porch is set into a dog-leg in the front wall, and therefore it has a hip end on one end, and a tiny gable end on the other.


You'll see that my commons are spaced at 400mm centres which I've now discovered is over the top!

Gary
 
No problem, give me couple days to put it together, and will post to you everything you need to know.
In the meantime revise yer roof plan. Yer hip rafter as shown is running about 38degrees and it should be at 45degrees. What you have now is unequal pitch. Will cause you shed load of problems. Have your comic right at the start and you can’t go wrong.
Dare say you had your reasons to hip end, but you have made a lot of work as against straight gable. Plus it may not look balanced.
When drawing revised, delete existing drawing and put new up. Will give me something to look at when putting things together for you.
old un.
 
Dare say you had your reasons to hip end, but you have made a lot of work as against straight gable. Plus it may not look balanced.
Exactly what i was about to comment on.. your adding more complications for yourself
 
The hip end was purely an asthetic decision to match the existing house roof (semi with hip ends) The mini gable end should measure less than a metre and be covered with creeping plants so I'm hoping it'll look good :)

This is the revised plan - with tidied up 45 degree hip rafter, and revised spacing to 600mm centres.

Another question - would you use any kind of special hanger for the hip rafter, or just nail it in?


Cheers

Gary
 
Gary, am going to briefly try and explain to you something that takes lads quite a while to learn. If I write HAP, it means height above plate. This is the top of common above wall plate measured down the plate plumb cut. Here goes.
Take measure from existing wall to outside of wall plate, deduct 50mm to allow for ceiling plate to be fixed. Plumb line up on existing house wall of the new porch flank wall to three course below cill of existing house window. From this line put mark on
existing house wall the same as you measured previous including your 50mm deduction. This is the end of your ridge plate. Fix ridge plate from corner dog leg to the mark on wall. This will be springing point for hip rafter.
Fix wall plate down , but before doing so make sure it is level and parallel to ridge plate. Take a measure down from edge ridge plate to edge wall plate each end. Must be same measure. Ease plate backwards slightly one end if required.
Crown your commons. Means any shaped like banana put curves to top.
Assume roof is somewhere near 30 degree pitch. This would mean that birdsmouth seat cut is 30 and plumb cuts are 60 degree 30+60 = 90. Got it? good.
Take your straightest common and put 60 degree line at one end. Run skil saw through it. By the way you need protractor and sliding bevel.
Out of bit 50x100mm cut a block 110mm long, make sure both ends are square. Put block on wall plate 110mm up and block plumb to back of plate. Put common on top of block and top of wall plate with your cut end pushed up to existing house wall. Stitch 50mm nail up top to hold in place.. Take short length 25x50, hold it against ridge plate and scribe line up common. This gives you your ridge cut no matter what the pitch is. Jump down on scaffold and plumb and scribe line up from back of plate. This gives you your birdsmouth plumb cut which should be same as ridge cut. Now measure down from the top of birdsmouth plumb cut two thirds the length of plumb cut and put mark. Square this mark of plumb cut and that gives you seat cut, 30 degrees. Seat cut should be about 75mm long and plumb gut to birdsmout about 45mm long.
If we have a good few rafters to cut we make up two templates, one for each cut and then we slice all our cuts of with skill saw, including birdsmouths, but there is a knack on doing the birdsmouth. If we cut by hand we use Japanese pull saws, they are twice as fast and twice as accurate as the crap European saws you buy in this country, mind you they get a lot of getting used to.
Cut your rafter, try it in place, and should fit snug as bug. If it don’t then it is your cutting. The most critical factor of a cut roof is that all cuts must be accurate and square all round thats why we make up templates. Mark this up as pattern rafter. Use this to mark other rafters, remember crown up.
Your queen common on new flank wall will sit against existing house and drop onto end of ridge plate. Your first common on back wall will sit on the end or your ridge plate and then work 600mm centres away from there. You may have to drop an additional common in at dog leg, depends how they space out.
Read this through dozen times, sketch it up on piece of paper, think about it , go outside and look at it, scratch yer a**e and it will come to you. Am p****d of now, so will come back to you early next week and finish it of. Any questions, ask
old un.
 
Your roof looks ok to me.

In fact, i thought it was better set at 400mm c/c.

I detest 600mm c/c and refuse to use this spacing for any layout be it roof or stud. One bad knotted lathe and you are through the felt.

Where the hip rafter lands on the corner of the wall plate you will need to cut the wall plate so that it gives you a 45 degree abutment so that the rafter plumb cut can sit snug against it. Even some of the masonry below may need a chop depending how deep the hip rafter is.

Most of what the Old Codger makes sense as in you are best making a pattern rafter, trying it in several locations then making them all up.

We leave our rafters long then use a string line to determine the soffit length whilst measuring horizontally off the the face brickwork. this means you will have a nice straight fascia and soffit parallel to the brickwork. If the off cuts are long enough these can be used as sprockets to trap the soffit down onto the brickwork.

I could go on but....:cool:
 

DIYnot Local

Staff member

If you need to find a tradesperson to get your job done, please try our local search below, or if you are doing it yourself you can find suppliers local to you.

Select the supplier or trade you require, enter your location to begin your search.


Are you a trade or supplier? You can create your listing free at DIYnot Local

 
Sponsored Links
Back
Top