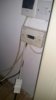
You may find that buried in the wall behind the Drayton is a back box that has been used as a junction box.
The Heat link replaces the Danfoss so they can be exchanged quite easily. The only problem you may encounter is if there are a lot of wires in the Drayton and not enough room to terminate them all in the Heat link. I which case you may find it easier to replace the Drayton with a junction box and then just wire single conductors from that to the Heat link terminals.
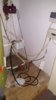
The Drayton wiring terminals have the following functions:
The existing wires are transferred from the terminals of the Drayton, to the Nest Heat link terminals that have exactly the same function.
Neutral, Live & Earth are straightforward
Drayton (1) Hot Water off = Heat link (4) Hot Water Satisfied
Drayton (3) Hot Water on = Heat link (6) Hot water Call for Heat
Drayton (4) Central Heating on = Heat link (3) Heating Call for Heat
Then terminals (L) (2) & (5) need to be electrically connected together
Don't worry if there aren't wires in every terminal, you will only need to use the wires that are present now.
The Nest Thermostat needs a 12v supply and can be powered either by using a separate plug in power supply, or by connecting terminals T1 & T2 of the Thermostat to the corresponding terminals at the Heat link.
Finally any existing room thermostat needs to be decommissioned, it can't just be disconnected otherwise the heating wiring would be permanently 'open circuit' and the heating would not operate. This is done by finding the origin of the thermostat cable, disconnecting it completely and then inserting a link between the terminals where the two thermostat live switching wires have just been removed from, so that they are electrically connected to complete the circuit. Alternatively as a temporary measure setting the existing room thermostat to maximum / permanently on, will prevent it interfering with the operation of the Nest