Nest Installation - Honeywell

Joined
5 Mar 2017
Messages
3
Reaction score
0
Country
United Kingdom
Hello All,
I'm fairly competent electrical wise, however having read up on DIY installing Nest into a S Plan system - now faced with the practical question of how to identify the connection to heating thermostat - see below picture

Any tips on how identifying which terminals go to the heating thermostat and which go to the current Honeywell controller ?

appreciate any hints

thanks
Magnus
 
Sponsored Links
Has this been powered up yet???...unless my eyes deceive me it looks like the grey core @ MV (perm live) terminates to neutral..:)
 
8 and 5 are the browns that open the zone valves, it will be the room stat and cylinder stat connected to one of each, you should be able to trace the programmer feeds with a multimeter, the oranges switch the boiler on/greys are permanent live.
 
Sponsored Links
Usually, the easiest way, is to replace the existing programmer with the Nest Heatlink, Normally all of the wires you need are in there.

Then all you need to do at the wiring centre in your photo, is to identify the cable going to the existing room thermostat, remove it and link the terminals where the two thermostat switching wires came from, together to complete the circuit.

If you need any help, post details of your existing programmer and room thermostat, as well as details of where the room thermostat wires are connected at the wiring centre, it's a bit difficult to see in the photo what goes where.

One wire from the room thermostat will be connected to the brown wire at one of the motorised valves. But because there are two motorised valves both wired to thermostats (Room stat and hot water cylinder stat) It's impossible to tell which is which from the photo, so you will need to tell us which is the room thermostat wiring.
 
Last edited:
Evening, thanks, appreciate tips so far, this is existing working system prior to Nest install, issue is six cables come through the wall and difficult to trace - four cables come sideways into wiring centre, from these I have been able to tell that -

Incoming Live is 1
Incoming neutral is 2
Earth 3 & 9 & 15
The wall stat I think is on 4
one side heating valve connector is on 5 ?
water tank thermostat on 6
nothing - 7
one side water valve on 8
earth 9
2nd side of both heat valve & water valve on 10
nothing - 11
one side of the pump appears to be 12
nothing 13 & 14
strange as a wire from heating valve goes to 16 but no other wire is connected ?

The Programmer is Honeywell ST9400

I will look again tomorrow and see about taking programmer off to see if can trace its wires back to wiring centre

But looking at prior diagrams on this forum - does not seem to be any real standard on which terminal in the wiring centre goes where - thus I guess going to have get meter and test each one.

Thanks for any thoughts or observations that might help.
Magnus
 
& @stem - yes that was the plan (just swapping programmer for Nest) it was the thermostat wires to use for 12v that started me into the wiring centre. appreciate tip though - one thought now is turn it all off, take thermostat apart and connect tone generator and then return to wire centre to find it - this should work right ?
 
Unfortunately when it comes to these systems, much is down to the personal preferences of the original installer and the location of the various components to each other. You seem to have some idea of what the wires are, so you can test the wires you think are the room thermostat with a continuity tester to be sure. Remove them from the wiring centre when you do (after making careful note of where they came from) so that you are not measuring other components that they may be connected to.

You say that you have a Honeywell ST9400 programmer, but make no mention of wires from it, other than perhaps the main supply. However, if your system is presently working as it should be, there is probably no need to trace the wires back from the programmer to the wiring centre, they should be easily identified from the terminals they are presently connected to at the programmer end. The room thermostat cable is the one you need to find.
 
You probably have this sussed now, but for those reading, the easiest way to identify the cable cores going to the room stat are to identify the heating zone valve, follow the cable into the wiring centre, the brown core will often connect to one side of the room stat. You can normally then identify the physical cable going to the stat, which, by taking the room stat off, you'll see the two live cores, 1 will be the same colour as connected to your brown on the heating valve, the other will be connecting to the heating "on" from the programmer.

Simply bridge these to leave the two room stat cores vacant and connected them to T1&T2 on the nest gen3.
 
Hi,

Sorry to add to this post. But I was wondering if you advise me if I need to connect all neutral wires on my exist Honeywell programmer to the nest heatsink 3rd gen?

Thanks in advance
 

Attachments

  • IMG_3144.JPG
    IMG_3144.JPG
    192.2 KB · Views: 693
Usually, the easiest way, is to replace the existing programmer with the Nest Heatlink, Normally all of the wires you need are in there.

Then all you need to do at the wiring centre in your photo, is to identify the cable going to the existing room thermostat, remove it and link the terminals where the two thermostat switching wires came from, together to complete the circuit.

If you need any help, post details of your existing programmer and room thermostat, as well as details of where the room thermostat wires are connected at the wiring centre, it's a bit difficult to see in the photo what goes where.

One wire from the room thermostat will be connected to the brown wire at one of the motorised valves. But because there are two motorised valves both wired to thermostats (Room stat and hot water cylinder stat) It's impossible to tell which is which from the photo, so you will need to tell us which is the room thermostat wiring.
 
Hi. I know this thread is old but need a bit of advise on where you remove and link the wires from the room stat. On an Honeywell S plan, do you remove terminal 4 and terminal 5 and then link the terminals together? So the stat wires are useless? This way you cannot use the old stat wires for t1 and t2 on the nest?

Is it possible with this set up to use the old stat wires for t1 and t2?

Thank you for all your help.
 
Hi Lee

Just for future reference as you are a newbie, it's best to start your own thread. Adding your question on to someone else's is called Hijacking and is against the forum rules. Also, when you start your own thread it is flagged up as a new unanswered post, and more likely to be seen by those in the know, than one that is buried away at the bottom of someone else's thread. Anyway lecture over, back to your question.

To decommission the old thermostat, as you have figured, you can't just disconnect it otherwise the heating wiring would be left 'open circuit' and the heating will not operate. So, it's necessary to trace the existing thermostat cable back from the thermostat to its origin, wherever that may be. Unfortunately, it could be one of a few places chosen at the discretion of the original installer, so I can't tell you where to find it. If you are unsure, someone competent with a multimeter should test the cable it to make sure you have found the right one.

Once you have found its origin, note first where the two 
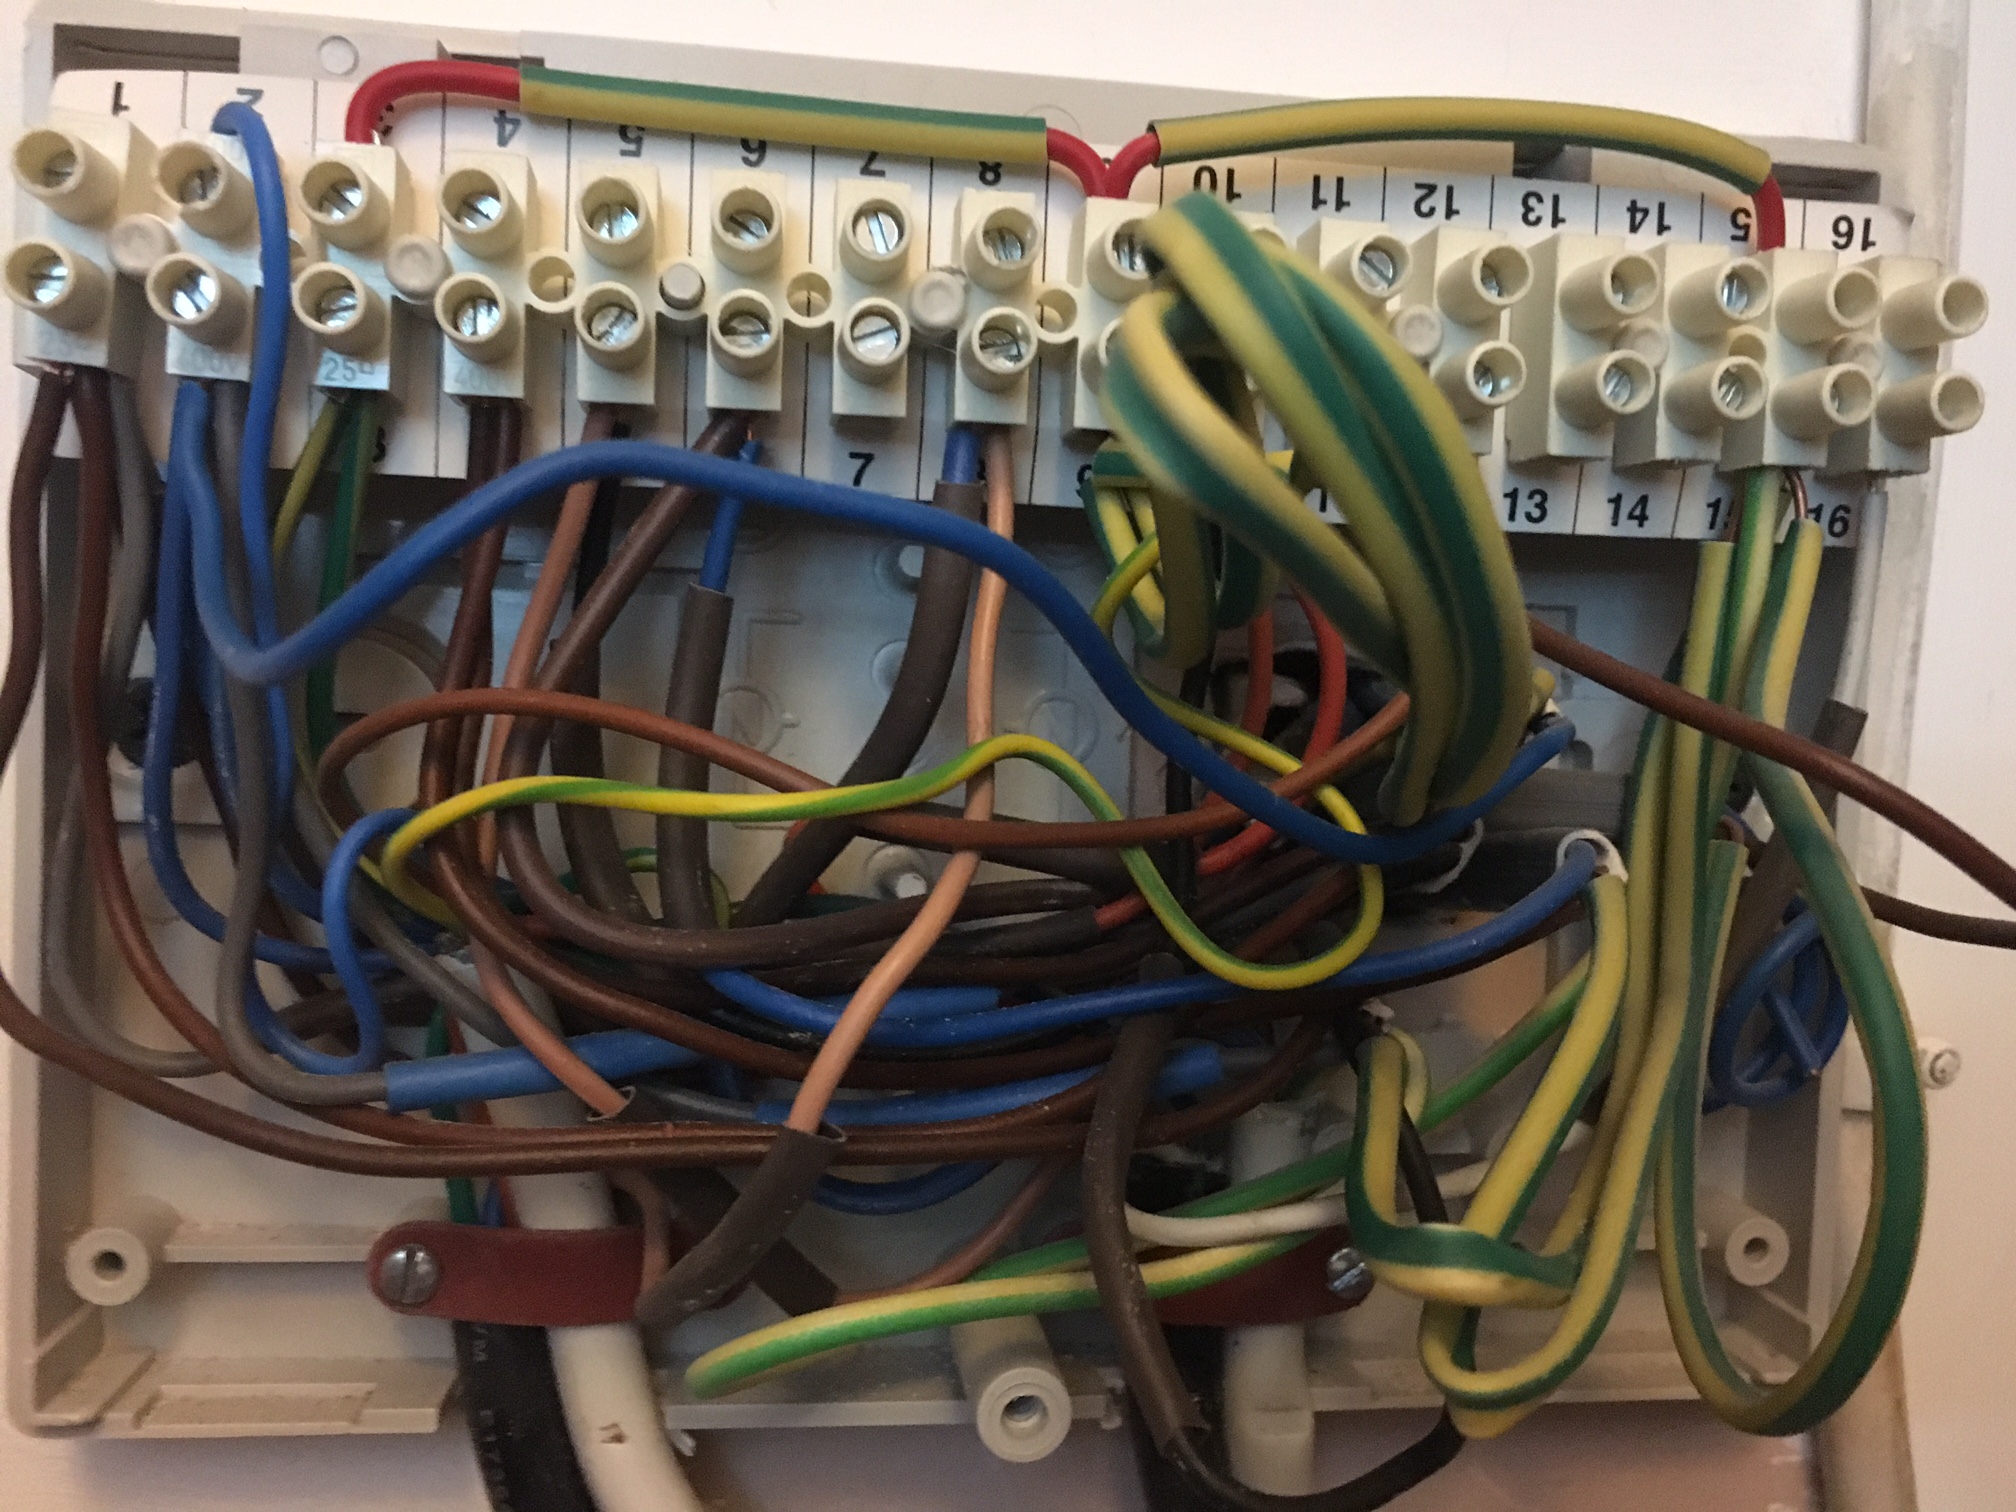
live wires are connected, and then disconnect them. You then need to join together the two terminals that previously contained the two wires you have just removed, to complete the circuit. The most common method of terminating the thermostat, is to use a wiring centre. So, if you do have one, and the two live room thermostat wires are connected to "terminal 4 and terminal 5" then your assumption is correct.

If there is a neutral present in the same cable, that is just disconnected, but make sure other neutrals in the same terminal are not disturbed.

Finally the original thermostat is disconnected, and you will then have a cable that is not connected to anything anywhere. Then if you wish, two of the wires can be used for T1 and T2. However, when you trace the thermostat cable you might find that if it does go the the wiring centre, depending upon where this is located, (ie it might be some distance from the Heat Link) it may end up being easier to run a new cable between the Heat link and Nest thermostat that reroute the original cable.

If you need any further assistance, details of the existing room thermostat (make & model) and the wires presently connected to each terminal, plus a photo of the wiring centre connections (if you have one) can sometimes help.
 
Last edited:
Thank you so much for the informative reply. And for giving me the low down on the forum rules. I shall remember this for next time.

It is as you say, boiler and programmer downstairs, wiring centre in airing cupboard and stat in the hall downstairs.

Hopefully I can disconnect the programmer at the wiring centre and install heat link and hope that the wiring from stat goes to this wiring centre as well so easy to connect to t1 t2.

Again, thank you for your help.
 

DIYnot Local

Staff member

If you need to find a tradesperson to get your job done, please try our local search below, or if you are doing it yourself you can find suppliers local to you.

Select the supplier or trade you require, enter your location to begin your search.


Are you a trade or supplier? You can create your listing free at DIYnot Local

 
Sponsored Links
Back
Top