Paint keeps coming off rear extension

Joined
14 Aug 2020
Messages
206
Reaction score
3
Country
United Kingdom
Hi guys

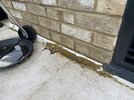
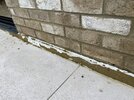
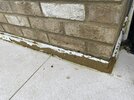
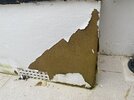
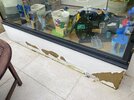
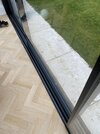
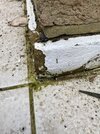
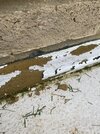
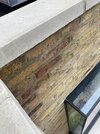
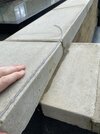
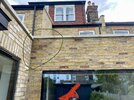
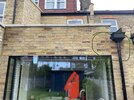
Exterior paint keeps peeling off our rear extension. Tried different paint, think it might be something in the mix when rendering the wall and the paint wont adhere correctly over it.

Any advice here would be gratefully received

Thanks
 

Attachments

  • IMG_1207.JPG
    IMG_1207.JPG
    572.3 KB · Views: 70
  • IMG_1206.JPG
    IMG_1206.JPG
    435.7 KB · Views: 59
  • IMG_1205.JPG
    IMG_1205.JPG
    556.9 KB · Views: 58
  • IMG_1204.JPG
    IMG_1204.JPG
    539.5 KB · Views: 57
  • IMG_1203.JPG
    IMG_1203.JPG
    407.6 KB · Views: 62
  • IMG_1202.JPG
    IMG_1202.JPG
    406.5 KB · Views: 71
Sponsored Links
Paint will peel on surfaces that get wet. Any exposed part of the surface will let water in.
 
As above, its below the dpc so will always be damp, and will debond the paint.Worth looking for a breathable paint, and maybe speaking to a paint company to see what they recommend
 
Paint will peel on surfaces that get wet. Any exposed part of the surface will let water in.
Can’t see where it is getting in though. The drip on the window box seat is probably not deep enough so wall getting wet there. But below brick wall??
 
Sponsored Links
You need to hack off the render below the dpc or you will never sort the problem out. The render could also lead to damp internally which will affect your internal decoration. All loose paint will need to be scraped off and the render allowed to dry out completely before re-painting.
 
Can’t see where it is getting in though. The drip on the window box seat is probably not deep enough so wall getting wet there. But below brick wall??


We think too much Feb mix put in sand and cement mixture first time, painted with masonry paint. Next time with undercoat and masonry.
Not sure what to use now….
 
Last edited:
Water gets in all along the ground. Red indicates water entry points. If you have a larger bead of sealant on the ground it might work. I sealed ground and wood joint with hybrid polymer sealant and that was effective. Silicone very unlikely to work because of high chance of failure.

water-in.png
 
What about some liquid rubber paint aswell? Comes in white….
 
Its nothing to do with the mix or any paint - Its a matter of capillary action pulling moisture from the paving slabs or the ground below them. It seems like your ground level is too high - is the interior FFL equal level with the paving slabs?
Post #5 put you on the right track. Except, IMO, no more painting would be required.
But where is the DPC line? Is there a DPC?
Your pics show two air bricks at a higher level than the FFL - they are useless above the DPC.
Air bricks go below the DPC where they typically vent suspended floors.
The interior FFL is above paving slabs. But not by much ( see photo)
There is a DPC. (See photo)
Yes on one side of the extension under a box window seat there are air bricks that are partially covered by a patio. Solid wall underneath window seat. I’ve included a photo of whole rear extension for clarity
 

Attachments

  • A4A58C26-3DA4-4F67-A8DB-E6900366A862.jpeg
    A4A58C26-3DA4-4F67-A8DB-E6900366A862.jpeg
    428.7 KB · Views: 24
  • 54A4D146-0534-450F-BA08-222B8FC72736.jpeg
    54A4D146-0534-450F-BA08-222B8FC72736.jpeg
    465.1 KB · Views: 26
  • 0F1B49BC-559C-4436-BC4F-7A7AC835EE59.jpeg
    0F1B49BC-559C-4436-BC4F-7A7AC835EE59.jpeg
    552.5 KB · Views: 25
  • B934A4AC-26D1-476D-9562-378962ED8F63.jpeg
    B934A4AC-26D1-476D-9562-378962ED8F63.jpeg
    557 KB · Views: 27
Last edited:
Does the main house have suspended floors - if so then how are they ventilated?
As before, above, you need to lower the patio and remove all the plinth mortar.

Below the box window: after lifting the concrete slabs, remove all render & plinth mortar back to masonry.
Then decide if you want to re- render or what?

Does the down pipe go into a trapped gulley or into a soakaway?
There's what looks like parapet, damp staining left, above the box window?
The main house has original flooring, apart from kitchen (on left hand side of extension) in photo, which has wooden floor on concrete subfloor.

The down pipe in the photo does into a gulley which connects to a soak away further into the garden…

the box seat is built from breeze blocks , so need to be rendered again if render removed

Yep there is a patch of wet wall there where you highlighted which I am in the process of sorting. Think the water splashes off the roof over the parapet in heavy rain….

Out of interest what if we didn’t do anything (apart from roof) do you think we might avoid internal problems….
 
Hi

We've now stopped, if there was any currently, leaks to the wall above where the damp staining was, a few weeks ago now. It still looks damp though? Would this take a while to dry out or would you suspect there is still a problem. The fall on the roof is away from the external wall, and ive checked under the coping stones on the parapet wall, the drip / groove underneath is still there....

Hoping this sorts itself out.

The hopper on the other side was allowing water to splash out and wet the wall too, but we have altered it and added more lead and there is not more splashing...however wall still looks wet

If anyone had any experience with this and could advise would be much appreciated
 

Attachments

  • IMG_1463.JPG
    IMG_1463.JPG
    486.7 KB · Views: 15
  • IMG_1462.JPG
    IMG_1462.JPG
    321.8 KB · Views: 19
  • IMG_1459.JPG
    IMG_1459.JPG
    404.3 KB · Views: 27
  • IMG_1471.jpg
    IMG_1471.jpg
    513.2 KB · Views: 16
  • IMG_1472.jpg
    IMG_1472.jpg
    496.7 KB · Views: 21
Last edited:

DIYnot Local

Staff member

If you need to find a tradesperson to get your job done, please try our local search below, or if you are doing it yourself you can find suppliers local to you.

Select the supplier or trade you require, enter your location to begin your search.


Are you a trade or supplier? You can create your listing free at DIYnot Local

 
Sponsored Links
Back
Top