Patching in around windows that may be replaced later.

Joined
17 Nov 2013
Messages
17
Reaction score
0
Location
Devon
Country
United Kingdom
Hi all I was looking for a bit of advice.

Im speaking to my plasterer soon but would like other peoples views on how they would proceed.

I need the radiators on the wall, so below the window, from floor to sill is going to be sand & cemented as I've had issues

with damp being sucked through bonding.

At this point I'm unsure if I'm going to replace wood windows with upvc as I have dwindling funds.

Therefore there is no point in plastering up to the window yet.

I have two choices really...

1. Put a corner bead on and plaster the face of the wall (areas A&B) up to it, leaving the reveal unplastered.

2. Just plaster area A below the window and leave the wall chased as is, then get it finished off when I decide on windows.

I'm prefer option 1 as it seals down the cut edges and all the main plaster can be skimmed in one hit. But I'm concerned

the beading may interfere with the removal of the windows?

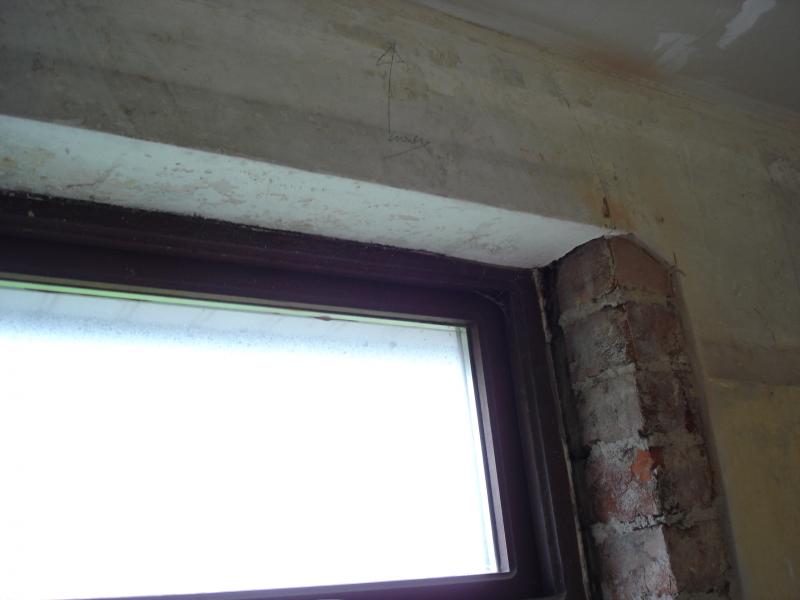
I'm also concerned about the damage removing the window would do to the skim above the window, which is plaster

boarded wood.

The window in the picture is dashed on the outside, but most the house is engineering brick without dashing.

I've included a couple of pictures. Thanks in advance :)


Sponsored Links
Ref your post of Nov 2013 what happened next? That post presumably ties in with this post?

Pics of outside would help.

Dont do any plastering until your frames are sorted and fixed, and all remedial measures have been taken.

All and any wood lintel bearings should be investigated before making good.
 
Hi Ree

Thanks :)

I've decided to plaster to sill level and leave the reveals. The plasterer will return later to do reveals when he does other areas.

Regarding the other posts. I had the electrics done while downstairs ceilings are down and plumbing too.

I hope Ive sorted the gable end damp by repointing the full gable which was completed this week. I'll probably add a coat of water based waterseal to the bricks while scaffold is in situ.

The damp around the windows upstairs has been corrected by removing the internal course of bricks from sill to floor and rebuilding using a DPC under the concrete sill thus preventing any bridge for moisture.

It seemt to have worked but was a pain. The walls under the windows were loose so i took them right down as I want to hang rads there.
Once its plastered, I can go ahead.

I still need to confirm my preferred site for boiler...in cupboard on landing venting thru roof....or in loft on gable venting thru gable end....or in cupboard but with a horizontal flu run to gable!!!

If I have money left I may replace the solid wood windows which although theyre in reasonable condidion seem to leak round the edges in rain. :D
 
ran1,

glad to hear that things have progressed and tied in. To DIY and work like you must have done, and presumably hold a job down, is tremendous. Well done.
Its the unbelievably long time factor that often kills it for DIY'ers, that and the relationship rows tied-in to the time factor.

Use render, not plaster, when covering previously damp areas, and its no bad thing to render W/F reveals.

Any frame replacement should be done before any making good. But, for my money, its best to keep the h/wood frames. Do you suspect leaks around the edge between the frames and the brickwork? Usually you can color match caulk the join, and re-new the caulk every few years.

And, to repeat myself, dont miss probing those wood lintel bearing ends.

What about the roof and c/breasts and stacks - sweep, smoke test, open up, vent?

If the frames leak around the glazing then call in a pro.

FWIW: dont vent through the roof go through a wall if possible. Why not put your boiler/venting issues to the Plumbing forum?
 
Sponsored Links
Hi Ree. Thanks for your reply.
The load bearing woodwork is old railway sleeper so they are creosoted and in good condition. It's because of the supporting woodwork that i refused to have the walls tanked as this locks the moisture into the walls causing wall tie and woodwork failure. I decided to repair the cavity so that everything can breathe . Even if I use portland cement internally, the house can now breathe to the cavity as intended :) .

I work for myself full time (decorator) so it seems more of a chore ;)

The chimney is being re-pointed next week along with ridge tiles and any loose slates repaired. I'm also having a cowl fitted which will keep water out and should accept a liner for a wood burner down the line.

Its a hard choice with the windows as i need a to replace the front door and side lights and lounge window anyway. I also have a white (newer) upvc window on the gable which doesnt match. Coupled with wanting to replace the dining window with patio doors. Yes the wood looks in good condition but it does weep and the thought of up-keep is like the proverbial busmans holiday!

Onto the boiler...The plumber wants it thru' the gable end and siting in the loft. I'd still prefer using the old airing cupboard as it will be easier to get to the boiler. There is currently a vent in the roof. The hole could be used to install a new vent directly above the boiler or I could run it along to the gable. I'll have to measure the run and see how long it is. :)

Thanks Ran1
 

DIYnot Local

Staff member

If you need to find a tradesperson to get your job done, please try our local search below, or if you are doing it yourself you can find suppliers local to you.

Select the supplier or trade you require, enter your location to begin your search.


Are you a trade or supplier? You can create your listing free at DIYnot Local

 
Back
Top