Plaster corner detail and tie-in

Joined
23 May 2011
Messages
56
Reaction score
1
Location
Invernesshire
Country
United Kingdom
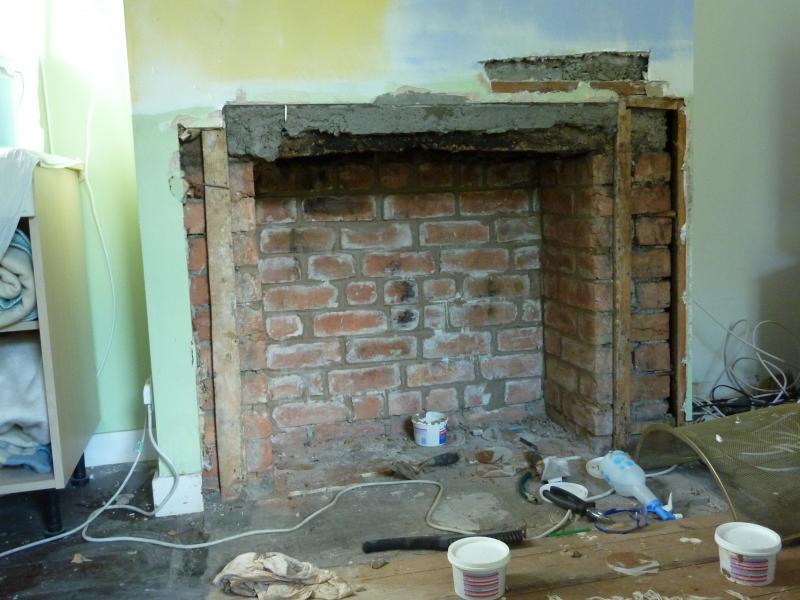
I've been reading through the many posts on the forum to try and figure out how to finish around the fireplace. What I am doing is re-pointing the original chimney brickwork in the recess and plastering the wall around the chimney. I've read Gypsum plaster is not as option, and VITCAS has been mentioned as an option. My questions are:

1:If I were to only use the VITCAS to 800mm above the fire (to save money) the how would I tie in normal gypsum plater as the VITCAS website says it forms a non porus surface and so can't be skimmed?
2: How would you finish the corner around the fireplace opening (between the wall and the fireplace recess) if you are keeping the internal bricks? Put up some formwork and plaster up to it to get a clean edge?
3. If I use fireboard, how can I tidy up the edges at the corners of the recess (as above)
4. This VITCAS stuff if quite expensive, any cheaper options?

Cheers!
 
Sponsored Links
To be honest jonnypetrie, i cant quite understand the situation your in, could i ask, is the fire a real fire as in solid fuel? Or is it Gas or Electric?

Why do you need refractory material?

One more thing to say at this point is that even if the material is non porous, you could still skim it by unibonding the wall first. You can skim over gloss paint with it if the paint is stuck firmly to the wall, just use unibond or a similar sealing liquid brand like Wicks own brand. Unibond is a brand name and somewhat expensive, so the likes of Wicks and other companies are cheaper to buy from.

On any internal brick corner, you would normally fit an angle bead first, then one side of the bead could be refractory material and the other side of the bead could be normal plaster or sand and cement render. To avoid a bad reaction between the two different coats, just don't force your coats too far in to the angle bead, so that there is a gap between the two coats behind the angle bead. These beads can be nailed on by knocking galvanized nails through the holes in the bead and in to the joints in the brickwork.

Normally in houses, ordinary plaster or render would do the job even on a chimney breast.

There have been problems with plaster sticking to concrete hollow flu liners, because the they are too smooth, but in your case it is brickwork

Could you post photo's of the situation?
 

Here's a pic of the opening. I want to leave the back and sides brickwork, and render / plaster the walls. I'm going to put a wood burner in the recess so need to keep a min distance for plaster / flammable material.

I think for the edge around the opening i will use a stop bead as I'm not rendering into the recess. Then I can use the heat resistant stuff up to a point, use uni bond or equivalent for the tie-in between that and the plaster and plaster the rest[/img]
 
Sponsored Links
I am like you, i like to see well pointed brick work, and to me the metal stop bead would detract from the rustic looking effect of the brickwork.

The way i would go with it is, cut a a wooden straight edge to the length of the corner of the area, by knocking nails in to the bed joints of the brickwork, or get some one to hold it in position while you render up to it, it just gives you a hard edge to finish to.

Let the scratch coat set, (but not dry) then give it the second coat, and wait while this starts to set, just keep testing it every so often until you can feel getting stiff. Then a moist sponge and very very gently run it down the stiffening angle. You will make a slightly rounded corner, what we would call a pencil round corner. Then take a small brush, about 1/2 inch or so wide and brush the render gently in to the bed joints. to fade it out from the corner.

Its a bit of a bit picky picky procedure, but when done right, i think it looks spot on.

If your not confident in doing that, you can of course just stick your stop bead on and at the end of the day, it is really is a matter of personal taste.


One more thing, is that the render will get hot and cold, expansion and contraction, which means that your render coat needs to be well and truly stuck to the wall. Another variable is the render it self, sand and cement is a stiff and rigid material when set, while browning and renovation plasters are more pliable, it has more give in it therefore less likely to crack from heat.

Which ever way you go with it, i personally would rake out the joints of the brick work your going to render over, to a depth of about 1 inch. This would then create a good key for the render to grip into and to counteract the results of expansion and contraction. Then of course PVA it before slapping on the render.

The ideal tool for raking out the old sand and cement in the brick work joints on small interior jobs like this is what i think is called a multi tool, that works on vibration and therefore does not blow the dust all over the place, perhaps you could borrow one from a mate or relative.

I'd be interested in seeing the finished job, if you get time to post one, either way good luck with it.
 
I'll post a picture when it's done, but i'm not sure how long it going to take me! i tend to go through phases of doing a lot, then not much for a while. when you're working full time it hard sometimes to do diy when you get home
 

DIYnot Local

Staff member

If you need to find a tradesperson to get your job done, please try our local search below, or if you are doing it yourself you can find suppliers local to you.

Select the supplier or trade you require, enter your location to begin your search.


Are you a trade or supplier? You can create your listing free at DIYnot Local

 
Sponsored Links
Back
Top